Salta al contenuto principale

IBM ThinkPad T30 Optical Drive Replacement

Cosa ti serve

  1. IBM ThinkPad T30 Optical Drive Replacement, Battery: passo 1, immagine 1 di 3 IBM ThinkPad T30 Optical Drive Replacement, Battery: passo 1, immagine 2 di 3 IBM ThinkPad T30 Optical Drive Replacement, Battery: passo 1, immagine 3 di 3
    • Make sure the ThinkPad is off and the power supply is unplugged.

    • Flip the ThinkPad upside down with the bottom facing you.

    • Slide the latch to the right into the unlock position.

    • While holding the latch in the unlock position, lift the battery out with your other hand.

  2. IBM ThinkPad T30 Optical Drive Replacement, Optical Drive: passo 2, immagine 1 di 1
    • Locate the 4.8mm Phillips #0 screw on the far left of the ThinkPad, closest to the edge and above the battery, and unscrew it with a Phillips #0 screwdriver.

  3. IBM ThinkPad T30 Optical Drive Replacement: passo 3, immagine 1 di 2 IBM ThinkPad T30 Optical Drive Replacement: passo 3, immagine 2 di 2
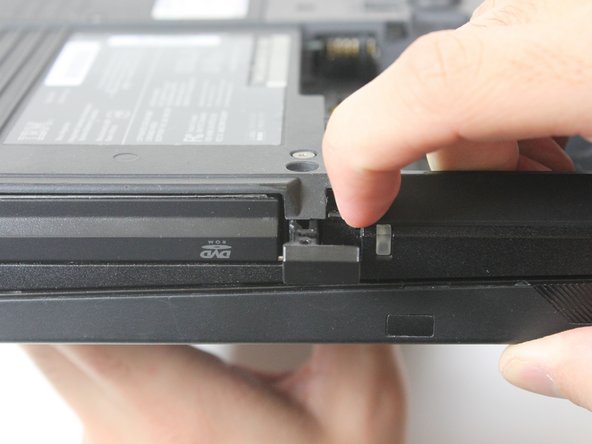
    • On the side of the ThinkPad, locate a lock next to the optical drive. Use your fingernail to slide the lock to the right.

  4. IBM ThinkPad T30 Optical Drive Replacement: passo 4, immagine 1 di 2 IBM ThinkPad T30 Optical Drive Replacement: passo 4, immagine 2 di 2
    • Once it is unlocked, a small tab will pop out. Pull on the tab with your fingers.

    • The optical drive will easily slide out. Remove the optical drive.

Conclusione

To reassemble your device, follow these instructions in reverse order.

Un'altra persona ha completato questa guida.

Alex Kost

Membro da: 10/05/12

271 Reputazione

5 Guide realizzate

Team

Cal Poly, Team 3-20, Amido Fall 2012 Membro di Cal Poly, Team 3-20, Amido Fall 2012

CPSU-AMIDO-F12S3G20

3 Membri

16 Guide realizzate

0 Commenti

Aggiungi Commento

Visualizza Statistiche:

Ultime 24 Ore: 1

Ultimi 7 Giorni: 2

Ultimi 30 Giorni: 3

Tutti i Tempi: 1,889