Salta al contenuto principale

Huawei Y300 LCD Screen Replacement

Cosa ti serve

  1. Huawei Y300 LCD Screen Replacement, Battery: passo 1, immagine 1 di 2 Huawei Y300 LCD Screen Replacement, Battery: passo 1, immagine 2 di 2
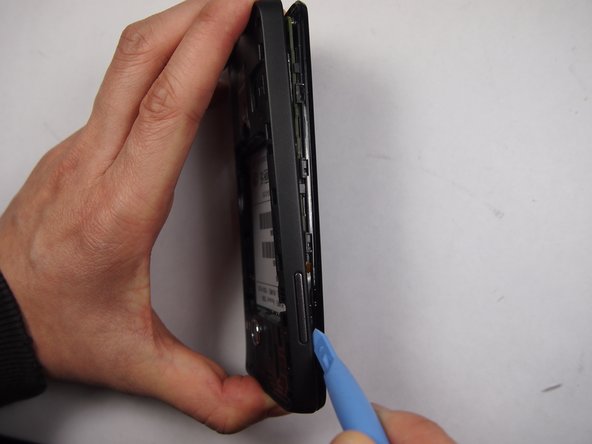
    • Remove the rear cover at the back by pulling the gap located at the bottom of the phone.

    • Lift up and remove the battery.

  2. Huawei Y300 LCD Screen Replacement: passo 2, immagine 1 di 3 Huawei Y300 LCD Screen Replacement: passo 2, immagine 2 di 3 Huawei Y300 LCD Screen Replacement: passo 2, immagine 3 di 3
    • Leave the phone down on a table.

    • 8 screws are what we need to remove next. There is one hiding below a white sticker.

  3. Huawei Y300 LCD Screen Replacement: passo 3, immagine 1 di 2 Huawei Y300 LCD Screen Replacement: passo 3, immagine 2 di 2
    Attrezzo utilizzato in questo passaggio:
    Magnetic Project Mat
    $19.95
    Compra
    • Use a screwdriver (T4 if you are using the 54 bit driver kit) to remove the 8 screws along the edges of the phone. There are four in each corner and four in the middle on the sides.

    • Put the screws on the magnetic mat/parts tray or bowl to make sure they are not lost.

  4. Huawei Y300 LCD Screen Replacement: passo 4, immagine 1 di 3 Huawei Y300 LCD Screen Replacement: passo 4, immagine 2 di 3 Huawei Y300 LCD Screen Replacement: passo 4, immagine 3 di 3
    • Use the plastic opening tool by fitting it into the gaps to pull back the frame.

  5. Huawei Y300 LCD Screen Replacement: passo 5, immagine 1 di 3 Huawei Y300 LCD Screen Replacement: passo 5, immagine 2 di 3 Huawei Y300 LCD Screen Replacement: passo 5, immagine 3 di 3
    • On the left of the motherboard there is a ribbon cable that connects the volume rocker to the motherboard, we need to disconnect it.

    • To do this, using either the spudger or tweezers lift up the retention flap holding the cable down.

    • Next using the tweezers carefully pull the ribbon cable away from the socket it was in until it is completely clear of the connector.

  6. Huawei Y300 LCD Screen Replacement: passo 6, immagine 1 di 1
    • There are two more ribbon cables at the top that must also be disconnected, to do this simply lift them up from their connecter with the tweezers or with the spudger.

  7. Huawei Y300 LCD Screen Replacement: passo 7, immagine 1 di 2 Huawei Y300 LCD Screen Replacement: passo 7, immagine 2 di 2
    • Pull back the orange tab. Carefully disconnect this.

  8. Huawei Y300 LCD Screen Replacement: passo 8, immagine 1 di 1
    • Once the orange tabs are pulled back, use a plastic wedge to detach the LCD screen.

    • Carefully pull the screen away from the cover and replace the LCD with a new one

Conclusione

To reassemble your device, follow these instructions in reverse order.

Altre 44 persone hanno completato questa guida.

Shuti Wu

Membro da: 10/20/14

530 Reputazione

1 Guida realizzata

Team

2 Commenti

good

it a good advise and easy

omeyo innocent - Replica

Its really helpful and so easy ... thanks

Ghulam Qamar - Replica

Aggiungi Commento

Visualizza Statistiche:

Ultime 24 Ore: 0

Ultimi 7 Giorni: 1

Ultimi 30 Giorni: 13

Tutti i Tempi: 17,357