Salta al contenuto principale

Acer Aspire 5742 RAM Replacement

Cosa ti serve

  1. Acer Aspire 5742 RAM Replacement, Battery: passo 1, immagine 1 di 3 Acer Aspire 5742 RAM Replacement, Battery: passo 1, immagine 2 di 3 Acer Aspire 5742 RAM Replacement, Battery: passo 1, immagine 3 di 3
    • Move the battery catch to the "unlocked" position.

    • Pull back the second spring-loaded battery catch until the battery pops up.

    • Remove the battery.

  2. Acer Aspire 5742 RAM Replacement, Cover Panel: passo 2, immagine 1 di 3 Acer Aspire 5742 RAM Replacement, Cover Panel: passo 2, immagine 2 di 3 Acer Aspire 5742 RAM Replacement, Cover Panel: passo 2, immagine 3 di 3
    • Turn the notebook around to face you.

    • There are two Phillips #00 screws securing the cover panel to the rest of the notebook. Remove these screws.

  3. Acer Aspire 5742 RAM Replacement: passo 3, immagine 1 di 3 Acer Aspire 5742 RAM Replacement: passo 3, immagine 2 di 3 Acer Aspire 5742 RAM Replacement: passo 3, immagine 3 di 3
    • Use a spudger to release the panel from the plastic retaining clips keeping it in place.

    • Do not apply too much force, or you may break the clips.

    • Remove the panel and set it aside.

  4. Acer Aspire 5742 RAM Replacement, RAM: passo 4, immagine 1 di 3 Acer Aspire 5742 RAM Replacement, RAM: passo 4, immagine 2 di 3 Acer Aspire 5742 RAM Replacement, RAM: passo 4, immagine 3 di 3
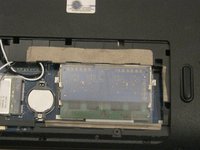
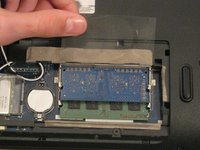
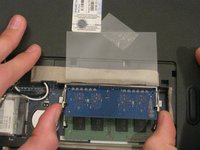
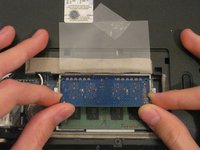
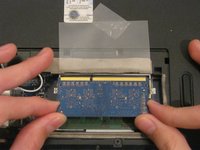
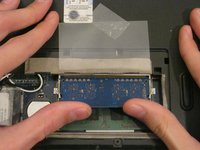
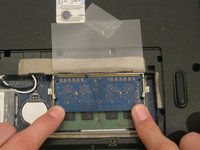
    • The RAM is protected by a transparent cellophane cover.

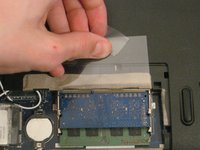
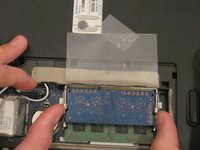
    • Lift this cover away from the RAM. It will not come free from the RAM.

    • You may wish to use some Scotch tape to hold the cover in place while you work.

  5. Acer Aspire 5742 RAM Replacement: passo 5, immagine 1 di 2 Acer Aspire 5742 RAM Replacement: passo 5, immagine 2 di 2
    • Pull back the retaining clips either side of the RAM.

    • It will spring up, ready to be removed.

  6. Acer Aspire 5742 RAM Replacement: passo 6, immagine 1 di 3 Acer Aspire 5742 RAM Replacement: passo 6, immagine 2 di 3 Acer Aspire 5742 RAM Replacement: passo 6, immagine 3 di 3
    • Hold on to opposite edges of the RAM chip and gently pull it diagonally upwards to remove it from the computer.

    • Repeat steps 5 and 6 for the second RAM chip if necessary.

  7. Acer Aspire 5742 RAM Replacement: passo 7, immagine 1 di 2 Acer Aspire 5742 RAM Replacement: passo 7, immagine 2 di 2
    • When reinserting RAM, push it diagonally downwards until almost all of the gold connector strip is inside the socket.

    • Push gently down on the RAM until the retaining clips click back over it.

Conclusione

To reassemble your device, follow these instructions in reverse order.

Altre 5 persone hanno completato questa guida.

2 Commenti

note to add: it only supports 8gb (2x4gb) max

SquinteyedSniper - Replica

Hi, not sure if this is the right place to post this troubleshooting request.

I’ve re-seated the original 4GB memory and added a further 4GB into the additional slot on my acer Aspire 5742 laptop. When I turn it on, the machine shows the initial ACER splash screen with the ‘Press <F2> to enter Setup.’ message in the bottom left-hand corner and the hard drive briefly whirls before the laptop powers down. It then powers back up and continually loops this cycle until I remove the power sources (mains and battery). When I press <F2>, I get 4 (four) short, quick beeps - which I think is telling me to re-seat the RAM. I have re-seated the RAM a handful of times without any progress in the reboot.

Any pointers please as to where I am going wrong or what to try next?

Stuart Adams - Replica

Aggiungi Commento

Visualizza Statistiche:

Ultime 24 Ore: 1

Ultimi 7 Giorni: 5

Ultimi 30 Giorni: 36

Tutti i Tempi: 10,559