Salta al contenuto principale

why! W670SZQ1 Replacement SSD Disk

Cosa ti serve

  1. why! W670SZQ1 Replacement SSD Disk, The Batteries: passo 1, immagine 1 di 3 why! W670SZQ1 Replacement SSD Disk, The Batteries: passo 1, immagine 2 di 3 why! W670SZQ1 Replacement SSD Disk, The Batteries: passo 1, immagine 3 di 3
    • Unlock the lock latch on the left.

    • Unlock the lock latch on the right.

    • Remove the battery while holding the lock latch unlocked.

  2. why! W670SZQ1 Replacement SSD Disk, Access to Major Components: passo 2, immagine 1 di 3 why! W670SZQ1 Replacement SSD Disk, Access to Major Components: passo 2, immagine 2 di 3 why! W670SZQ1 Replacement SSD Disk, Access to Major Components: passo 2, immagine 3 di 3
    • Using the Philips # 0 screwdriver, unscrew the 2 screws from the bottom cover.

    • Lift the bottom right cover with the iFixit Opening Tool.

    • Lift the lower left cover with the iFixit Opening Tool.

    • Finally clear the bottom cover completely to access the main components.

  3. why! W670SZQ1 Replacement SSD Disk, SSD disk: passo 3, immagine 1 di 3 why! W670SZQ1 Replacement SSD Disk, SSD disk: passo 3, immagine 2 di 3 why! W670SZQ1 Replacement SSD Disk, SSD disk: passo 3, immagine 3 di 3
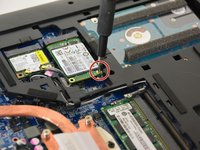
    • Unscrew the SSD fixing screw using the Philips # 0 screwdriver.
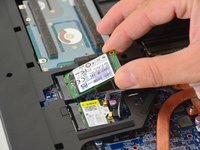
    • Lift the SSD.

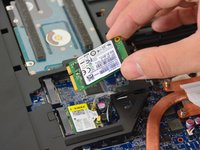
    • Remove the SSD from its connector.

Conclusione

To reassemble your device, follow the instructions in reverse order.

Un ringraziamento speciale a questi traduttori:

fr en

100%

Israel ci sta aiutando ad aggiustare il mondo! Vuoi partecipare?
Inizia a tradurre ›

Felice Suglia

Membro da: 06/15/13

30.884 Reputazione

264 Guide realizzate

0 Commenti

Aggiungi Commento

Visualizza Statistiche:

Ultime 24 Ore: 0

Ultimi 7 Giorni: 1

Ultimi 30 Giorni: 2

Tutti i Tempi: 120