Salta al contenuto principale

why! W670SZQ1 Fan Replacement

Guida Archiviata
Questa guida รจ mantenuta solo per scopi storici. Usa la versione aggiornata della guida per eseguire la riparazione.

Cosa ti serve

  1. why! W670SZQ1 Fan Replacement, accumulator: passo 1, immagine 1 di 3 why! W670SZQ1 Fan Replacement, accumulator: passo 1, immagine 2 di 3 why! W670SZQ1 Fan Replacement, accumulator: passo 1, immagine 3 di 3
    • Open the latch of the accumulator on the left side.

    • Open the battery latch on the right side.

    • Remove the accumulator by simultaneously holding the right-hand latch open.

  2. why! W670SZQ1 Fan Replacement, Access to the most important components: passo 2, immagine 1 di 3 why! W670SZQ1 Fan Replacement, Access to the most important components: passo 2, immagine 2 di 3 why! W670SZQ1 Fan Replacement, Access to the most important components: passo 2, immagine 3 di 3
    • Use the Philips screwdriver to remove the two screws at the bottom of the cover.

    • Lift the cover at the bottom right with the iFixit Opening Tool

    • Lift the cover at the bottom left with the iFixit Opening Tool

    • Finally, remove the cover to gain access to the most important components.

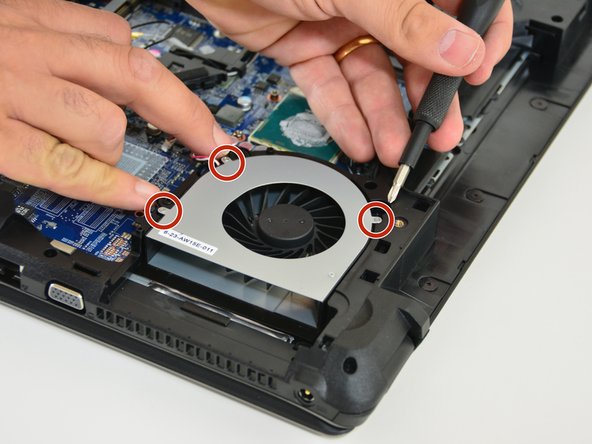
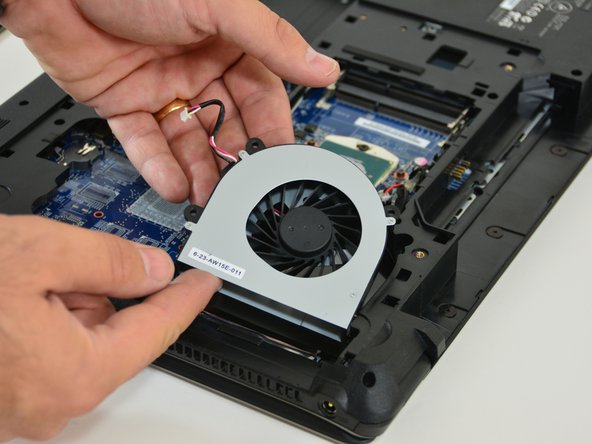
  3. why! W670SZQ1 Fan Replacement, Fan: passo 3, immagine 1 di 3 why! W670SZQ1 Fan Replacement, Fan: passo 3, immagine 2 di 3 why! W670SZQ1 Fan Replacement, Fan: passo 3, immagine 3 di 3
    • First, locate the fan. Then pull out the supply cable of the fan.

    • Remove the three retaining screws of the fan.

    • Finally, remove the fan by lifting it out.

Conclusione

Repeat the steps in reverse order to reassemble your device.

Un ringraziamento speciale a questi traduttori:

de en

100%

Questi traduttori ci stanno aiutando ad aggiustare il mondo! Vuoi partecipare?
Inizia a tradurre ›

Felice Suglia

Membro da: 06/15/13

30.731 Reputazione

261 Guide realizzate

0 Commenti

Aggiungi Commento

Visualizza Statistiche:

Ultime 24 Ore: 0

Ultimi 7 Giorni: 0

Ultimi 30 Giorni: 1

Tutti i Tempi: 103