Salta al contenuto principale

why! N650DU Pile BIOS

Cosa ti serve

  1. why! N650DU  Pile BIOS, The Batteries: passo 1, immagine 1 di 3 why! N650DU  Pile BIOS, The Batteries: passo 1, immagine 2 di 3 why! N650DU  Pile BIOS, The Batteries: passo 1, immagine 3 di 3
    • Unlock the button without spring

    • Slide the battery up while unlocking the button with spring

  2. why! N650DU  Pile BIOS, Access to major components: passo 2, immagine 1 di 3 why! N650DU  Pile BIOS, Access to major components: passo 2, immagine 2 di 3 why! N650DU  Pile BIOS, Access to major components: passo 2, immagine 3 di 3
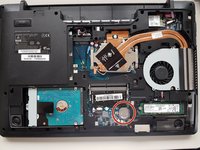
    • Unscrew the two large screws circled in red

    • Unscrew the two small screws circled in green

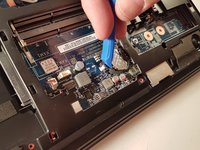
    • Slide the plate down and lift the

  3. why! N650DU  Pile BIOS, Pile BIOS: passo 3, immagine 1 di 2 why! N650DU  Pile BIOS, Pile BIOS: passo 3, immagine 2 di 2
    • Remove the battery using a flat screwdriver

Conclusione

To reassemble your device, Follow these instructions in reverse order.

Un'altra persona ha completato questa guida.

Un ringraziamento speciale a questi traduttori:

fr en

100%

irlanda ci sta aiutando ad aggiustare il mondo! Vuoi partecipare?
Inizia a tradurre ›

Felice Suglia

Membro da: 06/15/13

30.908 Reputazione

264 Guide realizzate

0 Commenti

Aggiungi Commento

Visualizza Statistiche:

Ultime 24 Ore: 0

Ultimi 7 Giorni: 4

Ultimi 30 Giorni: 11

Tutti i Tempi: 286