Salta al contenuto principale

MacBook Pro 13インチ Retina Display Early 2015 のバッテリーの交換

Avviso: Stai modificando una guida prerequisita. Tutte le modifiche avranno effetto su tutte le guide che includono questo passo.

Inglese
Giapponese

Traduzione in corso passo 6

Passo 6
MacBook Pro 13" Retina Display Early 2015 Battery Replacement: passo 0, immagine 1 di 3 MacBook Pro 13" Retina Display Early 2015 Battery Replacement: passo 0, immagine 2 di 3 MacBook Pro 13" Retina Display Early 2015 Battery Replacement: passo 0, immagine 3 di 3
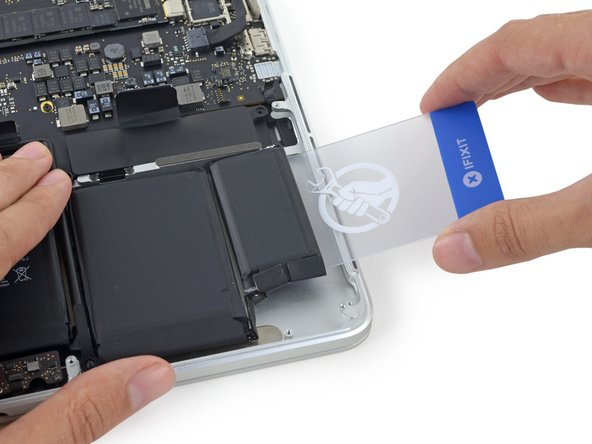
  • Push a plastic card between the right-most battery cell and the upper case, cutting the adhesive between the two.

  • Throughout this procedure, be careful not to damage any of the battery cells with your tools. A damaged lithium-ion battery may leak dangerous chemicals and/or catch fire. Use only plastic pry tools.

  • When using the hot iOpener method, if you encounter significant resistance to prying, stop and use the iOpener to reheat the section you're working on.

プラスチックカードを一番右側のバッテリーセルと上部ケースの間に差し込みます。両側に留められた接着剤を剥がします。

この手順全体で、ツールでバッテリーにダメージを与えてしまわないようにご注意ください。ダメージの入ったリチウムイオンバッテリーは危険な化学物質が排出されて引火する恐れがあります。作業にはプラスチック製のツールのみご利用ください。

温めたiOpenerを利用する方法の場合は、こじ開ける際にかなりの抵抗力があるかもしれません。その場合は作業を一旦停止してiOpenerを再度温め、該当箇所に載せます。

I tuoi contributi sono usati su licenza in base alla licenza open source Creative Commons.