Salta al contenuto principale

HP Mini 110-1046NR Keyboard Bezel Replacement

Nota: Stai modificando un prerequisito per la guida che stavi visualizzando. Tutte le modifiche avranno effetto su tutte 6le guide che includono questo passo.

Inglese
Italiano

Traduzione in corso passo 3

Passo 3
HP Mini 110-1046NR Keyboard Bezel Replacement: passo 0, immagine 1 di 3 HP Mini 110-1046NR Keyboard Bezel Replacement: passo 0, immagine 2 di 3 HP Mini 110-1046NR Keyboard Bezel Replacement: passo 0, immagine 3 di 3
  • Flip the netbook over and remove with a PH1 screwdriver the eight 5.9mm screws that secure the keyboard bezel in place.

  • Only remove the black screws with "M2.5x6" markings next to them. All others are unnecessary.

  • Taking the keyboard bezel off without removing the hard drive may be possible, but there is a risk of breaking several tabs on the keyboard bezel located between the hard drive and the frame of the computer.

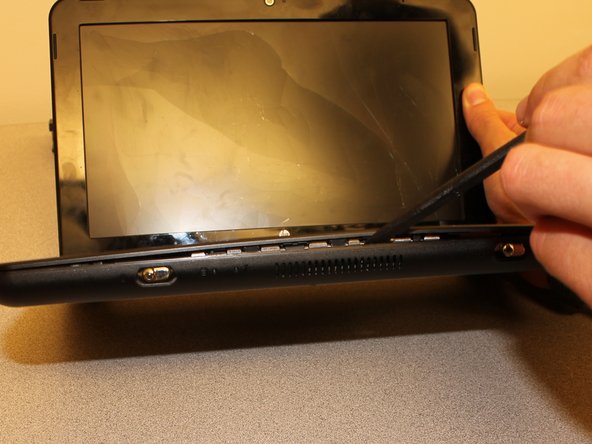
  • Using the flat end of the spudger or pry stick, pry the keyboard bezel away from the base by wedging the tool between the base and keyboard bezel and run the tool along the side until the cover is fully released.

  • Don't pull the front of the keyboard up very far. There is a small, potentially fragile ribbon cable on the back of the touchpad that is still attached to the system board.

  • Carefully flip the keyboard bezel over (toward you) to reveal the touchpad ribbon cable.

Inserisci qui la traduzione

Inserisci qui la traduzione

Inserisci qui la traduzione

Inserisci qui la traduzione

Inserisci qui la traduzione

Inserisci qui la traduzione

I tuoi contributi sono usati su licenza in base alla licenza open source Creative Commons.