Salta al contenuto principale

iPhone 13 Pro屏幕替换前提指南

Avviso: Stai modificando una guida prerequisita. Tutte le modifiche avranno effetto su tutte le guide che includono questo passo.

Inglese
Cinese

Traduzione in corso passo 6
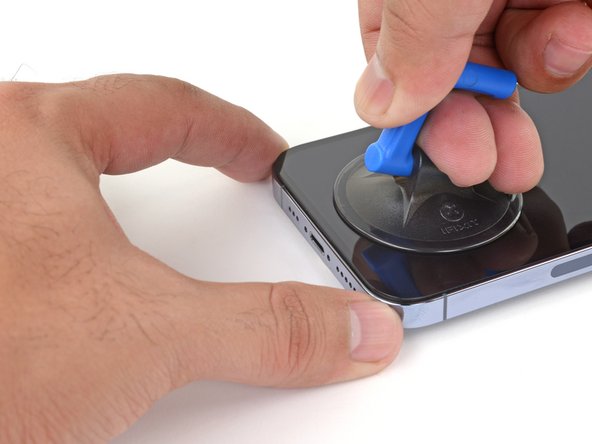
Passo 6
Screen Removal, Insert an opening pick: passo 0, immagine 1 di 3 Screen Removal, Insert an opening pick: passo 0, immagine 2 di 3 Screen Removal, Insert an opening pick: passo 0, immagine 3 di 3
Insert an opening pick
  • Apply a suction handle to the bottom edge of the phone, while avoiding the very edge of the glass.

  • Pull up on the suction cup with firm, constant pressure to create a slight gap between the screen and the frame.

  • Insert an opening pick into the gap under the screen's plastic bezel.

  • The watertight adhesive holding the screen in place is very strong; creating this initial gap takes a significant amount of force. If you're having a hard time opening a gap, apply more heat, and gently rock the screen up and down to weaken the adhesive until you create enough of a gap to insert your tool.

在屏幕的底部边缘使用吸柄,同时避开玻璃的最边缘。

用牢固、恒定的压力拉起吸盘,在屏幕和外边框之间形成微小的间隙。

将屏幕固定到位的粘合剂非常牢固; 最开始打开一个缝隙时需要很大的力气。 如果很难创造出来缝隙,请施加更多的热量,并轻轻地上下摇动屏幕以削弱粘合剂,直到你创造出足够的缝隙来插入撬片。

I tuoi contributi sono usati su licenza in base alla licenza open source Creative Commons.