Salta al contenuto principale

iRobot Roomba 890 Bumper Sensors Replacement

Cosa ti serve

  1. iRobot Roomba 890 Bumper Sensors Replacement, Bumper/Cliff Sensors: passo 1, immagine 1 di 2 iRobot Roomba 890 Bumper Sensors Replacement, Bumper/Cliff Sensors: passo 1, immagine 2 di 2
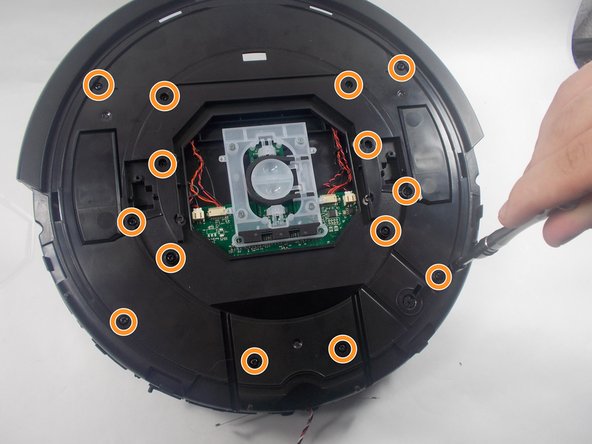
    • Use a Phillips #2 screwdriver to remove the 7.7 mm screw securing the side brush-head.

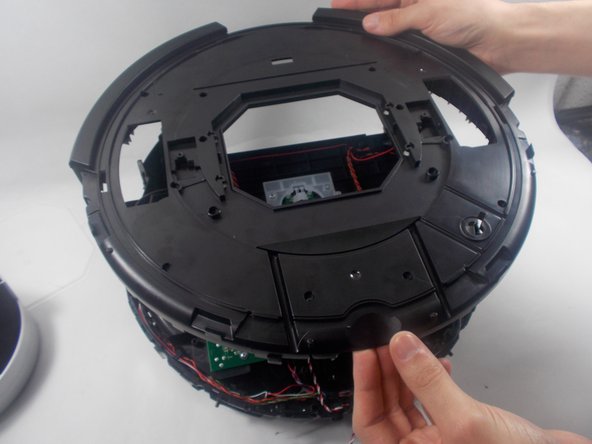
    • Lift off the yellow brush head.

  2. iRobot Roomba 890 Bumper Sensors Replacement: passo 2, immagine 1 di 1
    • Place the Roomba with its bottom facing toward you.

    • Use a Phillips #2 screwdriver to remove the four 11 mm screws.

  3. iRobot Roomba 890 Bumper Sensors Replacement: passo 3, immagine 1 di 1
    • Remove the battery plate.

    • Remove the battery by pulling directly up on the grey pull tabs.

  4. iRobot Roomba 890 Bumper Sensors Replacement: passo 4, immagine 1 di 1
    • Lift off the baseplate.

  5. iRobot Roomba 890 Bumper Sensors Replacement: passo 5, immagine 1 di 2 iRobot Roomba 890 Bumper Sensors Replacement: passo 5, immagine 2 di 2
    • Turn the Roomba face up.

    • Press the release button on the top side of the Roomba and pull the dustbin straight out.

  6. iRobot Roomba 890 Bumper Sensors Replacement: passo 6, immagine 1 di 2 iRobot Roomba 890 Bumper Sensors Replacement: passo 6, immagine 2 di 2
    • Use a Phillips #2 screwdriver to remove the ten 9.3 mm screws.

    • Remove the bumper retainer ring.

    • The bumper will now only be attached by the IR sensors' wires; be careful not to damage them.

  7. iRobot Roomba 890 Bumper Sensors Replacement: passo 7, immagine 1 di 1
    • Use a Phillips #2 screwdriver to remove the two 7.5 mm IR Sensor screws.

    • Remove the IR Sensor assembly.

  8. iRobot Roomba 890 Bumper Sensors Replacement: passo 8, immagine 1 di 2 iRobot Roomba 890 Bumper Sensors Replacement: passo 8, immagine 2 di 2
    • Use the iFixit opening tool to remove the retaining band.

    • Use the iFixit opening tool to remove the faceplate.

    • Pry up slowly around the edges as to not damage the plastic components.

  9. iRobot Roomba 890 Bumper Sensors Replacement: passo 9, immagine 1 di 3 iRobot Roomba 890 Bumper Sensors Replacement: passo 9, immagine 2 di 3 iRobot Roomba 890 Bumper Sensors Replacement: passo 9, immagine 3 di 3
    • Use a Phillips #1 screwdriver to remove the two 9.5 mm handle screws.

    • Use a Phillips #1 screwdriver to remove the fourteen 9.5 mm top plate screws.

    • Remove the top plastic plate.

  10. iRobot Roomba 890 Bumper Sensors Replacement: passo 10, immagine 1 di 2 iRobot Roomba 890 Bumper Sensors Replacement: passo 10, immagine 2 di 2
    • Disconnect the bumper/cliff sensor harness from motherboard.

    • Do not pull on the wires; instead pull on the white connector. Sometimes it is necessary to gently "walk" the connector from side to side to loosen it. Never pull at an angle.

  11. iRobot Roomba 890 Bumper Sensors Replacement: passo 11, immagine 1 di 1
    • Use a Phillips #1 screwdriver to remove the four 9.3 mm bumper sensor screws.

  12. iRobot Roomba 890 Bumper Sensors Replacement: passo 12, immagine 1 di 2 iRobot Roomba 890 Bumper Sensors Replacement: passo 12, immagine 2 di 2
    • Use blunt nose tweezers to remove the four cliff sensors.

    • Grip the IR sensors between the sensor and the Roomba chassis, then push on the sensors in an upward motion from the bottom of the sensor to remove them.

Conclusione

To reassemble your device, follow these instructions in reverse order.

Un'altra persona ha completato questa guida.

Team

Un commento

for step 12: just make sure to push in the IR cliff sensor towards the roomba and they should pop out really easily.

bob bob - Replica

Aggiungi Commento

Visualizza Statistiche:

Ultime 24 Ore: 0

Ultimi 7 Giorni: 3

Ultimi 30 Giorni: 22

Tutti i Tempi: 778