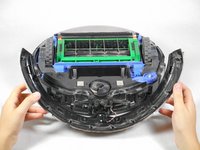
Salta al contenuto principale

iRobot Roomba 560 Clear Sensor Lens Replacement

Cosa ti serve

  1. iRobot Roomba 560 Clear Sensor Lens Replacement, Side Sweeper: passo 1, immagine 1 di 1
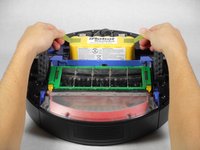
    • Flip the Roomba upside down.

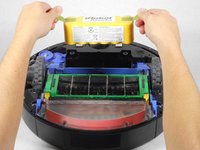
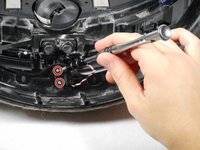
    • Unscrew the single 5 mm screw on the yellow side sweeper using the Phillips #2 driver.

  2. iRobot Roomba 560 Clear Sensor Lens Replacement: passo 2, immagine 1 di 1
    • Lift the yellow side sweeper, removing it from the device.

  3. iRobot Roomba 560 Clear Sensor Lens Replacement, Battery: passo 3, immagine 1 di 1
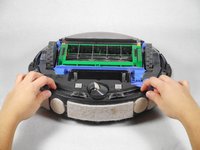
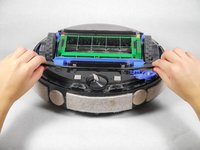
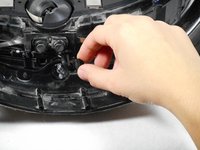
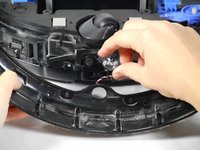
    • Using the Phillips #2 driver, remove the four 10 mm screws that hold the back panel in place.

  4. iRobot Roomba 560 Clear Sensor Lens Replacement: passo 4, immagine 1 di 1
    • Lift up the back panel to remove it from the device.

  5. iRobot Roomba 560 Clear Sensor Lens Replacement: passo 5, immagine 1 di 2 iRobot Roomba 560 Clear Sensor Lens Replacement: passo 5, immagine 2 di 2
    • Lift up the yellow battery by pulling up the green tabs on its side.

    • Handle the battery with care.

  6. iRobot Roomba 560 Clear Sensor Lens Replacement, Clear Sensor Lens: passo 6, immagine 1 di 1
    • Rotate the Roomba so the bumper is in front of you.

  7. iRobot Roomba 560 Clear Sensor Lens Replacement: passo 7, immagine 1 di 1
    • Using the Phillips #1 driver, remove the ten 10 mm screws on the bumper that run along the outer edge of the Roomba.

  8. iRobot Roomba 560 Clear Sensor Lens Replacement: passo 8, immagine 1 di 2 iRobot Roomba 560 Clear Sensor Lens Replacement: passo 8, immagine 2 di 2
    • Lift the thin top cover that holds the bumper in place.

  9. iRobot Roomba 560 Clear Sensor Lens Replacement: passo 9, immagine 1 di 1
    • Gently lift the device upwards from the bumper to detach these two pieces.

    • There are wires connecting the bumper to the device. Be careful while lifting the device off the bumper as to not damage these wires.

  10. iRobot Roomba 560 Clear Sensor Lens Replacement: passo 10, immagine 1 di 2 iRobot Roomba 560 Clear Sensor Lens Replacement: passo 10, immagine 2 di 2
    • Lift the bumper upwards for easier access.

    • Unscrew the two 5 mm screws that connect the red and white wires to the device using the Phillips #1 driver.

    • The sensor can be unplugged from the motherboard so the bumper isn't hanging off the Roomba.

  11. iRobot Roomba 560 Clear Sensor Lens Replacement: passo 11, immagine 1 di 2 iRobot Roomba 560 Clear Sensor Lens Replacement: passo 11, immagine 2 di 2
    • Lift the circular black panel off the lens.

    • Lift the clear lens that is on the other side of the bumper and replace it with a new lens.

Conclusione

To reassemble your device, follow these instructions in reverse order.

Altre 5 persone hanno completato questa guida.

Team

Cal Poly, Team 1-22, Maness Fall 2015 Membro di Cal Poly, Team 1-22, Maness Fall 2015

CPSU-MANESS-F15S1G22

4 Membri

14 Guide realizzate

3 Commenti

where do I get a new lens?

Stefan Crocoll - Replica

C’est très clair,merci.

pourtant j’aimerai savoir s’il n’y qu’un seul capteur infra rouge.

Je précise : le roomba “voit” très bien sa station de recharge mais pas les murs virtuels (ces derniers fonctionnent car je les ai testé sur un autre roomba) ?

si vous avez une solution…..:-)

hayon - Replica

Certains murs virtuels (tels que ceux du scooba ou d'anciens models de roomba) ne sont pas compatibles de base avec le roomba 560.

Il existe toutefois deux solutions pour les rendre compatible avec le roomba :

1) Acheter un OSMO contenant la dernière version sur firmware pour votre Roomba 560 sur internet.

2) Demander un OSMO contenant la dernière version du firmware au support iRobot.

Les OSMO sont de petit appareil qui se branches sur la prise diagnostic / debugage des Roomba et qui permettent d'en mettre à jour le firmware.

Brendan -

Aggiungi Commento

Visualizza Statistiche:

Ultime 24 Ore: 0

Ultimi 7 Giorni: 14

Ultimi 30 Giorni: 70

Tutti i Tempi: 7,783