Questa versione può contenere modifiche errate. Passa all'ultima istantanea verificata.
Cosa ti serve
-
-
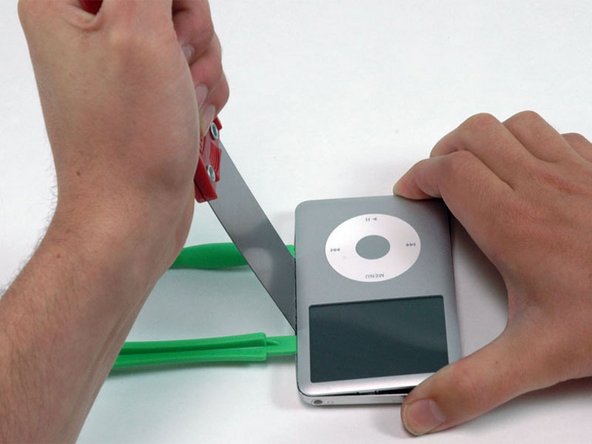
Infila attentamente una spatola metallica per circa 3 mm nella fessura tra i due strumenti di apertura, tenendola inclinata.
-
Una volta che la spatola ha superato il bordo della scocca posteriore, ruotala finché è verticale e infilala attentamente (ma con decisione), facendola ondeggiare, fino in fondo all'iPod tramite la fessura creata dagli strumenti di apertura.
-
-
-
Infila attentamente una spatola metallica per circa 3 mm nella fessura tra i due strumenti di apertura, tenendola inclinata.
-
Una volta che la spatola ha superato il bordo della scocca posteriore, ruotala finché è verticale e infilala attentamente (ma con decisione), facendola ondeggiare, fino in fondo all'iPod tramite la fessura creata dagli strumenti di apertura.
-
Tieni premuta con le dita la cover posteriore dietro la spatola per minimizzare la piegatura. Sempre lentamente piega la spatola come mostrato nell'immagine per assicurarti che la maggior parte dei ganci in metallo su questo lato dell'iPod siano rilasciati.
-
-
-
-
Prendi con una mano il pannello anteriore e con l'altra quello posteriore.
-
Delicatamente (DELICATAMENTE) libera i ganci restanti sulla scocca posteriore separando la parte anteriore da quella posteriore (considera il bordo inferiore dell'iPod come una cerniera), prestando molta attenzione a non danneggiare i cavi a nastro che collegano le due metà.
-
-
-
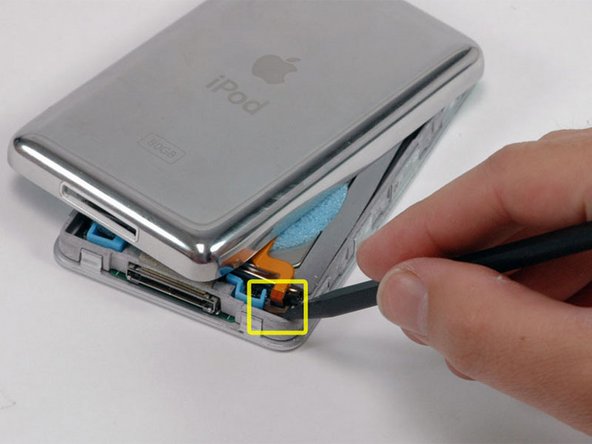
Solleva il disco rigido con una mano in modo da accedere al cavo a nastro della presa jack sottostante.
-
Usa uno spudger per per sollevare l'aletta in plastica che tiene fermo il cavo a nastro della presa jack. L'aletta ruoterà di circa 90°, rilasciando il cavo.
-
Sfila il cavo a nastro arancione della presa jack dal suo connettore sulla scheda logica.
-
Il pannello posteriore è ora separato completamente dall'iPod.
-
-
-
Ora occupiamoci di sistemare i danni fatti durante la procedura di apertura dell'iPod Classic! È molto probabile che almeno uno dei ganci in metallo della cover posteriore si sia piegato verso l'alto. Tutte queste clip devono puntare verso il basso per reinstallare la scocca posteriore.
-
-
Questo passaggio è privo di traduzione. Aiuta a tradurlo
-
Remove the three Phillips screws securing the front panel to the metal framework.
-
-
Questo passaggio è privo di traduzione. Aiuta a tradurlo
-
Rotate the iPod 180 degrees and remove the three Phillips screws securing the front panel to the metal framework on the other side.
-
-
Questo passaggio è privo di traduzione. Aiuta a tradurlo
-
Carefully work around the edges of the iPod to separate the front panel from the gray metal framework.
-
-
Questo passaggio è privo di traduzione. Aiuta a tradurlo
-
Lift the framework (including the attached screen, logic board, and click wheel) away from the front panel.
-
-
Questo passaggio è privo di traduzione. Aiuta a tradurlo
-
Use a spudger to flip up the plastic tab holding the orange display ribbon in place. The tab will rotate up 90 degrees towards the display, releasing the ribbon cable.
-
-
Questo passaggio è privo di traduzione. Aiuta a tradurlo
-
Slide the orange display ribbon cable directly out of its connector.
-
-
Questo passaggio è privo di traduzione. Aiuta a tradurlo
-
Lift the framework assembly up, and slide the display and LCD metal backplate out of the framework assembly.
-
-
Questo passaggio è privo di traduzione. Aiuta a tradurlo
-
Remove the two Phillips screws securing the logic board to the framework.
-
-
Questo passaggio è privo di traduzione. Aiuta a tradurlo
-
Carefully push the logic board away from the metal framework.
-
-
Questo passaggio è privo di traduzione. Aiuta a tradurlo
-
Move the click wheel from beneath the logic board so that the icons on the click wheel are visible.
-
Use a spudger to flip up the plastic tab holding the orange click wheel ribbon in place. The tab will rotate up 90 degrees, releasing the ribbon cable.
-
-
Questo passaggio è privo di traduzione. Aiuta a tradurlo
-
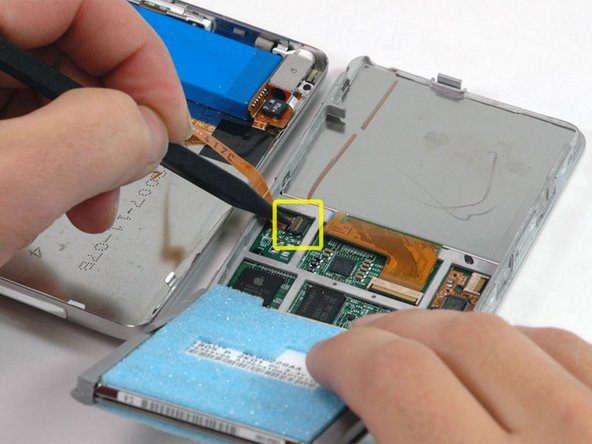
Use a spudger to lift the click wheel cable off the logic board. Be careful not to bend the cable too much, or the electronics on the cable could be damaged.
-
-
Questo passaggio è privo di traduzione. Aiuta a tradurlo
-
Slide the click wheel cable out of its connector.
-
Lift the click wheel assembly away from the logic board.
-
-
Questo passaggio è privo di traduzione. Aiuta a tradurlo
-
Use a spudger to flip up the plastic tab holding the orange hard drive ribbon in place. The tab will rotate up 90 degrees, releasing the ribbon cable.
-
-
Questo passaggio è privo di traduzione. Aiuta a tradurlo
-
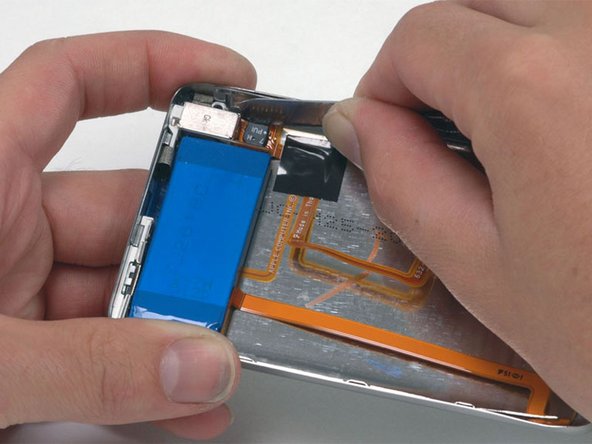
Slide the orange hard drive ribbon cable directly out of its connector. The cable may be attached to the logic board with some adhesive. If the cable doesn't immediately come free, carefully pull up on the cable to loosen the adhesive.
-


Annulla: non ho completato questa guida.
Altre 83 persone hanno completato questa guida.

10 Commenti
I was able to open my 160 GB skinny classic with out too much trouble. I used a utility knife blade to get the initial toehold between the back and front panels, once that was accomplished, I used the thin metal leaves of a disassembled automotive feeler gauge to release the latches and keep it open while I worked, better and safer than xacto knives.
So I followed this guide (and a bunch of others) for tearing down and replacing parts of my iPod. I finished everything, and I'm sure I got the right parts, but now it won't turn on. It says "The iPod software update server could not be contacted. The server does not support this version of iTunes." While I understand that iFixIt is not an Apple company, I feel like my iPod should be fixed? I'm pretty sure I did everything correctly.... Why won't it turn on?
I often do things like this at my work but this day all goes wrong. With Step 7 at this “How to”, I damaged my Display and with Step 18 I damaged the Power suply connector. Nice day!!! &&^&