Questa versione può contenere modifiche errate. Passa all'ultima istantanea verificata.
Cosa ti serve
-
-
Spegni il tuo iPhone prima di iniziare lo smontaggio.
-
La cover posteriore del telefono potrebbe avere due viti a croce Phillips #000 o viti "Pentalobe" a 5 punte di Apple. Controlla quali viti hai e assicurati di avere anche il cacciavite corretto per rimuoverle.
-
Rimuovi le due viti Pentalobe o Phillips #000 da 3,6 mm accanto al connettore dock.
-
-
-
Rimuovi la singola vite a croce Philips da 1,5 mm che fissa il connettore della batteria alla scheda madre (se presente).
-
-
-
Solleva la linguetta di plastica trasparente esposta per staccare la batteria dall'adesivo che la fissa all'iPhone.
-
Se è rimasta della soluzione alcolica nel telefono, puliscilo con cura o lascialo asciugare all'aria prima di installare la nuova batteria.
-
Rimuovi la batteria.
-
Prima del riassemblaggio, pulisci i punti di contatto metallo su metallo con uno sgrassante come windex. Gli oli delle dita possono potenzialmente causare problemi di interferenza wireless.
-
Esegui un hard reset dopo il rimontaggio. Ciò può prevenire diversi problemi e semplificare la risoluzione dei problemi.
-
-
Questo passaggio è privo di traduzione. Aiuta a tradurlo
-
Remove the two 1.8 mm Phillips screws securing the dock connector cable cover to the logic board.
-
Remove the metal dock connector cable cover.
-
-
Questo passaggio è privo di traduzione. Aiuta a tradurlo
-
Use the edge of a plastic opening tool to pry the dock cable up from its socket on the logic board.
-
-
-
Questo passaggio è privo di traduzione. Aiuta a tradurlo
-
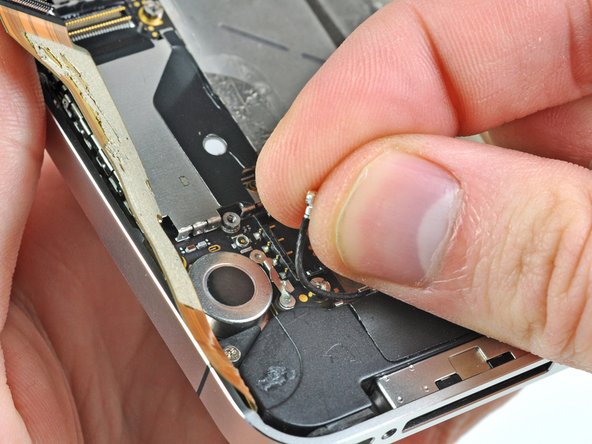
Peel the dock connector cable off the adhesive securing it to the logic board and the side of the speaker enclosure.
-
-
Questo passaggio è privo di traduzione. Aiuta a tradurlo
-
Remove the 1.6 mm Phillips screw securing the pressure contact to the logic board near the vibrator.
-
Remove the pressure contact.
-
-
Questo passaggio è privo di traduzione. Aiuta a tradurlo
-
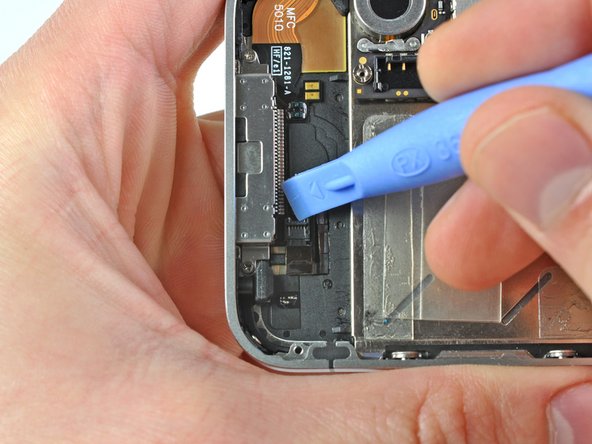
Use the edge of a plastic opening tool to pry the Wi-Fi antenna cable up from its socket on the logic board.
-
De-route the Wi-Fi antenna cable out from under the metal fingers attached to the logic board.
-
-
Questo passaggio è privo di traduzione. Aiuta a tradurlo
-
Remove the two 2.4 mm Phillips screws securing the speaker enclosure assembly to the outer case.
-
-
Questo passaggio è privo di traduzione. Aiuta a tradurlo
-
Remove the small black spacer that was under the Phillips screw near the vibrator.
-
-
Questo passaggio è privo di traduzione. Aiuta a tradurlo
-
Use a plastic opening tool to lift the speaker enclosure assembly out of the case, being sure not to damage the EMI fingers on the attached Wi-Fi antenna.
-
Remove the speaker enclosure assembly.
-
-
Questo passaggio è privo di traduzione. Aiuta a tradurlo
-
If present, remove the small strip of tape covering one of the dock connector screws.
-
-
Questo passaggio è privo di traduzione. Aiuta a tradurlo
-
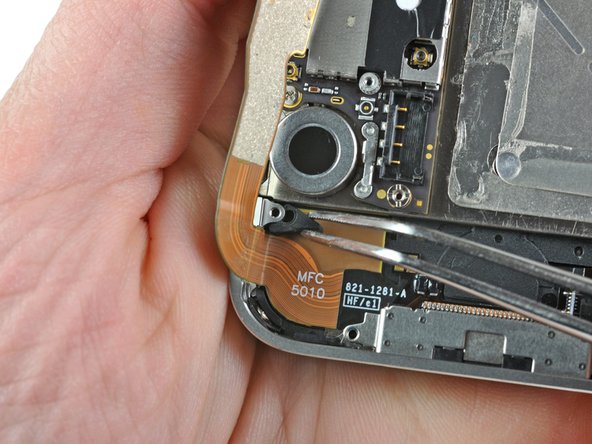
Use a plastic opening tool to flip up the retaining flap on the home button ribbon cable ZIF socket.
-
-
Questo passaggio è privo di traduzione. Aiuta a tradurlo
-
Use a pair of tweezers to pull the home button ribbon cable out of its socket.
-
-
Questo passaggio è privo di traduzione. Aiuta a tradurlo
-
Carefully pull, but do not remove, the rubber microphone holder out of its tube in the bottom edge of the iPhone.
-
-
Questo passaggio è privo di traduzione. Aiuta a tradurlo
-
Remove the two 1.3 mm Phillips screws securing the dock connector to the case of the iPhone.
-
-
Questo passaggio è privo di traduzione. Aiuta a tradurlo
-
Use a pair of tweezers to remove the small rubber spacer beneath the speaker enclosure mounting ear near the vibrator.
-
-
Questo passaggio è privo di traduzione. Aiuta a tradurlo
-
Remove the tiny rubber spacer near the dock connector.
-
-
Questo passaggio è privo di traduzione. Aiuta a tradurlo
-
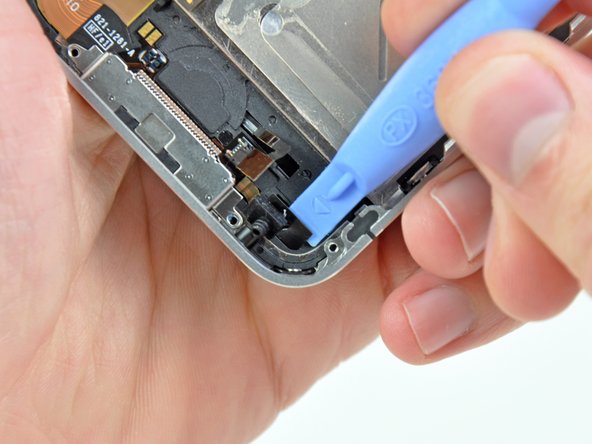
Use the edge of a plastic opening tool to peel the dock connector and its cable off the black plastic case of the iPhone.
-
-
Questo passaggio è privo di traduzione. Aiuta a tradurlo
-
Pry the dock connector away from its opening at the bottom of the iPhone.
-
Remove the dock connector.
-


Annulla: non ho completato questa guida.
Altre 117 persone hanno completato questa guida.

5 Commenti
So I attempted once to fix the dock connector and failed. A month later I took the phone apart again. The first thing I noticed when taking off the dock connector from the logic board is that it wasn't seated properly. I attached it properly and now the iPhone charges and home button works perfectly!
What about it was not seated properly? any specific contact point? was it not screwed in well if it wasn't seated properly? I just replaced on a friends 4, but it has not turned on yet, and I can't figure it out. It just stopped charging one day so I figured it was a bad port from corrosion or something and replaced it. The swap was easy enough so I'm confused as to why it isn't turning on yet.
Matthew -
New part from IFixit works great. Some tips from my installation:
- PH000 screwdriver works well, but takes some finesse. A little pressure to get the screw going, and don't try to over tighten on the way back in. If you happen to round one out, a 00 or 0 PH screwdriver might get enough bite to get it going.
- Plastic pieces are covering the adhesive on numerous parts of the new dock connector. These are to be removed prior to installation.
- Battery does not have to be removed, so I avoided the risk of breaking something else.
I completed this guide, but unfortunately my phone is in no better shape than it was before the dock replacement. Apparently, this was not the problem. The device won't restore in iTunes. It just sits with the Apple logo and an empty status bar on the screen. Now when I unplug it from the computer, I get a black screen, with just a touch of backlight, but no display otherwise. Before the dock replacement, it always said "Connect to iTunes" but would not restore either. Any thoughts on what else I could try now?