Introduzione
Togli il pannello posteriore per accedere ai componenti interni del tuo iPhone 4.
Cosa ti serve
Panoramica Video
-
-
Spegni il tuo iPhone prima di iniziare lo smontaggio.
-
La cover posteriore del tuo iPhone 4 può avere due viti di tipo a croce Phillips #000 oppure tipo Apple "pentalobe" con testa a cinque intagli (seconda immagine). Verifica quali viti usa il tuo telefono e se hai il cacciavite adatto per poterle svitare.
-
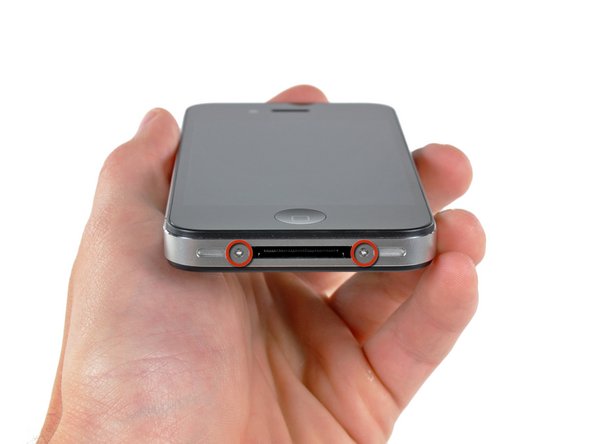
Rimuovi le due viti pentalobe o a croce Phillips #000 da 3,6 mm posizionate vicino al connettore dock.
-
-
Per rimontare il tuo dispositivo, segui queste istruzioni in ordine inverso.
Annulla: non ho completato questa guida.
Altre 811 persone hanno completato questa guida.
Un ringraziamento speciale a questi traduttori:
100%
Questi traduttori ci stanno aiutando ad aggiustare il mondo! Vuoi partecipare?
Inizia a tradurre ›
Documenti Allegati
9Commenti sulla guida
The replacement part for the iPhone 4 rear panel has two thin, clear overlays on the inside surface--a larger one that runs the full length, and a small one that only covers the lens. These should be removed prior to installation. Also, the first rear panel replacement I got from iFixit was not an exact fit and would not easily "click" into place. They replaced it for free and the second one clicked right in.
On step 3 when replacing the back panel with a new one, they aren't kidding about removing ALL the protective slips. There's THREE of them.
1), the obvious back slip that protects the new back.
2). the one inside the back protecting the side with the camera lens
3). the little square one OVER the lens itself.
First time I tried to reinstall my back, that tiny little square over the lens prohibited my ability to actually get the back on completely. My husband jammed it for me, but the screws still wouldn't take. It's amazing that these things are so precise that the tiny little film on the lens would make it that much tighter.
Anyways, hope that helps somebody. :)
Easiest repair I've ever done. Thanks y'all!


