Questa versione può contenere modifiche errate. Passa all'ultima istantanea verificata.
Cosa ti serve
-
-
Se il vetro del tuo schermo è rotto, applica del nastro adesivo per prevenire ulteriori rotture ed evitare di ferirti durante la riparazione.
-
Applica delle strisce sovrapposte di nastro adesivo trasparente sul display dell'iPhone fino a coprire l'intero schermo.
-
-
-
Rimuovi le due viti a croce Phillips #00 da 3,7 mm dall'estremità del connettore dock dell'iPhone.
-
-
-
Usa uno spudger per sollevare la linguetta di plastica bianca che tiene in posizione il cavo a nastro "3". La linguetta bianca ruoterà verso l'alto di 90 gradi, rilasciando il cavo a nastro.
-
Fai scorrere il cavo a nastro nero fuori dal connettore e rimuovi il gruppo display dall'iPhone.
-
-
Questo passaggio è privo di traduzione. Aiuta a tradurlo
-
Insert your SIM eject tool or a paper clip into the hole next to the headphone jack.
-
Press down on the tool until the SIM card tray pops out.
-
Grasp the SIM card tray and slide it out of the iPhone.
-
-
-
Questo passaggio è privo di traduzione. Aiuta a tradurlo
-
Use a spudger to disconnect the ribbon cable labeled "4."
-
-
Questo passaggio è privo di traduzione. Aiuta a tradurlo
-
Use a spudger to disconnect the ribbon cable labeled "5."
-
-
Questo passaggio è privo di traduzione. Aiuta a tradurlo
-
Use a spudger to disconnect the ribbon cable labeled "6."
-
-
Questo passaggio è privo di traduzione. Aiuta a tradurlo
-
Remove the following 8 screws:
-
Five 2.3 mm Phillips #00 screws with partial threads securing the logic board to the rear case.
-
Two 2.3 mm Phillips #00 screws with full threads securing the logic board and camera.
-
One 2.9 mm Phillips #00 screw from beneath the "Do not remove" sticker.
-
Note for re-assembly:
-
The screw that goes next to the camera (bottom right orange highlighted screw) also has a metal strip that holds the camera in place.
-
-
Questo passaggio è privo di traduzione. Aiuta a tradurlo
-
Use a spudger to gently pry the camera up and out of its housing in the rear case.
-
-
Questo passaggio è privo di traduzione. Aiuta a tradurlo
-
Use a spudger to gently pry up the end of the logic board closest to the dock connector.
-
-
Questo passaggio è privo di traduzione. Aiuta a tradurlo
-
Slide the logic board towards the dock connector and out of the iPhone.
-
When replacing the logic board after installing battery, connect the camera to the logic board before inserting it into the case. Then make sure to set the top section of the logic board (where the SIM tray is) in place before settling the rest of the board in place. This is important, as sometimes the SIM card slot will not align into place. Once the top section is in place, the bottom section can be maneuvered into place. You will know the logic board is correctly installed when the SIM tray is aligned with the opening in the iPhone case and the camera module seats neatly into its place.
-
-
Questo passaggio è privo di traduzione. Aiuta a tradurlo
-
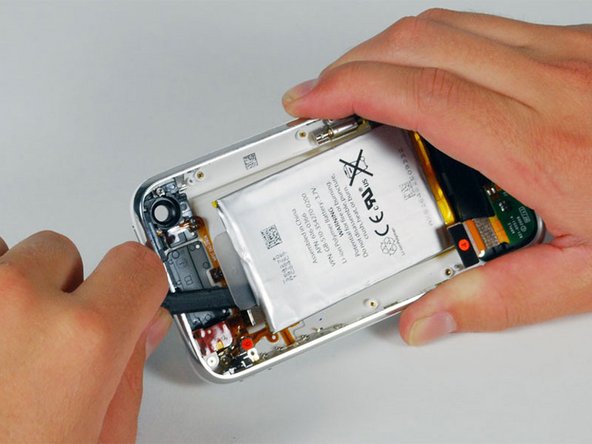
Use a spudger to pry the battery up from the rear case. The battery is attached with an adhesive strip around the perimeter of the battery.
-
-
Questo passaggio è privo di traduzione. Aiuta a tradurlo
-
Remove the two Phillips #00 screws securing the on/off switch to the front bezel.
-
-
Questo passaggio è privo di traduzione. Aiuta a tradurlo
-
Carefully peel up the orange ribbon cable from the rear case.
-
-
Questo passaggio è privo di traduzione. Aiuta a tradurlo
-
Remove the following 4 screws:
-
Three 1.8 mm Phillips #00 screws securing the headphone jack and GPS antenna to the rear case. Note the order in which you remove the screws, as the left one has a slightly larger head.
-
One 3.8 mm Phillips #00 screw in the plastic loop near the headphone jack.
-
-
Questo passaggio è privo di traduzione. Aiuta a tradurlo
-
Remove the four Phillips #00 screws securing the volume and mute switch.
-
The mute switch assembly screws should be tightened with the switch in the off position. Check the protrusion of the switch when turned on, since it may not stick out far enough to operate if the switch assembly is incorrectly positioned. (Check the gap between the switch frame and the bezel (white gap showing between the two screws near the 6). The screw on the far right is slightly longer than the other 3 screws. When reassembling the phone, keep this in mind.
-
-
Questo passaggio è privo di traduzione. Aiuta a tradurlo
-
Carefully lift the headphone jack assembly out of the iPhone.
-
Switch the green mute switch down (towards the back side of the iPhone) into mute position. This will make it much easier to insert it, once the new mute button is in place.
-
-
Questo passaggio è privo di traduzione. Aiuta a tradurlo
-
Remove the single 2.4mm Phillips #00 screw securing the black plastic spacer.
-
-
Questo passaggio è privo di traduzione. Aiuta a tradurlo
-
Use a spudger to pry up the black plastic antenna housing from the rear panel.
-
Lift the black plastic GPS antenna housing out of the iPhone.
-


Annulla: non ho completato questa guida.
Altre 64 persone hanno completato questa guida.

2 Commenti
Remove the single 2.4mm Phillips #00 screw securing the black plastic spacer. Update: Happy Wheels 3D.