Questa versione può contenere modifiche errate. Passa all'ultima istantanea verificata.
Cosa ti serve
-
-
Inserisci uno strumento di espulsione della scheda SIM o una graffetta nel foro accanto al jack delle cuffie.
-
Premi sull'attrezzo finché il vassoio della scheda SIM non fuoriesce.
-
-
-
Inserisci uno strumento di apertura per iPod nello spazio tra il coperchio dell'antenna e il frontalino. Il cuneo dello strumento dovrebbe puntare verso la cover dell'antenna. Fai scorrere lo strumento attorno all'angolo e verso l'alto fino a raggiungere il supporto metallico.
-
Ripeti la stessa procedura sull'altro lato del connettore dock.
-
-
Questo passaggio è privo di traduzione. Aiuta a tradurlo
-
Remove the three Phillips #00 screws securing the rear panel to the iPhone.
-
-
Questo passaggio è privo di traduzione. Aiuta a tradurlo
-
The small square hole is the location to insert the dental pick in the next step.
-
Insert the pointed end of a heavy-duty spudger into the space between the gray metal bar and the rear panel. Pry the panel up enough until you can get the tip of the iPod opening tool into the seam between the front bezel and rear panel.
-
-
-
Questo passaggio è privo di traduzione. Aiuta a tradurlo
-
Start removing the rear panel on the side with the buttons.
-
Slide the dental pick completely into the square hole. You may need to wiggle the tool and apply a good amount of force to get it to go all the way.
-
-
Questo passaggio è privo di traduzione. Aiuta a tradurlo
-
Pry up the rear panel by pulling the dental pick counterclockwise in a quick motion. Apply force perpendicular to the plane of the display assembly. You may be afraid to go fast, but going slowly is more likely to bend the case.
-
-
Questo passaggio è privo di traduzione. Aiuta a tradurlo
-
Use a spudger to free the rear panel from the iPhone along the corner and top.
-
-
Questo passaggio è privo di traduzione. Aiuta a tradurlo
-
Repeat the same procedure on the other side of the iPhone. Slide the dental pick completely into the square hole. You may need to wiggle the tool and apply a good amount of force to get it to go all the way.
-
-
Questo passaggio è privo di traduzione. Aiuta a tradurlo
-
Pry up the rear panel by pulling the dental pick counterclockwise in a quick motion. Apply force perpendicular to the plane of the display assembly. You may be afraid to go fast, but going slowly is more likely to bend the case.
-
The rear panel is still attached to the iPhone by the headphone jack cable, so don't entirely remove the rear panel from the iPhone just yet.
-
-
Questo passaggio è privo di traduzione. Aiuta a tradurlo
-
Use a spudger to disconnect the headphone jack cable from the logic board.
-
-
Questo passaggio è privo di traduzione. Aiuta a tradurlo
-
Remove the two Phillips #00 screws securing the on/off switch to the rear panel.
-
-
Questo passaggio è privo di traduzione. Aiuta a tradurlo
-
Remove the following 3 screws:
-
Two Phillips #00 screws securing the vibrator to the rear panel.
-
One larger head and longer Phillips #00 screw securing the headphone jack to the rear panel.
-
-
Questo passaggio è privo di traduzione. Aiuta a tradurlo
-
Grasp the metal screw plate attached to the on/off switch and lift slightly up and away from the rear panel. The button should come with the cable.
-
Gently peel up the on/off switch ribbon cable. Be sure to pull near where the ribbon cable is glued to the rear panel.
-
-
Questo passaggio è privo di traduzione. Aiuta a tradurlo
-
The headphone jack is slightly recessed into the rear panel. First slide the headphone jack away from its housing and then lift it up slightly (only 1/4 inch or 1/2 centimeter) so that it is no longer in the rear panel.
-
-
Questo passaggio è privo di traduzione. Aiuta a tradurlo
-
Grasp the headphone jack at the tip and gently lift up, pulling the vibrator out of the rear panel.
-
-
Questo passaggio è privo di traduzione. Aiuta a tradurlo
-
Remove the two Phillips #00 screws securing the silent/ring switch to the rear panel.
-
Pry off the metal backing with the screw holes and save for securing the replacement switch.
-
-
Questo passaggio è privo di traduzione. Aiuta a tradurlo
-
Grasp the silent/ring switch and lift it up to reveal the screw beneath.
-
-
Questo passaggio è privo di traduzione. Aiuta a tradurlo
-
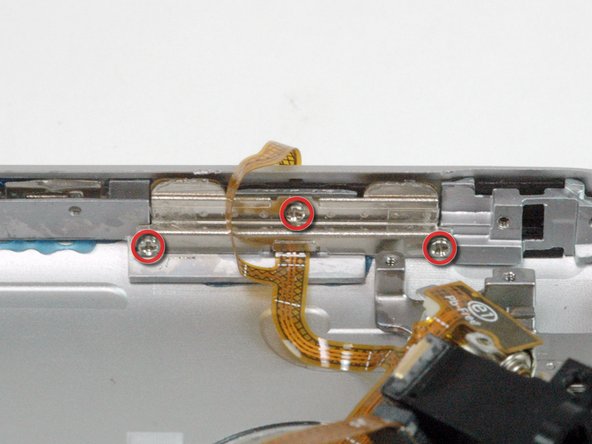
Remove the three Phillips #00 screws securing the volume switch to the rear panel.
-
-
Questo passaggio è privo di traduzione. Aiuta a tradurlo
-
Lift the headphone jack assembly out of the rear panel.
-
Annulla: non ho completato questa guida.
Altre 52 persone hanno completato questa guida.
2 Commenti
Keep in mind there is two different models - always check part number on actual flex - if you'll replace it with wrong one audio will work "other way around" - if you plug in headphones - speakers will start to work, if you unplug them speakers will not work.
I bought a iphone 2g off ebay and it has this problem.. :( Please is there anyway to fix it? There is 0 information on the internet about this problem.
Robert -


