Salta al contenuto principale

Sostituzione Schermo e Digitalizzatore iPad mini 4 LTE

Cosa ti serve

  1. Sostituzione Schermo e Digitalizzatore iPad mini 4 LTE, Applicazione nastro adesivo su un pannello frontale rotto: passo 1, immagine 1 di 3 Sostituzione Schermo e Digitalizzatore iPad mini 4 LTE, Applicazione nastro adesivo su un pannello frontale rotto: passo 1, immagine 2 di 3 Sostituzione Schermo e Digitalizzatore iPad mini 4 LTE, Applicazione nastro adesivo su un pannello frontale rotto: passo 1, immagine 3 di 3
    Attrezzo utilizzato in questo passaggio:
    Safety Glasses
    $3.19
    Compra
    • Se il vetro del display è rotto, l'uso del nastro adesivo sulla superficie impedisce alla rottura di espandersi e previene danni fisici dovuti alle schegge di vetro.

    • Stendi delle strisce sovrapposte di nastro adesivo da pacchi trasparente sul display dell'iPad fino a coprire l'intera superficie. Per rotture molto serie, può essere necessario applicare due strati di nastro sovrapposti.

    • Questo farà si che i pezzi di vetro rimangano fermi ed isolati. Inoltre fornisce integrità strutturale quando andrai a far leva per alzare lo schermo.

    • Cerca di seguire al meglio il resto della guida. Tuttavia, una volta che il vetro è crepato, continuerà a rompersi sempre di più mentre procederai alla riparazione. Potresti aver bisogno di strumenti metallici per rimuovere il vetro.

    • Proteggi i tuoi occhi! Questa procedura può far volare dei piccoli pezzi di vetro verso la tua faccia. Non provare a seguire la procedura senza un paio di occhiali di sicurezza.

  2. Sostituzione Schermo e Digitalizzatore iPad mini 4 LTE, Procedura di apertura: passo 2, immagine 1 di 1
  3. Sostituzione Schermo e Digitalizzatore iPad mini 4 LTE: passo 3, immagine 1 di 3 Sostituzione Schermo e Digitalizzatore iPad mini 4 LTE: passo 3, immagine 2 di 3 Sostituzione Schermo e Digitalizzatore iPad mini 4 LTE: passo 3, immagine 3 di 3
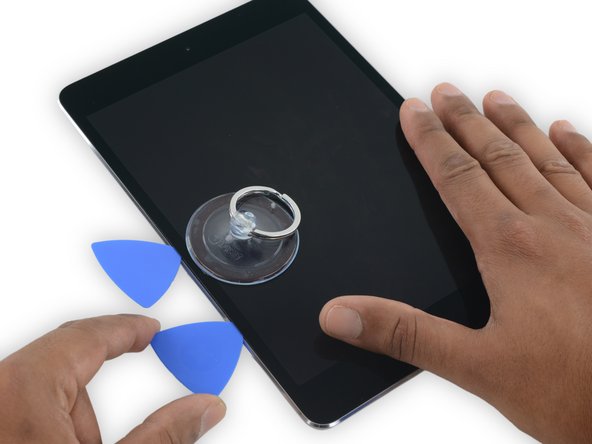
    • Posiziona una ventosa al centro del bordo sinistro.

    • Assicurati che la ventosa sia completamente piatta sul vetro per avere una presa salda.

    • Mentre tieni fermo l'iPad con una mano, tira la ventosa con una forza costante per creare una fessura.

    • A seconda dell'età del tuo dispositivo, questo potrebbe essere difficile. Se stai avendo problemi, applica più calore e riprova.

    • Sta' attento a sollevare il vetro solo il sufficiente per infilarci un plettro. Se lo sollevi di più rischi di rompere il vetro.

  4. Sostituzione Schermo e Digitalizzatore iPad mini 4 LTE: passo 4, immagine 1 di 2 Sostituzione Schermo e Digitalizzatore iPad mini 4 LTE: passo 4, immagine 2 di 2
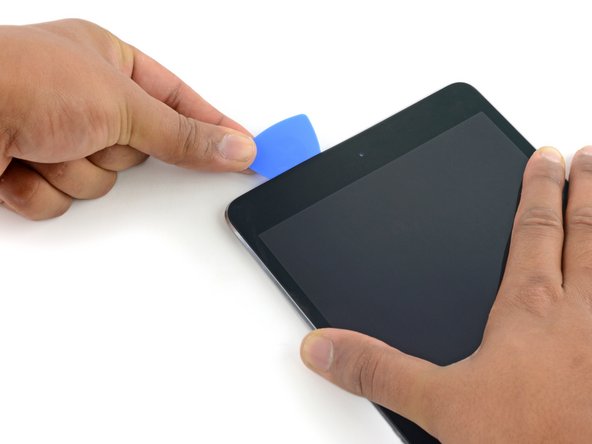
    • Mentre tieni sollevato il vetro con la ventosa, inserisci la punta di un plettro nella fessura tra il vetro e il corpo dell'iPad.

    • Non infilare il plettro più di 2 mm sotto il lato del vetro. Infilarlo più a fondo potrebbe danneggiare il gruppo della retroilluminazione, il pannello LCD o il touch screen.

    “Don't insert the opening pick any deeper than the black bezel on the side of the display. Inserting the pick too far may damage the LCD.”

    Unfortunately, you only know you have inserted it too far when you have, and you start seeing little bubble veins form between the glass screen and the LCD.

    The adhesive can be very stiff/hard, and if pushing through it can result in the pick plunging into the LCD when the adhesive finally gives way.

    Take your time, use alot of heat, and if you need to try and push the pick in, try and do so in a slicing motion along the edge, use the wide edge, or hold the pick so that your finger will hit the edge of the screen before the pick tip will pass the bezel.

    lucanos - Replica

    Adhesive strips are only 1mm wide on sides. Up to 5mm wide top and bottom. I used the Isclack. Screen seemed ok bending without breaking. Worth looking for a photo of the replacement adhesive strips so you know what you have to separate. Be extra careful at the lower right corner where the cables are.

    ian cheong - Replica

    This is a failure of a guide as it doesn’t tell you to insert at a downward angle so you don’t potrude into the LCD… Now I have to spend more money to replace the screen as I pushed adhesive between the LCD and the screen even though I went no farther than a millimeter short of the screen...

    Alec - Replica

    can you open the right side if the left is too cracked to use a suction cup on?

    clark overhiser - Replica

    This guide needs amending urgently.

    You MUST NOT put the pick or whatever you are using more than 2mm under the sides of the screen, or you will cut through the adhesive tape securing the backlight assembly to the LCD glass.

    This will push adhesive into the viewable area of the LCD and cause the backlight assembly to no longer be secured against the LCD fully.

    I now need a new screen.

    This line below from the guide is absolutely INCORRECT and will ruin your expensive display:

    ”Don't insert the opening pick any deeper than the black bezel on the side of the display.”

    The black bezel is 5mm to 6mm wide; you MUST NOT insert anything to that depth or you will destroy your display. 2mm maximum!

    jamesqb2001 - Replica

    thanks. will take this into account for my repair

    Adab Abu -

    I too damaged my display because of this absolute nonsense (The German version, which I used, still had this INCORRECT portion in it). I can't believe how long it took iFixit to update this, even though people have been reporting this for years on end. Sadly iFixit still haven't updated a variety of other things that are still at the very least high risk instructions. I just messaged them the other day, but they don't seem to care about or understand the remaining issues that this guide has. At least they updated one of the most severe things, but they just plainly told me 'I'm wrong' about the rest. I liked iFixit it so far, and I've worked on a variety of (difficult) repairs - but this experience was a very huge let down.

    Mac Stevenson -

    A few thoughts after opening a number of Mini 4’s.

    1) if the display is warm enough you can squeeze the digitizer and LCD back together after a minor incursion with the opening pick and it will reseal.

    2) I’ve started going in at the top just to the right of the camera (I use an iFlex to get in then switch to a pick). Then I run down either side with my fingers choked up on the pick so there only a mm or 2 sticking out. Usually after running down one side, I can get the display open enough to get the pick in behind the LCD when I do the other side

    Stow - Replica

  5. Sostituzione Schermo e Digitalizzatore iPad mini 4 LTE: passo 5, immagine 1 di 1
    • Scalda di nuovo e riappoggia l'iOpener sul bordo sinistro per qualche minuto.

    • Stai attento a non surriscaldare l'iOpener durante la procedura di riparazione. Aspetta sempre almeno 10 minuti prima di scaldare di nuovo l'iOpener.

    If your iPad is cold, consider leaving the iOpener on for longer than 5 minutes. The aluminum housing is a very large thermally dissipating mass and will quickly cool off the glass and make you have to start over and wait the 10 minutes to reheat. There’s a very slim window in which you’re able to insert the pick into the glass adhesive before it solidifies once again. I’ve been fighting with it for like 20 minutes following these instructions and it’s not working. You really need to leave it for longer than just 5 minutes to get the back housing hot too.

    Crystal S - Replica

    Heat is essential. I used a 3d printer’s heated set at 65 degrees. Chris Storer’s stip above saved me as you really need to let it sit for quite a while to soften the adhesive. Since I was doing a battery change, I heated both sides as the aluminum back is a huge heatsink that really sucks up the heat. Don’t try forcing it; if the suction cup isn’t pulling a gap in the screen, leave it on the heater for additional time.

    garbage911garbage - Replica

    Love the 3d printer idea, I hadn’t thought of that! I have used a heat gun as well but you have to be very careful to not use too much heat. Also watch for inserting the pick too far, it is really easy to delaminate glass from the display!

    russ -

  6. Sostituzione Schermo e Digitalizzatore iPad mini 4 LTE: passo 6, immagine 1 di 3 Sostituzione Schermo e Digitalizzatore iPad mini 4 LTE: passo 6, immagine 2 di 3 Sostituzione Schermo e Digitalizzatore iPad mini 4 LTE: passo 6, immagine 3 di 3
    • Inserisci un secondo plettro accanto al primo e fallo scorrere verso il bordo inferiore dell'iPad, separando l'adesivo.

    • Durante il resto della procedura, se incontri troppa resistenza mentre fai scorrere il plettro sotto il vetro, fermati e riscalda la zona dove stai lavorando. Fare troppa forza con il plettro potrebbe rompere il vetro.

    I have found that wedging a blue pry tool in between the frame and the glass can give you a better edge enough to slide the pick in.

    Crystal S - Replica

  7. Sostituzione Schermo e Digitalizzatore iPad mini 4 LTE: passo 7, immagine 1 di 3 Sostituzione Schermo e Digitalizzatore iPad mini 4 LTE: passo 7, immagine 2 di 3 Sostituzione Schermo e Digitalizzatore iPad mini 4 LTE: passo 7, immagine 3 di 3
    • Continua a far scorrere il plettro verso il basso per separare l'adesivo.

    • Se il plettro si incastra nell'adesivo, "giralo" lungo il bordo dell'iPad, continuando a separare l'adesivo.

  8. Sostituzione Schermo e Digitalizzatore iPad mini 4 LTE: passo 8, immagine 1 di 2 Sostituzione Schermo e Digitalizzatore iPad mini 4 LTE: passo 8, immagine 2 di 2
    • Prendi il primo plettro che hai infilato e fallo scorrere verso il bordo superiore dell'iPad.

  9. Sostituzione Schermo e Digitalizzatore iPad mini 4 LTE: passo 9, immagine 1 di 1
    • Scalda di nuovo l'iOpener e appoggialo al bordo superiore dell'iPad, sopra la fotocamera anteriore.

    • Stai attento a non surriscaldare l'iOpener durante la procedura di riparazione. Aspetta almeno 10 minuti prima di scaldare di nuovo l'iOpener.

    • Se hai un iOpener pieghevole, puoi piegarlo allo stesso tempo sia sopra il bordo superiore che sulla parte superiore del bordo sinistro.

  10. Sostituzione Schermo e Digitalizzatore iPad mini 4 LTE: passo 10, immagine 1 di 3 Sostituzione Schermo e Digitalizzatore iPad mini 4 LTE: passo 10, immagine 2 di 3 Sostituzione Schermo e Digitalizzatore iPad mini 4 LTE: passo 10, immagine 3 di 3
    • Fai scorrere il plettro attorno l'angolo in alto a sinistra dell'iPad per separare l'adesivo.

  11. Sostituzione Schermo e Digitalizzatore iPad mini 4 LTE: passo 11, immagine 1 di 3 Sostituzione Schermo e Digitalizzatore iPad mini 4 LTE: passo 11, immagine 2 di 3 Sostituzione Schermo e Digitalizzatore iPad mini 4 LTE: passo 11, immagine 3 di 3
    • Fai scorrere il plettro sotto il bordo superiore dell'iPad, fermandoti appena prima deella fotocamera.

    • Mentre ti avvicini alla fotocamera, sfila leggermente il plettro e continua a farlo scorrere sotto il bordo superiore.

    • Evita di far scorrere il plettro sopra la fotocamera, in quanto potresti macchiare la lente con l'adesivo o danneggiare la fotocamera. I passaggi seguenti ti mostreranno come evitare al meglio la fotocamera anteriore.

  12. Sostituzione Schermo e Digitalizzatore iPad mini 4 LTE: passo 12, immagine 1 di 3 Sostituzione Schermo e Digitalizzatore iPad mini 4 LTE: passo 12, immagine 2 di 3 Sostituzione Schermo e Digitalizzatore iPad mini 4 LTE: passo 12, immagine 3 di 3
    • Lascia il plettro infilato nell'iPad leggermente dopo la fotocamera.

    • Prendi un secondo plettro ed infilalo a sinistra della fotocamera, dove sei già passato col primo plettro. Fallo scorrere verso l'angolo in alto a sinistra per tagliare del tutto l'adesivo rimasto.

    • Lascia il secondo plettro sotto l'angolo per evitare che l'adesivo si reincolli raffreddandosi.

  13. Sostituzione Schermo e Digitalizzatore iPad mini 4 LTE: passo 13, immagine 1 di 2 Sostituzione Schermo e Digitalizzatore iPad mini 4 LTE: passo 13, immagine 2 di 2
    • Infila il primo plettro più a fondo nell'iPad e fallo scorrere lontano dalla fotocamera, verso l'angolo.

  14. Sostituzione Schermo e Digitalizzatore iPad mini 4 LTE: passo 14, immagine 1 di 1
    • Lascia i tre plettri sotto gli angoli dell'iPad per evitare che l'adesivo si reincolli.

    • Scalda di nuovo l'iOpener e appoggialo al bordo destro dell'iPad, dove ci sono i tasti del volume e di accensione.

  15. Sostituzione Schermo e Digitalizzatore iPad mini 4 LTE: passo 15, immagine 1 di 3 Sostituzione Schermo e Digitalizzatore iPad mini 4 LTE: passo 15, immagine 2 di 3 Sostituzione Schermo e Digitalizzatore iPad mini 4 LTE: passo 15, immagine 3 di 3
    • Infila un nuovo plettro e fallo scorrere sotto il bordo destro dell'iPad, separando l'adesivo.

  16. Sostituzione Schermo e Digitalizzatore iPad mini 4 LTE: passo 16, immagine 1 di 3 Sostituzione Schermo e Digitalizzatore iPad mini 4 LTE: passo 16, immagine 2 di 3 Sostituzione Schermo e Digitalizzatore iPad mini 4 LTE: passo 16, immagine 3 di 3
    • Continua a far scorrere il plettro verso il bordo inferiore dell'iPad, riscaldandolo con un iOpener se necessario.

    • Stai attento a non infilare troppo a fondo il plettro vicino all'angolo in basso a destra, o rischi di danneggiare il cavo dello schermo.

  17. Sostituzione Schermo e Digitalizzatore iPad mini 4 LTE: passo 17, immagine 1 di 1
    • Lascia i plettri sotto gli angoli e scalda di nuovo l'iOpener.

    • Ricordati di non surriscaldare l'iOpener: non scaldarlo più di una volta ogni 10 minuti.

    • Appoggia l'iOpener riscaldato sul bordo inferiore dell'iPad, sopra il tasto Home, e lascialo lì per qualche minuto per ammorbidire l'adesivo sotto il vetro.

  18. Sostituzione Schermo e Digitalizzatore iPad mini 4 LTE: passo 18, immagine 1 di 3 Sostituzione Schermo e Digitalizzatore iPad mini 4 LTE: passo 18, immagine 2 di 3 Sostituzione Schermo e Digitalizzatore iPad mini 4 LTE: passo 18, immagine 3 di 3
    • Infila un nuovo plettro sotto l'angolo in basso a destra dello schermo, sotto l'ultimo plettro usato sotto il bordo destro.

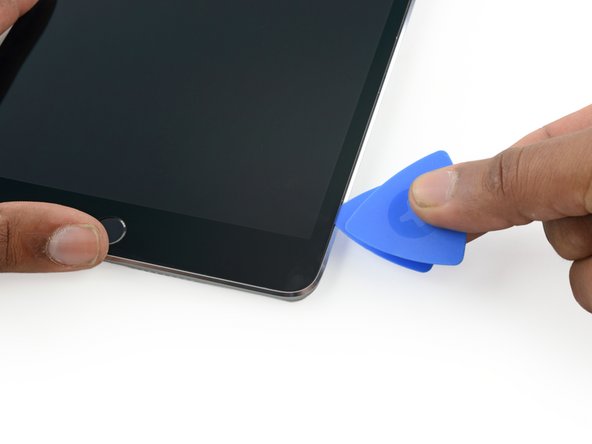
    • Ruota il nuovo plettro attorno all'angolo in basso a destra del dispositivo.

  19. Sostituzione Schermo e Digitalizzatore iPad mini 4 LTE: passo 19, immagine 1 di 2 Sostituzione Schermo e Digitalizzatore iPad mini 4 LTE: passo 19, immagine 2 di 2
    • Fai scorrere il plettro dall'angolo in basso a destra sotto il bordo inferiore del dispositivo. Fermati a circa un centimetro dal tasto Home.

  20. Sostituzione Schermo e Digitalizzatore iPad mini 4 LTE: passo 20, immagine 1 di 2 Sostituzione Schermo e Digitalizzatore iPad mini 4 LTE: passo 20, immagine 2 di 2
    • Infila un ultimo plettro sotto l'angolo in basso a sinistra dell'iPad, sotto quello già presente.

  21. Sostituzione Schermo e Digitalizzatore iPad mini 4 LTE: passo 21, immagine 1 di 2 Sostituzione Schermo e Digitalizzatore iPad mini 4 LTE: passo 21, immagine 2 di 2
    • Fai scorrere il plettro attorno all'angolo in basso a sinistra dell'iPad.

  22. Sostituzione Schermo e Digitalizzatore iPad mini 4 LTE: passo 22, immagine 1 di 3 Sostituzione Schermo e Digitalizzatore iPad mini 4 LTE: passo 22, immagine 2 di 3 Sostituzione Schermo e Digitalizzatore iPad mini 4 LTE: passo 22, immagine 3 di 3
    • Continua a far scorrere il plettro verso il centro del bordo inferiore, fino a circa un centimetro dal tasto Home.

  23. Sostituzione Schermo e Digitalizzatore iPad mini 4 LTE: passo 23, immagine 1 di 3 Sostituzione Schermo e Digitalizzatore iPad mini 4 LTE: passo 23, immagine 2 di 3 Sostituzione Schermo e Digitalizzatore iPad mini 4 LTE: passo 23, immagine 3 di 3
    • Ruota i due plettri sotto il bordo superiore dell'iPad per separare l'adesivo restante che tiene fermo lo schermo.

    • Solleva lo schermo dal bordo superiore per aprire il dispositivo.

    "Twist the two picks at the top edge of the iPadTwist the two picks at the top edge of the iPad "

    When I did this twisting motion, and I thought I was being gentle, one of the picks cracked nearly in half. That adhesive is very strong! I probably did not cut into it far enough before applying the twisting to open the screen.

    jharrison - Replica

  24. Sostituzione Schermo e Digitalizzatore iPad mini 4 LTE, Connettore Batteria: passo 24, immagine 1 di 1
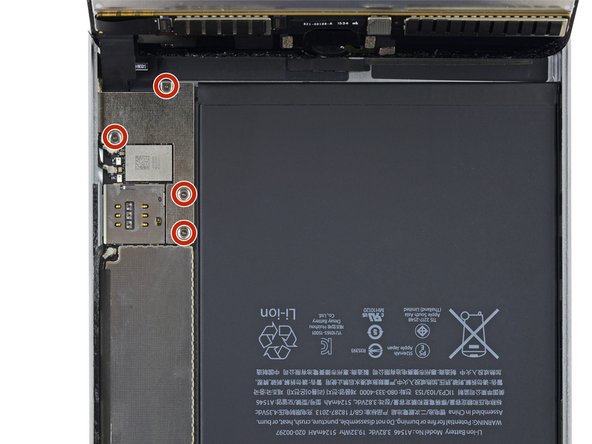
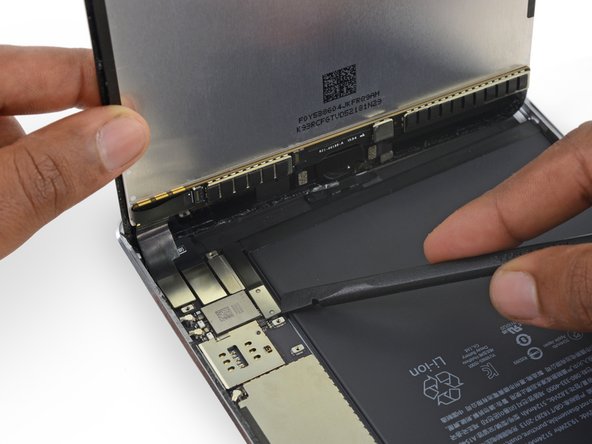
    • Per evitare di stressare i cavi, tieni saldo il gruppo schermo perpendicolarmente al corpo dell'iPad finché non sarà disconnesso.

    • Rimuovi le quattro viti Phillips da 1,2 mm sopra la staffa del connettore della batteria/schermo.

    What you need to do is move the display inboard up to the edge area of battery! That will relieve all the stress on the cables. Simply holding it straight up is not enough, especially later when you go back to reconnect the cables and the bracket over the connectors.

    Fixrights - Replica

  25. Sostituzione Schermo e Digitalizzatore iPad mini 4 LTE: passo 25, immagine 1 di 1
    • Rimuovi la staffa che copre il cavo della batteria/schermo.

    Your bracket may look different to this. Mine had a black covering on the long edge being held between the fingers in this illustration. Same screws, same position, just a different color.

    lucanos - Replica

    Is it the end of the world if the bracket is not reinstalled, will the device function normally or will it eventually have issues with the connectors coming loose following shock?

    Thomas Langford - Replica

    Note that the left had side of the bracket hooks under a lip on the edge of the case. Always recommend to replace connector brackets. If you forget and leave it out, best to buy a new set of adhesive strips for the day when the connector comes loose.

    cheongi - Replica

  26. Sostituzione Schermo e Digitalizzatore iPad mini 4 LTE: passo 26, immagine 1 di 2 Sostituzione Schermo e Digitalizzatore iPad mini 4 LTE: passo 26, immagine 2 di 2
    • Quando scolleghi qualsiasi connettore a pressione dalla scheda logica, assicurati di alzare il connettore verso l'alto per evitare di rompere il socket della scheda.

    • Usa la parte piatta dello spudger per scollegare il connettore della batteria dal suo socket sulla scheda logica.

    • Piega il cavo piatto del connettore della batteria leggermente verso l'alto per evitare che possa fare contatto e quindi accendere l'iPad.

    When i was starting to disconnect the lcd to the board i hit the black film and it lit and now even the new display wont display anything how to fix it? The black film near the lcd connector.

    tyroon_jul27 - Replica

  27. Sostituzione Schermo e Digitalizzatore iPad mini 4 LTE, Gruppo Schermo: passo 27, immagine 1 di 3 Sostituzione Schermo e Digitalizzatore iPad mini 4 LTE, Gruppo Schermo: passo 27, immagine 2 di 3 Sostituzione Schermo e Digitalizzatore iPad mini 4 LTE, Gruppo Schermo: passo 27, immagine 3 di 3
    • Usa l'estremità appuntita di uno spudger per scollegare il connettore dei dati dello schermo dal suo alloggiamento sulla scheda logica.

    • Usa l'estremità appuntita di uno spudger per scollegare il connettore del digitalizzatore dal suo alloggiamento sulla scheda logica.

    • Quando dovrai ricollegarli, premi verso il basso prima da un'estremità del connettore poi dall'altra. Se premi sulla sezione centrale del connettore, potresti piegarlo e di conseguenza danneggiarlo o non farlo aderire correttamente coi contatti.

  28. Sostituzione Schermo e Digitalizzatore iPad mini 4 LTE: passo 28, immagine 1 di 1
    • Rimuovi il gruppo schermo.

    • Per re-installare il gruppo schermo, dovrai sostituire l'adesivo che lo teneva fermo. Usa la nostra guida per l'applicazione dell'adesivo per riapplicare l'adesivo del tuo schermo e sigillare nuovamente il dispositivo.

    Ich habe eine Bücherstütze benutzt um das Display in senkrechter Position zu halten, während ich die vier Schräubchen gelöst habe.. So zieht man nicht so an den Flexkabeln….!

    Fridtjof Schüssler - Replica

    Because the 3-piece adhesive strips shown in the Display Adhesive Application Guide link were different from iPad Mini 4 Adhesive Strips (item code IF316-013-1), it wasn't easy to figure out the exact location of the bottom adhesive. It would be helpful to include a separate application guide or an additional picture showing the exact location of each strip) on the guide.

    Christian Kim - Replica

  29. Sostituzione Schermo e Digitalizzatore iPad mini 4 LTE, Gruppo tasto Home: passo 29, immagine 1 di 2 Sostituzione Schermo e Digitalizzatore iPad mini 4 LTE, Gruppo tasto Home: passo 29, immagine 2 di 2
    • Usa la punta di uno spudger per ruotare verso l'alto l'aletta di bloccaggio sul connettore ZIF del tasto Home.

  30. Sostituzione Schermo e Digitalizzatore iPad mini 4 LTE: passo 30, immagine 1 di 3 Sostituzione Schermo e Digitalizzatore iPad mini 4 LTE: passo 30, immagine 2 di 3 Sostituzione Schermo e Digitalizzatore iPad mini 4 LTE: passo 30, immagine 3 di 3
    • Usa un paio di pinzette per sfilare il cavo a nastro del tasto Home dalla sua presa ZIF.

    • Rimuovi il cavo a nastro fino alla schermatura EMI.

  31. Sostituzione Schermo e Digitalizzatore iPad mini 4 LTE: passo 31, immagine 1 di 2 Sostituzione Schermo e Digitalizzatore iPad mini 4 LTE: passo 31, immagine 2 di 2
    • Usa le pinzette per sollevare il modulo di controllo del tasto Home dal gruppo dello schermo.

  32. Sostituzione Schermo e Digitalizzatore iPad mini 4 LTE: passo 32, immagine 1 di 2 Sostituzione Schermo e Digitalizzatore iPad mini 4 LTE: passo 32, immagine 2 di 2
    • Usa un plettro per separare il cavo a nastro del tasto Home dal gruppo dello schermo.

    • Se usi uno strumento in metallo per separare questo cavo, potresti graffiare il vetro dell'iPad, rimuovendo della vernice.

  33. Sostituzione Schermo e Digitalizzatore iPad mini 4 LTE: passo 33, immagine 1 di 3 Sostituzione Schermo e Digitalizzatore iPad mini 4 LTE: passo 33, immagine 2 di 3 Sostituzione Schermo e Digitalizzatore iPad mini 4 LTE: passo 33, immagine 3 di 3
    • Usa uno strumento di apertura in plastica per fare leva sul supporto del tasto Home dal gruppo dello schermo.

    • Mentre sostituisci questo supporto, ti raccomandiamo di usare del nastro adesivo resistente per fissarlo.

    The tip about the high-bond tape is great, but high-bond tape is something that should be mentioned at the beginning in the list of supplies we need. Because I have the whole thing taken apart, and now I’m told I need something that I don’t have on hand. So what am I supposed to do, just let everything sit around open, until I get to the store to see if they have some high-bond tape?

    Robb M - Replica

  34. Sostituzione Schermo e Digitalizzatore iPad mini 4 LTE: passo 34, immagine 1 di 1
    • Scalda un iOpener e appoggialo al bordo inferiore del vetro anteriore per ammorbidire l'adesivo che tiene fermo il tasto Home.

    what is another option if you dont have heat iopener

    premal06 - Replica

    A hairdryer and much patience

    BeLeFu -

  35. Sostituzione Schermo e Digitalizzatore iPad mini 4 LTE: passo 35, immagine 1 di 2 Sostituzione Schermo e Digitalizzatore iPad mini 4 LTE: passo 35, immagine 2 di 2
    • Il tasto Home è tenuto fermo da una sottile e delicata guarnizione in gomma che è leggermente incollata al vetro anterioire.

    • Spingi lentamente il tasto Home verso l'alto e fuori dal gruppo dello schermo per separare la guarnizione dal vetro.

    • Stai attento a non tirare la guarnizione fino a strapparla. Se l'adesivo è caldo a sufficienza, si separerà dal vetro con una leggera pressione.

  36. Sostituzione Schermo e Digitalizzatore iPad mini 4 LTE: passo 36, immagine 1 di 1
    • Rimuovi il gruppo del tasto Home.

    What is the proper way to reinstall the home button bracket?

    chris crawford - Replica

  37. Sostituzione Schermo e Digitalizzatore iPad mini 4 LTE, Schermo e Digitizer: passo 37, immagine 1 di 3 Sostituzione Schermo e Digitalizzatore iPad mini 4 LTE, Schermo e Digitizer: passo 37, immagine 2 di 3 Sostituzione Schermo e Digitalizzatore iPad mini 4 LTE, Schermo e Digitizer: passo 37, immagine 3 di 3
    • Analizza la tua componente nuova e il tuo schermo originale per essere sicuro che siano compatibili.

    • Il tuo schermo nuovo potrebbe non essere dotato dei sensori sleep/wake necessari per la Smart Cover. Se vuoi continuare ad avere questa funzionalità dovrai trasferire i componenti necessari.

    • Dissalda i sei collegamenti dalla parte inferiore sinistra dello schermo per rimuovere il gruppo di sensori.

    This is an important step that’s missed by a lot of people resulting in negative reviews on replacement screens. Screen suppliers never mention this step or people would not buy from them. Save yourself a headache and time and buy a screen-digitizer with the sleep/wake sensor already soldered.

    Thomas Tommy - Replica

    Is there any reason to replace this if you won’t use it? If I don’t move over the old sensor, will it still work? I’ve never soldered something this small and expensive before.

    drumminherbie - Replica

    hab es ohne gemacht, da es auch keine lötstellen gibt - seither gibt es gar keine Standyby funktion mehr!

    junk - Replica

    LÖSUNG: in den Systemeinstellungen “anzeige und Helligkeit” Sperren/entsperren deaktivieren.

    junk -

    Was meinst du damit “weil es keine Lötstellen gibt”? Sind auf deinem neuen Display keine Lötstellen gewesen wo du den Sensor hättest dran löten können?

    Funktioniert dein Lösungsweg für dich noch: “anzeige und Helligkeit” Sperren/entsperren deaktivieren“ ?

    Ich stehe vor der gleichen Herausforderung und will ungern löten und würde mich über eine Antwort freuen :/

    eugen_roth -

    This is something that should be mentioned in the beginning of the article, or even as a *warning, so people know what they’re getting into PRIOR to taking the entire iPad apart.

    Robb M - Replica

    I replace my iPad mini 4 screen-digitizer and did not have to replace this sensor because it did not have one, but the new screen-digitizer came with the sleep/wake sensor in place. Small electronics needs careful and tedious work. Thanks iFixit for the instructions to fix my iPad. I have to mention that I am a technician from the old school.

    wogriffith - Replica

    What is the name of this component? I left this out and now the smart cover isn't working. T.T

    이규한 - Replica

Conclusione

Per riassemblare il dispositivo, segui le istruzioni nell'ordine inverso.

Altre 42 persone hanno completato questa guida.

Un ringraziamento speciale a questi traduttori:

en it

100%

Questi traduttori ci stanno aiutando ad aggiustare il mondo! Vuoi partecipare?
Inizia a tradurre ›

Evan Noronha

Membro da: 02/05/15

223.412 Reputazione

168 Guide realizzate

3 Commenti

Please post a caution about the home button ribbon cable. I was removing it from an extremely damaged screen and I accidentally slightly ripped it. Now I’m not sure what to do :( If I had known about the problems associated with changing a touch ID home button I would have been 100x more cautious but I’ve only ever had to fix my Mini 2 before so this wasn’t an issue.

Patrick Giordano - Replica

I have an iFixit replacement screen (C-stock) that has some existing adhesive already on it, but there are a few parts of the adhesive that are folded over on itself. I also have replacement adhesive. Two questions:

Should I replace the existing, possibly-worn adhesive with new adhesive, or is it better to stay with the already-applied adhesive?

Should I warm up the adhesive when I’m applying the screen back onto the body? Or should I keep it room-temperature?

Michael Innes - Replica

Just want to say Thank you for for the guide and what i can only describe as the perfect pctures to go along! Nice1

phill baker - Replica

Aggiungi Commento

Visualizza Statistiche:

Ultime 24 Ore: 10

Ultimi 7 Giorni: 74

Ultimi 30 Giorni: 313

Tutti i Tempi: 79,868