Questa versione può contenere modifiche errate. Passa all'ultima istantanea verificata.
Cosa ti serve
-
-
Se il tuo vetro è in pezzi, evita di romperlo ulteriormente e di tagliarti con le schegge coprendolo con del nastro adesivo.
-
Applica delle strisce di nastro adesivo trasparente da pacchi sul vetro, una sopra l'altra, finché è completamente coperto.
-
Fai del tuo meglio per seguire il resto della guida come descritto. Comunque, una volta rotto il vetro, continuerà a rompersi mentre ci lavori e potresti dover usare uno strumento di apertura in metallo per rimuovere il vetro.
-
-
-
Infila uno spudger di metallo tra il bordo superiore del gruppo dello schermo e la scocca.
-
Ruota lo spudger lontano da te per sganciare le clip lungo il bordo superiore dello schermo.
-
Infila un secondo spudger di metallo tra il bordo superiore dello schermo e la scocca per evitare che i ganci si richiudano.
-
-
-
Con uno spudger, procedi lungo il bordo destro dell'iPad.
-
Lo schermo è tenuto fermo dai ganci metallici lungo i bordi superiore, inferiore e sinistro. Il bordo destro ha delle clip in plastica che fanno presa direttamente sulla scocca.
-
Una volta rilasciati i ganci, solleva il bordo sinistro dello schermo e fallo scorrere verso sinistra per liberare i ganci dalla scocca in alluminio.
-
-
-
Questo passaggio è privo di traduzione. Aiuta a tradurlo
-
Use the edge of a plastic opening tool to carefully pry the ambient light sensor board off the adhesive securing it to the display frame.
-
Once you've gained enough clearance, peel the ambient light sensor off the LCD.
-
-
Questo passaggio è privo di traduzione. Aiuta a tradurlo
-
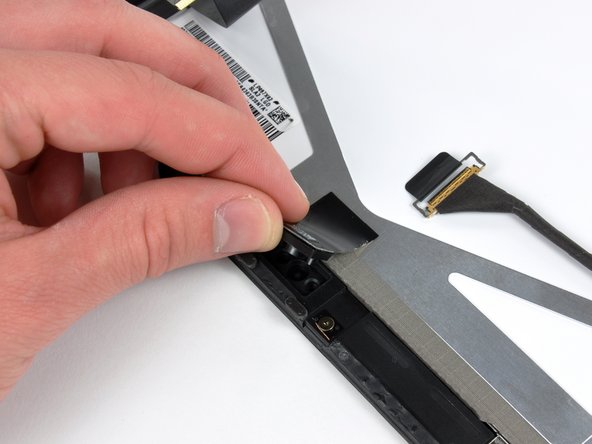
While holding the digitizer cable down, carefully peel back the piece of tape connecting the digitizer cable to the display frame.
-
-
Questo passaggio è privo di traduzione. Aiuta a tradurlo
-
Remove the three T5 Torx screws securing the clips and LCD brackets covered in EMI tape near the home button switch.
-
Carefully peel the display clip and its attached tape off the black plastic display frame.
-
-
Questo passaggio è privo di traduzione. Aiuta a tradurlo
-
Remove the remaining T5 Torx screws securing the LCD to the black plastic display frame.
-
-
Questo passaggio è privo di traduzione. Aiuta a tradurlo
-
Insert the edge of a plastic opening tool under one of the ears attached to the steel LCD frame.
-
Twist the plastic opening tool to gently pry the LCD up off the adhesive securing it to the front glass panel.
-
-
Questo passaggio è privo di traduzione. Aiuta a tradurlo
-
Repeat the process detailed on the previous step to pry up the display around the three sides opposite the digitizer cable side of the display.
-
-
Questo passaggio è privo di traduzione. Aiuta a tradurlo
-
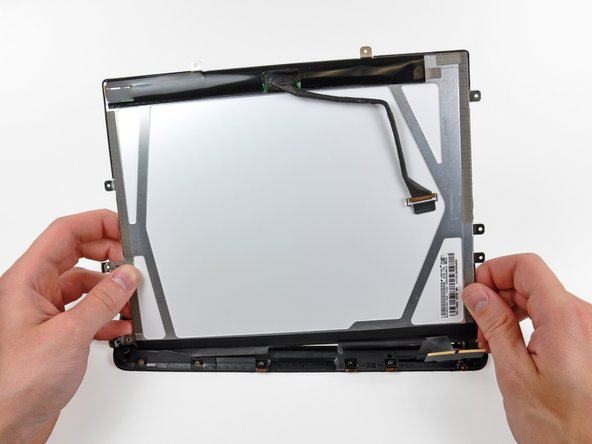
Lift the LCD from its free end, and remove it from the display frame.
-
Carefully peel the adhesive securing the long side of the LCD to the display frame, then remove the LCD.
-
-
Questo passaggio è privo di traduzione. Aiuta a tradurlo
-
If it is still stuck to the front panel, remove the strip of EMI tape near the ambient light sensor socket.
-
-
Questo passaggio è privo di traduzione. Aiuta a tradurlo
-
If they are still in good shape, transfer the clips and EMI tape near the bottom of the LCD to your new LCD.
-


Annulla: non ho completato questa guida.
Altre 79 persone hanno completato questa guida.

4 Commenti
So what if ive snapped off one of the retaining flaps? Ive seen in the past when ive snapped them off before i could just plug it in, slap on some kapton tape and it was fine. This time i cant get the bottom of the digitizer to work on new glass. I put on the old glass and the bottom works just fine. the bottom flap is the one that broke, but why would the old glass work just fine, but the new glass does nothing on the bottom half?
Just replaced my lcd using this guide. Not easy, but doable. Took about an hour and a half. broke about half of the clips that hold the assembly in, but moved the remaining ones around so that it is secure. I recommend buying replacement clips if you aren't comfortable with that. Also, this guide says to use a Torx T5 screwdriver. Other sites say T4. It is most definitely T5. I bought the wrong one first and had to get a new one. Home Depot has an 8 in 1 Torx tool for 6 bucks that is great. Thank you iFixit for saving me hundreds that I would have spent on a new iPad!
Don't worry about buying more replacment clips -- if you still have them on the left edge, not having the clips on the top and bottom isn't noticeable.
Styg -
When reassembling at the last step (inserting the screen assembly into the back cover), do NOT simply do the reverse of what you did to take it out. Instead, insert the right edge first (with the plastic tabs). The metal tabs on the left edge (and top and bottom edges if you have any left) are flexible, so it is very easy to snap the left edge of the screen into the back cover AFTER the right edge is in place. If you put the left edge in first, you'll have a much tougher time trying to get the plastic tabs on the right edge into back cover.