Salta al contenuto principale

iPad Mini CDMA Small Metal Bracket Replacement

Solo Prerequisita
Questa guida è destinata a essere usata solo come prerequisito per altre guide. Da sola è incompleta.

Cosa ti serve

  1. iPad Mini CDMA Small Metal Bracket Replacement, Small Metal Bracket: passo 1, immagine 1 di 3 iPad Mini CDMA Small Metal Bracket Replacement, Small Metal Bracket: passo 1, immagine 2 di 3 iPad Mini CDMA Small Metal Bracket Replacement, Small Metal Bracket: passo 1, immagine 3 di 3
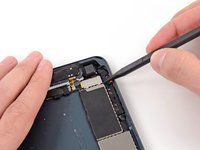
    • Use the tip of a spudger to start peeling up the right side of the black tape covering the small metal bracket.

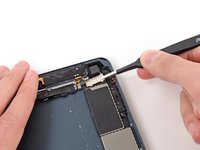
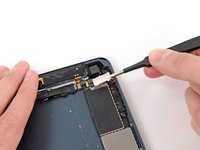
    • Use tweezers to peel the tape up the rest of the way, and remove it from the bracket.

  2. iPad Mini CDMA Small Metal Bracket Replacement: passo 2, immagine 1 di 2 iPad Mini CDMA Small Metal Bracket Replacement: passo 2, immagine 2 di 2
    • Use a plastic opening tool to push the bracket slightly to the left.

  3. iPad Mini CDMA Small Metal Bracket Replacement: passo 3, immagine 1 di 2 iPad Mini CDMA Small Metal Bracket Replacement: passo 3, immagine 2 di 2
    • Use a spudger tip to lift up the lower side of the bracket.

  4. iPad Mini CDMA Small Metal Bracket Replacement: passo 4, immagine 1 di 2 iPad Mini CDMA Small Metal Bracket Replacement: passo 4, immagine 2 di 2
    • Remove the bracket with tweezers.

    • During reassembly, hook the top edge of the plate in place first, then lower the bottom into its slots.

Conclusione

To reassemble your device, follow these instructions in reverse order.

0 Commenti

Aggiungi Commento

Visualizza Statistiche:

Ultime 24 Ore: 0

Ultimi 7 Giorni: 0

Ultimi 30 Giorni: 0

Tutti i Tempi: 111