Salta al contenuto principale

iPad Mini CDMA Front Facing Camera Cable Replacement

Solo Prerequisita
Questa guida รจ destinata a essere usata solo come prerequisito per altre guide. Da sola รจ incompleta.

Cosa ti serve

  1. iPad Mini CDMA Front Facing Camera Cable Replacement, Front Facing Camera Cable: passo 1, immagine 1 di 2 iPad Mini CDMA Front Facing Camera Cable Replacement, Front Facing Camera Cable: passo 1, immagine 2 di 2
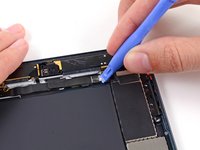
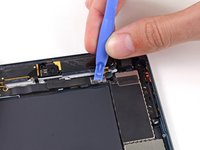
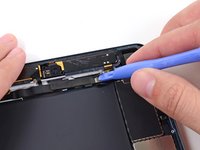
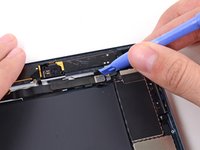
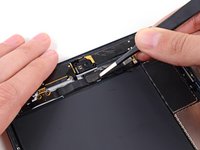
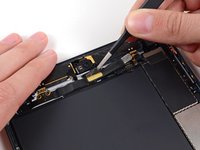
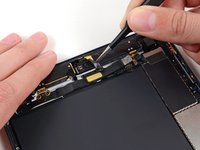
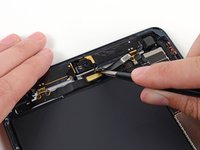
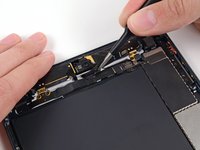
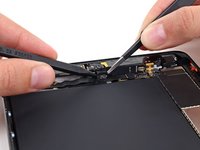
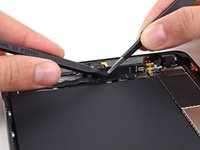
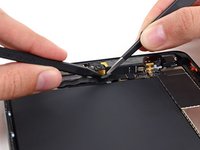
    • Use a pair of tweezers to peel up and remove the small piece of tape covering the front-facing camera cable connector.

  2. iPad Mini CDMA Front Facing Camera Cable Replacement: passo 2, immagine 1 di 1
    • The front-facing camera cable connector is secured with pieces of tape that wrap up around the sides of the cable and are fastened to two small metal plates.

    • In the next two steps, you will be prying the two metal plates up and out from the center of the cable.

  3. iPad Mini CDMA Front Facing Camera Cable Replacement: passo 3, immagine 1 di 3 iPad Mini CDMA Front Facing Camera Cable Replacement: passo 3, immagine 2 di 3 iPad Mini CDMA Front Facing Camera Cable Replacement: passo 3, immagine 3 di 3
    • Use a plastic opening tool to gently pry the lower metal plate up from the front-facing camera cable connector.

    • Being careful not to break the plate or the tape attached to it, pry it up and fold it away from the front-facing camera cable connector.

  4. iPad Mini CDMA Front Facing Camera Cable Replacement: passo 4, immagine 1 di 3 iPad Mini CDMA Front Facing Camera Cable Replacement: passo 4, immagine 2 di 3 iPad Mini CDMA Front Facing Camera Cable Replacement: passo 4, immagine 3 di 3
    • Gently pry the second metal plate up from the front-facing camera cable connector.

    • Again, carefully pry the plate up and away from the front-facing camera cable connector.

  5. iPad Mini CDMA Front Facing Camera Cable Replacement: passo 5, immagine 1 di 2 iPad Mini CDMA Front Facing Camera Cable Replacement: passo 5, immagine 2 di 2
    • Use a plastic opening tool to pry the front-facing camera cable's connector up from its socket on the logic board.

  6. iPad Mini CDMA Front Facing Camera Cable Replacement: passo 6, immagine 1 di 3 iPad Mini CDMA Front Facing Camera Cable Replacement: passo 6, immagine 2 di 3 iPad Mini CDMA Front Facing Camera Cable Replacement: passo 6, immagine 3 di 3
    • Use a pair of tweezers to peel up the top of the rectangular piece of tape covering the bend in the front-facing camera cable.

    • Do not try to remove the tape, as it is connected below the cable.

    • Bend the tape up out of the way of the front-facing camera cable.

  7. iPad Mini CDMA Front Facing Camera Cable Replacement: passo 7, immagine 1 di 2 iPad Mini CDMA Front Facing Camera Cable Replacement: passo 7, immagine 2 di 2
    • Gently fold the front-facing camera cable upwards (roughly at a 90-degree angle), exposing the bottom side of it.

  8. iPad Mini CDMA Front Facing Camera Cable Replacement: passo 8, immagine 1 di 3 iPad Mini CDMA Front Facing Camera Cable Replacement: passo 8, immagine 2 di 3 iPad Mini CDMA Front Facing Camera Cable Replacement: passo 8, immagine 3 di 3
    • While holding the front-facing camera cable up, use the tip of a spudger to separate the piece of tape adhered to the bottom side of the corner of the cable.

    • The tape is folded in half to attach to both the underside of the front-facing camera cable and the top side of the cable directly beneath it (headphone jack cable).

Conclusione

To reassemble your device, follow these instructions in reverse order.

0 Commenti

Aggiungi Commento

Visualizza Statistiche:

Ultime 24 Ore: 0

Ultimi 7 Giorni: 0

Ultimi 30 Giorni: 0

Tutti i Tempi: 594