Introduzione
Segui questa guida per sostituire le strisce adesive e richiudere il tuo iPad 4.
Da utilizzare solo per un gruppo del vetro anteriore ORIGINALE.
Cosa ti serve
-
-
Svita le due viti a croce Phillips #00 da 2,1 mm che fissano la scheda di controllo del tasto Home alla sua staffa di montaggio.
-
-
-
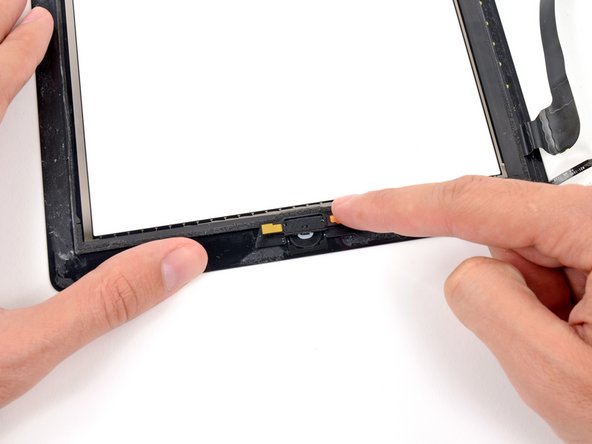
Infila la parte piatta di uno strumento di apertura in plastica tra l'estremità destra della scheda di controllo del tasto Home e la sua staffa di montaggio.
-
Spingi lo strumento di apertura in plastica verso il basso per separare l'adesivo che fissa la scheda di controllo del tasto Home e la sua staffa di montaggio.
-
-
-
-
Nei prossimi passaggi, applicherai i pezzi rimanenti dell'adesivo sul vetro anteriore.
-
Non rimuovere ancora la protezione trasparente dalle strisce.
-
Appoggia la striscia adesiva a forma di ponte tra il bordo superiore della cornice interna del pannello anteriore e la staffa di montaggio della fotocamera.
-
Appiattisci la striscia dal centro verso l'esterno, stando attento a non far formare delle bolle tra la striscia stessa e il pannello.
-
-
-
Usa un paio di pinzette per rimuovere la protezione trasparente dalla striscia adesiva sotto il cavo a nastro del tasto Home.
-
Appoggia il cavo a nastro del tasto Home sulla striscia adesiva ed appiattiscilo dal centro verso l'esterno, stando attento a non far formare bolle tra la striscia e il cavo.
-
-
-
Usa un panno in microfibra asciutto per pulire il pannello LCD e l'interno del vetro anteriore. Potresti usare dell'aria compressa o un compressore per soffiare via la polvere.
-
Usa un paio di pinzette per rimuovere la protezione trasparente dalle strisce adesive.
Just anted to remind everyone to connect all your cables BEFORE sticking the screen down!!
…before attaching the LCD, in fact.
To go a step further in caution, leave the backing on the adhesive strips, attach all the cables (and replace the tape over them if you like), making sure all of the motherboard screws are in place. Then lay the LCD on top (without screwing it down), lay the glass on top of that, and TEST. Make sure you have full LCD and digitizer function. If not, do a hard reset and test again. If still not, dismantle everything and re-check the cables—they should be fully inserted (usually the white line should not show at all), with their latches down and no sharp crimps. It’s surprising how small a change in digitizer insertion can make a black screen suddenly function just fine.
-


Per rimontare il tuo dispositivo, segui le istruzioni in ordine inverso.
Per rimontare il tuo dispositivo, segui le istruzioni in ordine inverso.
Annulla: non ho completato questa guida.
Altre 18 persone hanno completato questa guida.
Un ringraziamento speciale a questi traduttori:
100%

Questi traduttori ci stanno aiutando ad aggiustare il mondo! Vuoi partecipare?
Inizia a tradurre ›

I have just replaced the adhesive on an iPad 4 and did not need to remove and replace the home button. There seemed no reason to remove the button because the adhesive strips did not encroach on the button mount. Removing adhesive is aided by rubbing it with iso propyl alcohol (rubbing alcohol) after striping back the plastic film that covers it. It would be nice if the adhesive would come away with the plastic film but this does not happen even with gentle heat. If you use shart instruments to remove the adhesive its very easy to damage the underlying paint.
geoffrey - Replica