Questa versione può contenere modifiche errate. Passa all'ultima istantanea verificata.
Cosa ti serve
-
-
Riempi una pentola o una padella con abbastanza acqua per immergerci un iOpener.
-
Scalda l'acqua finché non bolle. Spegni il fuoco.
-
Posiziona l'iOpener nell'acqua calda per 2-3 minuti. Assicurati che l'iOpener sia completamente immerso nell'acqua.
-
Usa delle pinze per estrarre l'iOpener scaldato dall'acqua calda.
-
Asciuga accuratamente l'iOpener con un asciugamano.
-
Il tuo iOpener è pronto all'uso! Se devi scaldare di nuovo l'iOpener, scalda l'acqua fino all'ebollizione, spegni il fuoco e immergi l'iOpener in acqua per 2-3 minuti.
-
-
-
Se il vetro dello schermo è crepato, previeni ulteriori rotture e danni fisici durante la riparazione coprendo lo schermo con del nastro adesivo trasparente.
-
Sovrapponi strisce di nastro adesivo trasparente per coprire tutta la superficie dello schermo dell´iPad.
-
Fai del tuo meglio per seguire il resto della guida, come descritta. In ogni caso, uno schermo crepato continuerà probabilmente a danneggiarsi durante la riparazione e, perciò potrebbe essere necessario utilizzare uno strumento metallico per estrarre il vetro.
-
-
-
C'è una piccola fessura nell'anello adesivo dell'iPad nell'angolo in alto a destra, a circa 5 cm dal bordo superiore. Dovrai sfruttare questa debolezza.
-
Allinea lo strumento con il tasto del muto. Infila la punta di uno uno strumento di apertura in plastica nella fessura tra il vetro anteriore e il bordo in plastica. Infila solo la punta dello strumento, solo abbastanza per allargarla.
-
-
-
Una volta superata l'antenna WiFi (a circa da 75 mm dal bordo destro, o accanto al tasto Home), reinfila il plettro completamente.
-
Fai scorrere il plettro verso destra, rilasciando l'adesivo che fissa l'antenna WiFi al vetro anteriore.
-
L'antenna del WiFi è attaccata al bordo inferiore dell'iPad tramite delle viti e un cavo. Questo passaggio separa l'antenna dal pannello anteriore, assicurando che quando lo rimuoverai l'antenna non verrà danneggiata.
-
-
-
-
Fai scorrere il plettro sotto il bordo superiore dell'iPad, sfilandolo leggermente per aggirare la staffa della fotocamera anteriore.
-
L'adesivo in questa zona è molto spesso e può essere richiesta abbastanza forza. Lavora attentamente e lentamente, assicurandoti di non scivolare e danneggiare te stesso o l'iPad.
-
-
Questo passaggio è privo di traduzione. Aiuta a tradurlo
-
Remove the four 2 mm Phillips #00 screws securing the LCD to the aluminum frame.
-
-
Questo passaggio è privo di traduzione. Aiuta a tradurlo
-
Using a plastic opening tool or a spudger, lift the right edge of the LCD out of the iPad.
-
Rotate the LCD along its left edge and lay it down on top of the front panel.
-
-
Questo passaggio è privo di traduzione. Aiuta a tradurlo
-
Using the tip of a spudger, peel back the piece of tape covering the LCD ribbon cable connector.
-
-
Questo passaggio è privo di traduzione. Aiuta a tradurlo
-
Flip up the retaining flap on the LCD ribbon cable ZIF connector.
-
Using your fingers or a pair of tweezers, pull the LCD ribbon cable from its socket on the logic board.
-
-
Questo passaggio è privo di traduzione. Aiuta a tradurlo
-
Without touching the front of the LCD, lift the LCD off the front panel.
-
-
Questo passaggio è privo di traduzione. Aiuta a tradurlo
-
Flip up the retaining flap on both of the digitizer ribbon cable ZIF connectors.
-
-
Questo passaggio è privo di traduzione. Aiuta a tradurlo
-
Use the flat end of a spudger to loosen the adhesive underneath the digitizer ribbon cable.
-
Very carefully pull the digitizer ribbon cable straight out of its sockets on the logic board.
-
-
Questo passaggio è privo di traduzione. Aiuta a tradurlo
-
Peel back the digitizer ribbon cable and use the flat end of a spudger to release the adhesive securing the cable to the rear aluminum case.
-
-
Questo passaggio è privo di traduzione. Aiuta a tradurlo
-
Using your fingers, pull the digitizer ribbon cable out of its recess in the aluminum frame.
-
Remove the front panel from the iPad.
-
-
Questo passaggio è privo di traduzione. Aiuta a tradurlo
-
Peel back and remove the piece of electrical tape covering the headphone jack assembly cable connector.
-
Using the tip of a spudger, flip up the retaining flap on both of the ZIF connectors securing the headphone jack cable to the logic board.
-
-
Questo passaggio è privo di traduzione. Aiuta a tradurlo
-
Slide the flat end of a spudger underneath the headphone jack assembly cable, releasing the adhesive securing it to the rear aluminum frame.
-
Pull the headphone jack assembly cable straight out of its socket on the logic board.
-
-
Questo passaggio è privo di traduzione. Aiuta a tradurlo
-
Peel back and remove the adhesive tape covering the headphone jack assembly.
-
-
Questo passaggio è privo di traduzione. Aiuta a tradurlo
-
Using the flat end of a spudger, pry the front-facing camera connector off of its socket on the headphone jack assembly.
-
Slide the spudger to the right, releasing the adhesive holding down the camera cable.
-
-
Questo passaggio è privo di traduzione. Aiuta a tradurlo
-
Using the tip of a spudger, flip up the retaining flap on the microphone cable ZIF connector.
-
-
Questo passaggio è privo di traduzione. Aiuta a tradurlo
-
Insert the tip of the spudger underneath the microphone ribbon cable, removing it from its ZIF connector.
-
Slide the spudger to the left, releasing the adhesive holding the microphone ribbon cable to the headphone jack assembly.
-
-
Questo passaggio è privo di traduzione. Aiuta a tradurlo
-
Flip up the retaining flap securing the volume/power button ribbon cable connector to the headphone jack assembly board.
-
Remove the volume button ribbon cable from its ZIF connector.
-
-
Questo passaggio è privo di traduzione. Aiuta a tradurlo
-
Remove the following screws from the headphone jack assembly:
-
Five 2.6 mm Phillips #0
-
Two 2.0 mm Wide Head Phillips #00
-
Two 2.6 mm Phillips #00
-
-
Questo passaggio è privo di traduzione. Aiuta a tradurlo
-
Gently peel the headphone jack assembly ribbon cable up from the foam pad in the top left of the rear case.
-
If necessary, use the flat end of a spudger to loosen the adhesive securing the ribbon cable to the foam.
-
-
Questo passaggio è privo di traduzione. Aiuta a tradurlo
-
Grasping the headphone jack assembly with both hands, pull the assembly from the iPad, minding any cables that may get caught.
-
-
Questo passaggio è privo di traduzione. Aiuta a tradurlo
-
Remove the following screws securing the power & volume button cable to the aluminum frame:
-
Two 5.5mm Phillips #0
-
One 2.6 mm Phillips #0
-
Two 2.6 mm Phillips #0
-
-
Questo passaggio è privo di traduzione. Aiuta a tradurlo
-
Remove the piece of plastic covering the volume buttons.
-
-
Questo passaggio è privo di traduzione. Aiuta a tradurlo
-
Remove the single 2.6 mm Phillips #00 screw holding the volume button frame to the aluminum frame.
-
-
Questo passaggio è privo di traduzione. Aiuta a tradurlo
-
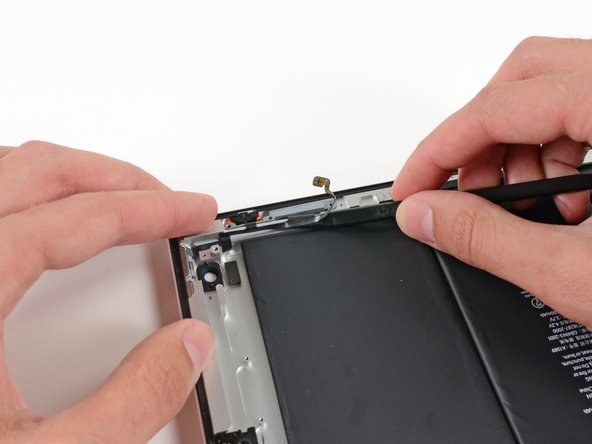
Wedge the edge of a plastic opening tool underneath the sleep/wake sensor, being careful to not damage the fragile cable.
-
Move the plastic opening tool around the sensor, releasing the adhesive.
-
-
Questo passaggio è privo di traduzione. Aiuta a tradurlo
-
Continue sliding the plastic opening tool underneath the power & volume cables, releasing the adhesive.
-
-
Questo passaggio è privo di traduzione. Aiuta a tradurlo
-
Using the tip of a spudger, release the adhesive underneath the volume button branch of the ribbon cable.
-
-
Questo passaggio è privo di traduzione. Aiuta a tradurlo
-
Continue sliding the tip of the spudger toward the top of the iPad, releasing the adhesive.
-
-
Questo passaggio è privo di traduzione. Aiuta a tradurlo
-
With the tip of the spudger still underneath the ribbon cable, gently lift the power button out of its socket in the aluminum frame.
-
-
Questo passaggio è privo di traduzione. Aiuta a tradurlo
-
Holding the power & volume button cable with with both hands, carefully pull the volume buttons and lock switch from their sockets in the aluminum frame.
-
Lift and remove the power & volume button cable out of the rear aluminum case.
-
-
Questo passaggio è privo di traduzione. Aiuta a tradurlo
-
Using the spudger to help guide it out of the iPad, push the mute/lock switch out of its recess in the aluminum frame.
-
Lift and remove the mute/lock switch out of the rear aluminum case.
-


Un commento
I just got finished with replacing the power/mute/volume assembly in a wifi ipad 3, and I did not find that removing the headphone jack assembly was necessary. Just unscrew the rear camera so you can pivot it out of the way of the power switch, but it can stay connected via its ribbon cable.
Also, when reassembling I found that I needed to be careful about over-tightening the screws around all three buttons. If they were too tight they wouldn't click properly.