Questa versione può contenere modifiche errate. Passa all'ultima istantanea verificata.
Cosa ti serve
-
-
Riempi una pentola o una padella con abbastanza acqua per immergerci un iOpener.
-
Scalda l'acqua finché non bolle. Spegni il fuoco.
-
Posiziona l'iOpener nell'acqua calda per 2-3 minuti. Assicurati che l'iOpener sia completamente immerso nell'acqua.
-
Usa delle pinze per estrarre l'iOpener scaldato dall'acqua calda.
-
Asciuga accuratamente l'iOpener con un asciugamano.
-
Il tuo iOpener è pronto all'uso! Se devi scaldare di nuovo l'iOpener, scalda l'acqua fino all'ebollizione, spegni il fuoco e immergi l'iOpener in acqua per 2-3 minuti.
-
-
-
Se il vetro dello schermo è crepato, previeni ulteriori rotture e danni fisici durante la riparazione coprendo lo schermo con del nastro adesivo trasparente.
-
Sovrapponi strisce di nastro adesivo trasparente per coprire tutta la superficie dello schermo dell´iPad.
-
Fai del tuo meglio per seguire il resto della guida, come descritta. In ogni caso, uno schermo crepato continuerà probabilmente a danneggiarsi durante la riparazione e, perciò potrebbe essere necessario utilizzare uno strumento metallico per estrarre il vetro.
-
-
-
C'è una piccola fessura nell'anello adesivo dell'iPad nell'angolo in alto a destra, a circa 5 cm dal bordo superiore. Dovrai sfruttare questa debolezza.
-
Allinea lo strumento con il tasto del muto. Infila la punta di uno uno strumento di apertura in plastica nella fessura tra il vetro anteriore e il bordo in plastica. Infila solo la punta dello strumento, solo abbastanza per allargarla.
-
-
-
Una volta superata l'antenna WiFi (a circa da 75 mm dal bordo destro, o accanto al tasto Home), reinfila il plettro completamente.
-
Fai scorrere il plettro verso destra, rilasciando l'adesivo che fissa l'antenna WiFi al vetro anteriore.
-
L'antenna del WiFi è attaccata al bordo inferiore dell'iPad tramite delle viti e un cavo. Questo passaggio separa l'antenna dal pannello anteriore, assicurando che quando lo rimuoverai l'antenna non verrà danneggiata.
-
-
-
Fai scorrere il plettro sotto il bordo superiore dell'iPad, sfilandolo leggermente per aggirare la staffa della fotocamera anteriore.
-
L'adesivo in questa zona è molto spesso e può essere richiesta abbastanza forza. Lavora attentamente e lentamente, assicurandoti di non scivolare e danneggiare te stesso o l'iPad.
-
-
-
-
Svita le quattro viti a croce Phillips #00 da 2 mm che fissano il pannello LCD alla cornice in alluminio.
-
-
-
Usando la punta di uno spudger, rimuovi il pezzo di nastro che copre il connettore del cavo a nastro del pannello LCD.
-
-
Questo passaggio è privo di traduzione. Aiuta a tradurlo
-
Using the tip of a spudger, peel back the piece of tape that secures the touchscreen ribbon cable to the logic board.
-
-
Questo passaggio è privo di traduzione. Aiuta a tradurlo
-
Flip up the retaining flap on both of the touchscreen ribbon cable ZIF connectors.
-
-
Questo passaggio è privo di traduzione. Aiuta a tradurlo
-
Use the flat end of a spudger to loosen the adhesive underneath the digitizer ribbon cable.
-
Pull the digitizer ribbon cable straight out of its sockets on the logic board.
-
-
Questo passaggio è privo di traduzione. Aiuta a tradurlo
-
Peel back the touchscreen ribbon cable and use the flat end of a spudger to release the adhesive securing the cable to the rear aluminum case.
-
-
Questo passaggio è privo di traduzione. Aiuta a tradurlo
-
Using your fingers, pull the touchscreen ribbon cable out of its recess in the aluminum frame.
-
Remove the front panel from the iPad.
-
-
Questo passaggio è privo di traduzione. Aiuta a tradurlo
-
Disconnect the following connectors from their respective sockets on the logic board:
-
Wi-Fi antenna cable
-
Speaker connector cable.
-
Dock connector cable.
-
-
Questo passaggio è privo di traduzione. Aiuta a tradurlo
-
Peel back and remove the piece of electrical tape covering the headphone jack assembly cable connector.
-
Using the tip of a spudger, flip up the retaining flap on both of the ZIF connectors securing the headphone jack cable to the logic board.
-
-
Questo passaggio è privo di traduzione. Aiuta a tradurlo
-
Slide the flat end of a spudger underneath the headphone jack assembly cable, releasing the adhesive securing it to the rear aluminum frame.
-
Pull the headphone jack assembly cable straight out of its socket on the logic board.
-
-
Questo passaggio è privo di traduzione. Aiuta a tradurlo
-
Peel back and remove the piece of tape covering the SIM board cable ZIF connector.
-
Flip up the retaining flap on the SIM board cable ZIF connector.
-
Using the tip of a spudger, pull the SIM board cable straight out of its socket on the logic board.
-
-
Questo passaggio è privo di traduzione. Aiuta a tradurlo
-
Remove the following seven screws securing the logic board to the rear aluminum panel.
-
Six 2.1mm Phillips #00
-
One 2.5mm Phillips #00
-
-
Questo passaggio è privo di traduzione. Aiuta a tradurlo
-
Holding the logic board by the side nearest the dock connector, carefully pull the logic board toward the bottom of the iPad.
-
-
Questo passaggio è privo di traduzione. Aiuta a tradurlo
-
Flip the logic board over, minding any cables that may get caught.
-
Using the tip of a spudger, remove the three antenna connectors from their sockets on the logic board.
-
-
Questo passaggio è privo di traduzione. Aiuta a tradurlo
-
The battery is very firmly glued to the aluminum frame using copious amounts of strong adhesive.
-
-
Questo passaggio è privo di traduzione. Aiuta a tradurlo
-
Insert the flat end of a metal spudger underneath the battery near the bottom of the iPad.
-
Slide the metal spudger approximately 1.5" underneath the battery, releasing the adhesive.
-
-
Questo passaggio è privo di traduzione. Aiuta a tradurlo
-
In the same manner as described above, slide the spudger ~2" underneath the other adhesive strips.
-
-
Questo passaggio è privo di traduzione. Aiuta a tradurlo
-
Carefully slide the metal spudger underneath the battery connector, releasing the adhesive securing it in place.
-
-
Questo passaggio è privo di traduzione. Aiuta a tradurlo
-
Continue releasing the adhesive near the top of the battery.
-
-
Questo passaggio è privo di traduzione. Aiuta a tradurlo
-
Starting where the last pass left off, insert the metal spudger another two inches underneath the battery.
-
Repeat this process for the remaining adhesive strips.
-
-
Questo passaggio è privo di traduzione. Aiuta a tradurlo
-
In the same manner as previously described, continue loosening the adhesive on all the strips to a depth of ~4".
-
-
Questo passaggio è privo di traduzione. Aiuta a tradurlo
-
For the last pass, push the metal spudger all the way to the right edge of the iPad.
-
Continue to do this for all of the adhesive strips.
-
-
Questo passaggio è privo di traduzione. Aiuta a tradurlo
-
Make sure that all the adhesive glue has been loosed from the battery.
-
Gently lift the left side of the battery up, rotating it toward the right side of the iPad.
-
Remove the battery from the iPad.
-
-
Questo passaggio è privo di traduzione. Aiuta a tradurlo
-
Using the flat end of the spudger, pry the plastic spacer away from the aluminum frame.
-
Remove the plastic spacer from the iPad.
-
-
Questo passaggio è privo di traduzione. Aiuta a tradurlo
-
Remove the two 1.8 mm Phillips #00 screws securing the dock connector to the rear aluminum case.
-
-
Questo passaggio è privo di traduzione. Aiuta a tradurlo
-
Using the flat end of a spudger, lift up the dock connector.
-
Remove the dock connector from the iPad.
-
-
Questo passaggio è privo di traduzione. Aiuta a tradurlo
-
Remove the following screws securing the Wi-Fi antenna to the aluminum frame.
-
Two 1.75 mm Phillips #00 (small head)
-
One 4.15 mm Phillips #00
-
One 1.8 mm Phillips #00 (wide head)
-
-
Questo passaggio è privo di traduzione. Aiuta a tradurlo
-
Use the flat end of a spudger to loosen the foam adhesive holding the Wi-FI antenna to the speaker assembly.
-
-
Questo passaggio è privo di traduzione. Aiuta a tradurlo
-
Firmly grasp the Wi-Fi antenna and speaker cable together.
-
Carefully, pull the cables off of the aluminum frame.
-
-
Questo passaggio è privo di traduzione. Aiuta a tradurlo
-
Separate the speaker cable from the Wi-Fi antenna cable.
-
Remove the Wi-Fi cable from the iPad.
-
-
Questo passaggio è privo di traduzione. Aiuta a tradurlo
-
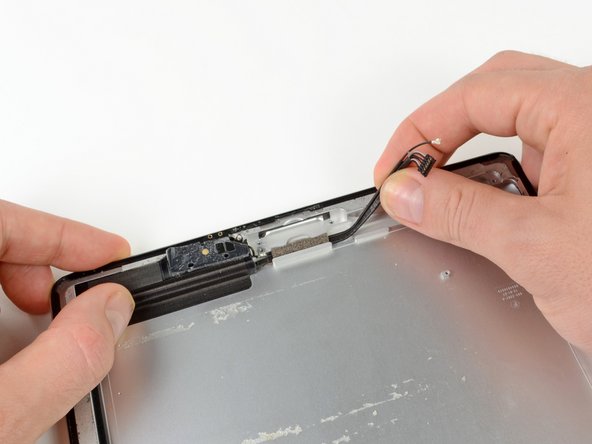
Insert the tip of a spudger underneath the adhesive tape securing the speaker to the aluminum frame.
-
Slide the spudger underneath the tape, loosening the adhesive.
-
-
Questo passaggio è privo di traduzione. Aiuta a tradurlo
-
Remove the three 4.25 mm Phillips #00 screws securing the speaker to the aluminum frame.
-
-
Questo passaggio è privo di traduzione. Aiuta a tradurlo
-
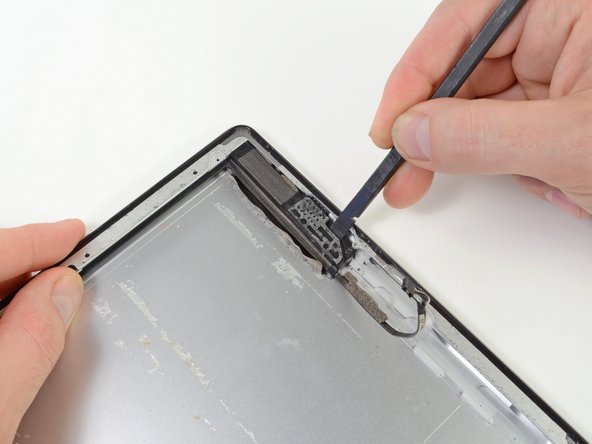
Using a spudger, carefully push the speaker assembly out of its recess in the aluminum frame.
-
-
Questo passaggio è privo di traduzione. Aiuta a tradurlo
-
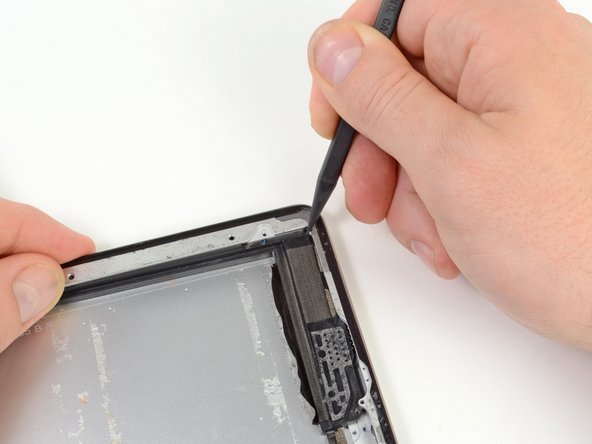
Continue pushing and prodding until the corner of the speaker comes out from under the aluminum frame.
-
Remove the speaker from the iPad.
-


Annulla: non ho completato questa guida.
Altre 24 persone hanno completato questa guida.


3 Commenti
Awesome and very helpfull… great efforts and very easy step by step guide for iPad speaker issues resolution… keep it up… : )
Is it necessary to remove the motherboard to replace the speaker? It seems like the speaker can be replaced by simply removing the batteries.