Questa versione può contenere modifiche errate. Passa all'ultima istantanea verificata.
Cosa ti serve
-
-
Riempi una pentola o una padella con abbastanza acqua per immergerci un iOpener.
-
Scalda l'acqua finché non bolle. Spegni il fuoco.
-
Posiziona l'iOpener nell'acqua calda per 2-3 minuti. Assicurati che l'iOpener sia completamente immerso nell'acqua.
-
Usa delle pinze per estrarre l'iOpener scaldato dall'acqua calda.
-
Asciuga accuratamente l'iOpener con un asciugamano.
-
Il tuo iOpener è pronto all'uso! Se devi scaldare di nuovo l'iOpener, scalda l'acqua fino all'ebollizione, spegni il fuoco e immergi l'iOpener in acqua per 2-3 minuti.
-
-
Questo passaggio è privo di traduzione. Aiuta a tradurlo
-
Use a SIM eject tool or an uncoiled paperclip to eject the SIM card tray.
-
-
Questo passaggio è privo di traduzione. Aiuta a tradurlo
-
Pull the SIM tray out of its slot and remove it from the iPad 2.
-
-
-
Se il vetro dello schermo è crepato, previeni ulteriori rotture e danni fisici durante la riparazione coprendo lo schermo con del nastro adesivo trasparente.
-
Sovrapponi strisce di nastro adesivo trasparente per coprire tutta la superficie dello schermo dell´iPad.
-
Fai del tuo meglio per seguire il resto della guida, come descritta. In ogni caso, uno schermo crepato continuerà probabilmente a danneggiarsi durante la riparazione e, perciò potrebbe essere necessario utilizzare uno strumento metallico per estrarre il vetro.
-
-
-
C'è una piccola fessura nell'anello adesivo dell'iPad nell'angolo in alto a destra, a circa 5 cm dal bordo superiore. Dovrai sfruttare questa debolezza.
-
Allinea lo strumento con il tasto del muto. Infila la punta di uno uno strumento di apertura in plastica nella fessura tra il vetro anteriore e il bordo in plastica. Infila solo la punta dello strumento, solo abbastanza per allargarla.
-
-
-
Una volta superata l'antenna WiFi (a circa da 75 mm dal bordo destro, o accanto al tasto Home), reinfila il plettro completamente.
-
Fai scorrere il plettro verso destra, rilasciando l'adesivo che fissa l'antenna WiFi al vetro anteriore.
-
L'antenna del WiFi è attaccata al bordo inferiore dell'iPad tramite delle viti e un cavo. Questo passaggio separa l'antenna dal pannello anteriore, assicurando che quando lo rimuoverai l'antenna non verrà danneggiata.
-
-
-
-
Fai scorrere il plettro sotto il bordo superiore dell'iPad, sfilandolo leggermente per aggirare la staffa della fotocamera anteriore.
-
L'adesivo in questa zona è molto spesso e può essere richiesta abbastanza forza. Lavora attentamente e lentamente, assicurandoti di non scivolare e danneggiare te stesso o l'iPad.
-
-
Questo passaggio è privo di traduzione. Aiuta a tradurlo
-
Remove the four 2.0 mm Phillips screws securing the LCD to the rear case.
-
-
Questo passaggio è privo di traduzione. Aiuta a tradurlo
-
Lift the LCD from its long edge closest to the volume buttons and rotate it out of the rear case.
-
Lay the LCD on the front panel as seen in the second picture.
-
-
-
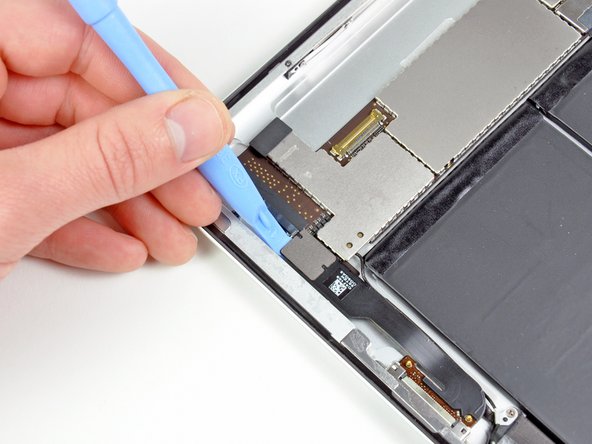
Usa la parte piatta di uno strumento di apertura in plastica per ruotare attentamente verso l'alto le alette di bloccaggio sulle due prese ZIF del cavo a nastro del digitizer.
-
-
-
Solleva il pannello LCD dal suo lato lungo lontano dal cavo del digitizer e ruotalo delicatamente verso la copertura posteriore, come per chiudere un libro.
-
Mentre tieni sollevato il pannello LCD, sfila delicatamente il pannello anteriore lontano dall'iPad. Stai attento a non far impigliare il cavo del digitizer sulla copertura posteriore o sul pannello LCD.
-
Appoggia il pannello LCD nel corpo dell'iPad per sicurezza.
-
-
Questo passaggio è privo di traduzione. Aiuta a tradurlo
-
Lift the LCD from its long edge closest to the volume buttons and gently flip it out of the rear case—like turning the page in a book.
-
Set the LCD face down on a clean surface. You may want to rest it on a soft cloth to prevent scratches.
-
-
Questo passaggio è privo di traduzione. Aiuta a tradurlo
-
Carefully lay the LCD next to the rear panel.
-
Use a plastic opening tool to lift the display data cable lock upwards.
-
Pull the display data cable out of its socket.
-
-
Questo passaggio è privo di traduzione. Aiuta a tradurlo
-
Remove the LCD assembly from the rear panel assembly.
-
-
Questo passaggio è privo di traduzione. Aiuta a tradurlo
-
If present, use a plastic opening tool to help remove the piece of tape covering the end of the dock connector cable.
-
Use the edge of a plastic opening tool to carefully pry the dock connector cable's connector up from its socket on the logic board.
-
Peel the dock connector ribbon cable off the rear panel.
-
-
Questo passaggio è privo di traduzione. Aiuta a tradurlo
-
Pry the speaker cable connector straight up from its socket on the logic board.
-
-
Questo passaggio è privo di traduzione. Aiuta a tradurlo
-
Use the edge of a plastic opening tool to flip up the retaining flap on the headphone jack and front camera cable ZIF socket.
-
Peel the headphone jack and front camera cable off the rear case.
-
-
Questo passaggio è privo di traduzione. Aiuta a tradurlo
-
Pull the headphone jack and front camera ribbon cable straight out of its socket on the logic board.
-
-
Questo passaggio è privo di traduzione. Aiuta a tradurlo
-
Use the edge of a plastic opening tool to flip up the retainer securing the upper component board cable connector to its socket on the logic board.
-
Pull the connector away from its socket on the logic board.
-
-
Questo passaggio è privo di traduzione. Aiuta a tradurlo
-
Remove the three 2 mm Phillips screws securing the SIM card slot to the rear panel.
-
-
Questo passaggio è privo di traduzione. Aiuta a tradurlo
-
Remove the two 2.9 mm Phillips screws securing the headphone jack to the top edge of the rear panel.
-
-
Questo passaggio è privo di traduzione. Aiuta a tradurlo
-
Use a plastic opening tool to help pull the headphone jack out of its recess in the top of the rear panel.
-
Peel the headphone jack/SIM slot assembly away from the top edge of the communications board.
-
-
Questo passaggio è privo di traduzione. Aiuta a tradurlo
-
Remove the two 2.1 mm Phillips screws securing the logic board bracket to the rear case near the digitizer cable socket.
-
Remove the logic board bracket from the rear case.
-
-
Questo passaggio è privo di traduzione. Aiuta a tradurlo
-
Remove the four 2.6 mm Phillips screws securing the logic and communications boards to the rear panel.
-
-
Questo passaggio è privo di traduzione. Aiuta a tradurlo
-
Use the edge of a plastic opening tool to gently pry the logic board up from the adhesive securing it to the rear case.
-
-
Questo passaggio è privo di traduzione. Aiuta a tradurlo
-
Lift the logic board out from the rear case and rotate it slightly toward the battery.
-
-
Questo passaggio è privo di traduzione. Aiuta a tradurlo
-
Use a plastic opening tool to disconnect both antenna connectors from their sockets on the communications board.
-
-
Questo passaggio è privo di traduzione. Aiuta a tradurlo
-
Disconnect the Wi-Fi antenna connector from its socket on the logic board.
-
-
Questo passaggio è privo di traduzione. Aiuta a tradurlo
-
Reheat the iOpener in the microwave for one minute.
-
Place the heated iOpener on the back of the iPad just right of center (the side opposite the rear facing camera). Let it sit there for 90 seconds to soften the battery adhesive.
-
Move the iOpener to the center of the back of the iPad and let the iOpener sit for another 90 seconds.
-
Move the iOpener to the left edge (the side with the rear facing camera) of the back of the iPad and let the iOpener sit for another 90 seconds.
-
-
Questo passaggio è privo di traduzione. Aiuta a tradurlo
-
Starting with the battery cell closest to the dock connector, run a plastic opening tool underneath the edge of the battery closest to the logic board void to make enough room to insert the flat end of a spudger
-
Run the flat end of a spudger along the two long sides of each battery cell to completely separate them from the adhesive securing them to the rear case.
-
-
Questo passaggio è privo di traduzione. Aiuta a tradurlo
-
Before prying up the middle battery cell, use the edge of a plastic opening tool to lift the battery connector board away from the rear panel.
-
-
Questo passaggio è privo di traduzione. Aiuta a tradurlo
-
Next use your spudger to separate the adhesive along the long sides of the middle battery cell.
-
Repeat the process for the final battery cell, reheating the case if necessary.
-
-
Questo passaggio è privo di traduzione. Aiuta a tradurlo
-
Carefully lift the battery out of the rear panel and remove it from the iPad 2.
-


Annulla: non ho completato questa guida.
Altre 77 persone hanno completato questa guida.

Un commento
Replaced the battery and now it shows battery icon with 3 red lines and no lightning bolt. Won't power on, is charging because you can feel the warmth. Can't reset ipad either. Any tips to get it powered on?