Introduzione
L'aggiornamento della memoria RAM garantisce un aumento immediato della velocità.
Cosa ti serve
-
-
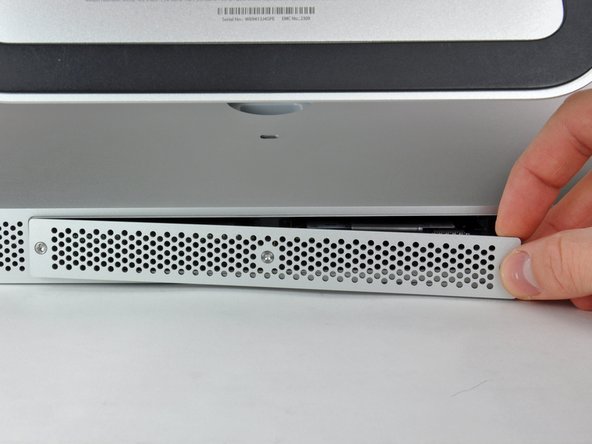
Allentare le tre viti con testa a croce che fissano lo sportello di accesso al bordo inferiore dell'iMac.
-
Rimuovere lo sportello di accesso dall'iMac.
-
-
-
-
Mediante le dita o la punta di un inseritore, far scorrere la linguetta del vassoio della memoria RAM di plastica nera fuori dall'apposito slot.
Bonjour, j’ai arraché la languette. Conséquence, elle est inutilisable et je ne peux pas retirer la barrette. Comment faire autrement ? Est-ce que cet outil peut être utile ?
-
-
-
Tirare la linguetta di plastica nera dall'iMac per estrarre il modulo RAM dal suo alloggiamento.
-
Mediante le dita, far scorrere il modulo RAM fuori dall'alloggiamento.
None. 4mb ram is too old to fit into any computer manufactured after like 1998.
@Brett
I suggest that you learn your unit symbols before you try to appear clever:
4mb == 4 milli bits
4MB == 4 mega bytes
nowsc was obviously meaning 4GB not 4MB, try not to be a dick.
Just for the records :
4 millibits are 0,000000004 MB
There was never any RAM in mb and the question states MB and nobody except you is talking of millibits.
You are also a dick if you try to spread “your knowledge” nobody has asked for
Take care to note which way out the RAM comes - there is a notch in each RAM and it is not centered, therefore either the notch will be on the left or to the right (depending on which way up you have your iMac). This will make it easier to replace the RAM without damaging anything.
If damaged the notch inside one pair of RAM slots, is it fixable ?
its not that hard to say that you can add up to 4GB sticks, bringing a total to 16GB
-


Per riassemblare il tuo dispositivo, segui queste istruzioni in ordine inverso.
Per riassemblare il tuo dispositivo, segui queste istruzioni in ordine inverso.
Annulla: non ho completato questa guida.
Altre 166 persone hanno completato questa guida.
Un ringraziamento speciale a questi traduttori:
100%


Questi traduttori ci stanno aiutando ad aggiustare il mondo! Vuoi partecipare?
Inizia a tradurre ›

8 Commenti
Interestingly, the mid 2011 iMac 27 inch also goes to 12GB!
I originally thought I'd be upgrading to 8GB today but found 4 slots instead of 2 :-)
As long as the two front (close to the screen) slots are paired with the exact same RAM config.
For example:
Two front slots Apple 2GB chips = 4GB.
Two rear slots, Crucial Lexar 4GB chips = 8GB
Total 12GB
Hoorah no waste and more RAM, come on Lion... I'm Ready!
Need a#0 screwdriver, not #1
Be sure to really push the RAM all the way into the socket. I had a "no RAM" error beep when I first booted up my iMac after doing this. Just an extra two millimetres was all it needed to be properly installed. It can be quite tough to get in.
Hi,
I've got a 2309 and just received my two additional 4GB RAM Cards. Put them in and I can say that the speed improved (now with 16GB). Not dramatically, however, some applications did always show the little rainbow disc when my Mac was "thinking". This is now gone.
I am on OS X 10.9.5 still and the whole Mac feels as if it can "breathe" more lightly with the additional RAM.
Thanks!
My 11,1 27” 2.66Ghz iMac happy eats up all the 4x8GB I put in there.
Ditto here.
I’m currently running in Recovery Mode awaiting a lesser replacement video card to get by with until I do the dreaded bake for this 4850. I’m not sure if anything will change once I can boot into normal mode or not, but here’s what I’m seeing now-
Strangely enough, I realized after booting that I had bought completely the wrong ram.I don’t know what the heck I was thinking! All seems fine, though. Currently as it sits, things are running fine with 32GB of “Crucial 8GB DDR3 Laptop DDR3L 1600MHz 204-Pin Sodimm PC3L-12800 1.35V Memory” (ebay description). I’m not sure if this will cause any issues or not- if someone else knows better, please chime in!
“About This Mac” reports that it is running at 1333Mhz, but specs call for 1066Mhz?
No erratic behaviour as of yet.
Matt
Matt -
I agree with Magda the boards are not easy to install.
I used a piece of wood the length of the board to help push the board in.
I am going to put a very important comment here. Before you start this process listen to the fans on your iMac do any of them sound obviously loud (think about how quiet your iMac used to sound as a reference) If you notice one or more of them sounding substantially loud compared to the others consider locating a replacement fan prior starting this process. After all if you are already “in the neighborhood” it is a shame to do all this work only to have to disassemble your imac a couple weeks later because you realize the fan is failing. I speak from my own personal learning experience of having to disassembly my iMac 3 weeks later because the HDD was failing and apparently the moving the fan around was just enough to push it to start really under performing.
Wizbang FL - Replica
I’m not sure why it is necessary to remove the RAM. As far as I can tell, it can remain in place during this procedure.
gordonhamachi - Replica