Questa versione può contenere modifiche errate. Passa all'ultima istantanea verificata.
Cosa ti serve
-
-
Allentare le tre viti con testa a croce che fissano lo sportello di accesso al bordo inferiore dell'iMac.
-
Rimuovere lo sportello di accesso dall'iMac.
-
-
-
Fai aderire una ventosa accanto a ciascuno dei due angoli superiori del pannello di vetro.
-
Se la ventosa non aderisce, prova a ripulire il pannello di vetro e la ventosa con un solvente delicato.
-
-
-
Solleva il pannello di vetro in perpendicolare rispetto alla superficie dello schermo LCD, affinché sia possibile liberare i piedini di montaggio in acciaio inseriti lungo il lato sottostante al bordo superiore del pannello di vetro.
-
Estrai il panello di vetro dal bordo inferiore dell'iMac e mettilo da parte con attenzione.
-
-
-
Rimuovi le otto viti Torx T10 da 8 mm che fissano il display al case esterno.
-
-
-
Rimuovi le quattro viti che fissano l'alimentatore al case esterno:
-
Due viti Torx T10 a passo fine da 22,2 mm
-
Una vite Torx T10 a passo grosso da 25 mm
-
Una vite Torx T10 a passo grosso da 9 mm
-
-
-
Con molta attenzione solleva ed estrai l'alimentatore dal case esterno e fallo ruotare fino a scoprire il connettore come in figura, tenendo presente che il cavo della tensione di uscita è ancora collegato alla macchina.
-
Per scollegare il cavo di ingresso della tensione premi sul sistema di bloccaggio del connettore ed estrai il connettore stesso dalla presa sul circuito stampato.
-
Una volta estratto, tieni il connettore distante dall'alimentatore.
-
-
-
-
Tira fuori dal suo zoccolo sulla scheda madre il connettore del sensore termico dell'unità ottica.
-
-
-
Solleva dal bordo interno il disco ottico e fai passare il suo connettore oltre il telaio attaccato alla scheda logica.
-
Spingi con attenzione il disco ottico fuori dai suoi pin di montaggio sul bordo del case esterno in modo da avere spazio per disconnettere il cavo del disco ottico.
-
-
Questo passaggio è privo di traduzione. Aiuta a tradurlo
-
Remove the single 13 mm T10 Torx screw securing the optical drive fan to the outer case.
-
-
Questo passaggio è privo di traduzione. Aiuta a tradurlo
-
Pull the optical drive off the pins attached to the outer case.
-
-
Questo passaggio è privo di traduzione. Aiuta a tradurlo
-
Pull the optical drive fan connector away from its socket on the logic board.
-
Remove the optical drive fan from the iMac.
-
-
Questo passaggio è privo di traduzione. Aiuta a tradurlo
-
Pull the left and right speaker connectors toward the right side of the iMac to disconnect them from the logic board.
-
-
Questo passaggio è privo di traduzione. Aiuta a tradurlo
-
Disconnect the audio port cable by pulling its connector toward the right side of the iMac.
-
-
Questo passaggio è privo di traduzione. Aiuta a tradurlo
-
Disconnect the AirPort cable by lifting its connector off the socket on the logic board.
-
-
Questo passaggio è privo di traduzione. Aiuta a tradurlo
-
Disconnect the following cables by pulling their connectors toward the top edge of the iMac:
-
Camera cable
-
Hard drive thermal sensor
-
Hard drive fan
-
Microphone
-
Disconnect the following cables by pulling their connectors toward the right edge of the iMac:
-
Ambient temperature sensor
-
Bluetooth cable
-
-
Questo passaggio è privo di traduzione. Aiuta a tradurlo
-
Disconnect the CPU fan and power button by pulling their connectors toward the left edge of the iMac.
-
-
Questo passaggio è privo di traduzione. Aiuta a tradurlo
-
If present, remove the piece of tape covering the IR sensor connector.
-
Disconnect the IR sensor by pulling its connector toward the top edge of the iMac.
-
-
Questo passaggio è privo di traduzione. Aiuta a tradurlo
-
Use your fingers to lift IR sensor assembly straight up out of the outer case.
-
-
Questo passaggio è privo di traduzione. Aiuta a tradurlo
-
Remove the following six screws securing the logic board to the outer case:
-
Three 25 mm T10 Torx
-
Two 21.5 mm T10 Torx
-
One 7 mm T10 Torx
-
-
Questo passaggio è privo di traduzione. Aiuta a tradurlo
-
Remove the plastic ducts from the side of the LED driver board and the hard drive by pulling them away from the outer case.
-
-
Questo passaggio è privo di traduzione. Aiuta a tradurlo
-
Carefully remove the aluminum tape attaching the GPU heat sink to the outer case.
-
-
Questo passaggio è privo di traduzione. Aiuta a tradurlo
-
Carefully pull the logic board slightly away from the outer case.
-
While holding the board away from the outer case, rotate the board back and forth while lifting up to release it from the outer case.
-
-
Questo passaggio è privo di traduzione. Aiuta a tradurlo
-
Now that the lower edge of the board is free from the outer case, rotate the logic board toward yourself to expose its rear face.
-
Carefully pull the optical drive connector away from its socket on the logic board.
-
-
Questo passaggio è privo di traduzione. Aiuta a tradurlo
-
Disconnect the DC-In cable from the logic board by simultaneously depressing the locking lever on the connector while pulling it away from its socket.
-
Remove the logic board from the outer case.
-
-
Questo passaggio è privo di traduzione. Aiuta a tradurlo
-
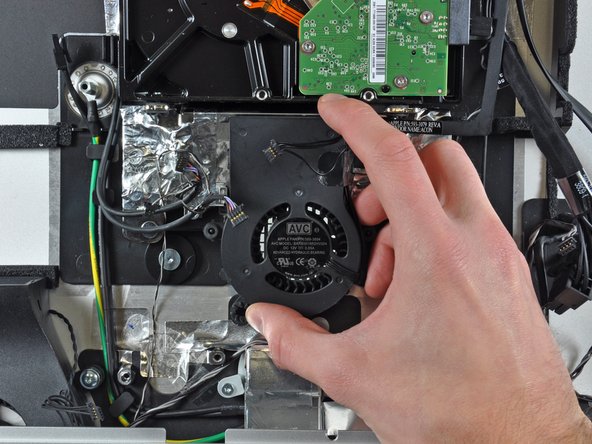
Remove the single 13mm T10 Torx screw securing the hard drive fan to the outer case.
-
Remove the hard drive fan from the outer case.
-


Annulla: non ho completato questa guida.
Altre 7 persone hanno completato questa guida.

2 Commenti
can you tell me where to buy this fan?
I would not classify this as a “very easy” repair. If you have pulled apart your iMac before, it is manageable, but this is a moderate to difficult repair at least. Other than that, this is a helpful guide and quite necessary for doing this repair. If only the fan was available from ifixit!