Questa versione può contenere modifiche errate. Passa all'ultima istantanea verificata.
Cosa ti serve
-
-
Allenta le due viti a croce Phillips imperdibili che fissano la porta di accesso all'iMac.
-
Rimuovi la port di accesso dall'iMac.
-
-
-
Rimuovi le seguenti quattro viti:
-
Tre Torx T8 da 6 mm
-
Una Torx T8 da 8 mm
-
-
-
Capovolgi il tuo iMac e appoggialo con il lato del supporto rivolto verso il basso su una superficie piana.
-
Per rimuovere contemporaneamente la cornice anteriore dall'iMac:
-
Utilizza i pollici per premere nei bracci della RAM e tenere fermo l'iMac.
-
Utilizza gli indici per tirare verso di te il piccolo ponte di materiale sulla cornice anteriore.
-
Tira verso l'alto la cornice anteriore con gli indici.
-
Una volta che il piccolo ponte di materiale ha liberato i bracci della RAM, solleva la cornice anteriore dal suo bordo inferiore quanto basta per liberare il bordo inferiore del case posteriore.
-
-
-
Inserisci una scheda di plastica nell'angolo della fessura della presa d'aria vicino alla parte superiore del case posteriore.
-
Spingi la scheda verso la parte superiore dell'iMac per rilasciare il fermo della cornice anteriore.
-
Allontana la cornice anteriore dal case posteriore.
-
Ripeti questa procedura per l'altro lato della cornice anteriore.
-
Se la cornice si rifiuta di sbloccarsi, prova a premere il bordo inferiore sul case posteriore e ripeti questa procedura di apertura.
-
-
-
Appoggia il tuo iMac su un tavolo con il lato del supporto rivolto verso il basso.
-
Solleva la cornice anteriore dal suo bordo inferiore e ruotala allontanandola dal resto dell'iMac, facendo attenzione ai bracci RAM che potrebbero rimanere incastrati.
-
Appoggia la cornice anteriore sopra il resto dell'iMac.
-
-
Questo passaggio è privo di traduzione. Aiuta a tradurlo
-
Peel up the lower EMI shield from the rear case.
-
-
Questo passaggio è privo di traduzione. Aiuta a tradurlo
-
Remove the two 4.8 mm T6 Torx screws securing the display data cable to the logic board.
-
Grab the display data cable connector by its black tab and pull it straight up off the logic board.
-
-
-
Questo passaggio è privo di traduzione. Aiuta a tradurlo
-
Inverter cable on 24inch iMac pulls off to the left.
-
Pull the inverter cable connector straight up off its socket on the logic board.
-
-
Questo passaggio è privo di traduzione. Aiuta a tradurlo
-
Peel back the aluminum EMI tape from the two vertical edges of the display.
-
-
Questo passaggio è privo di traduzione. Aiuta a tradurlo
-
Remove the four 8 mm with 2 mm thick head coarse-thread T10 Torx screws securing the display to the rear case.
-
-
Questo passaggio è privo di traduzione. Aiuta a tradurlo
-
Lift the display from its lower edge and pull it toward yourself to peel off the EMI shield attached to its top edge.
-
-
Questo passaggio è privo di traduzione. Aiuta a tradurlo
-
Remove the two 7 mm T10 Torx screws securing the optical drive clip to the logic board.
-
-
Questo passaggio è privo di traduzione. Aiuta a tradurlo
-
Pull the optical drive thermal sensor cable connector away from its socket on the logic board.
-
-
Questo passaggio è privo di traduzione. Aiuta a tradurlo
-
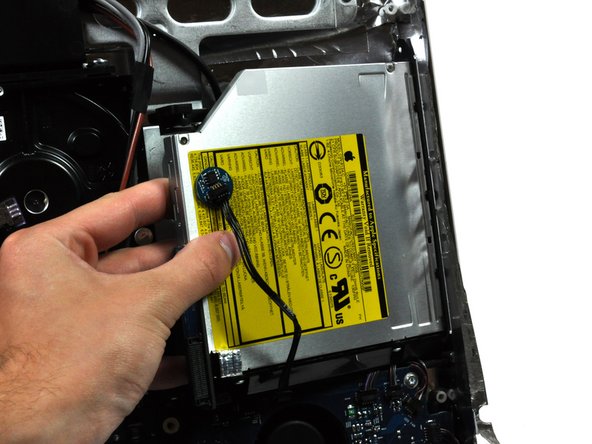
Squeeze the two optical drive bracket ears together while pulling the drive toward yourself.
-
Pull the optical drive away from the side of the rear panel and remove it from the iMac.
-
-
Questo passaggio è privo di traduzione. Aiuta a tradurlo
-
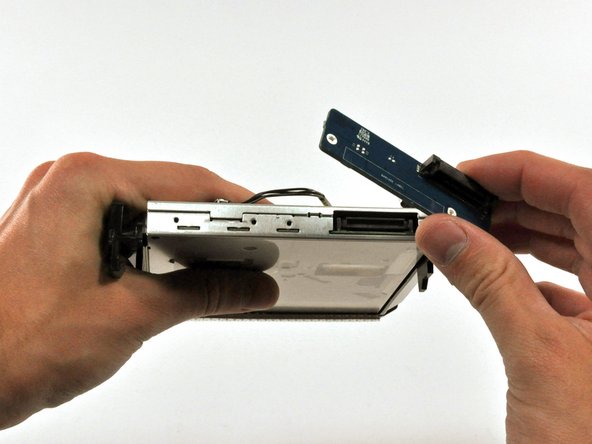
Remove the two T6 Torx screws securing the connector board to the optical drive.
-
Pull the connector board away from the optical drive.
-
-
Questo passaggio è privo di traduzione. Aiuta a tradurlo
-
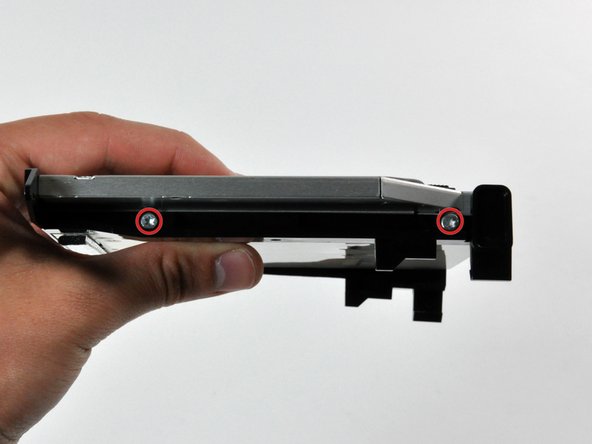
Remove the two T10 Torx screws from each side of the optical drive (four screws total).
-
-
Questo passaggio è privo di traduzione. Aiuta a tradurlo
-
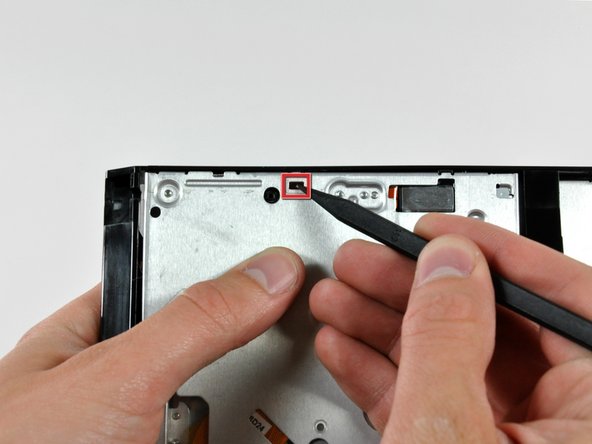
Use the flat end of a spudger to remove the EMI gasket from the underside of the optical drive.
-
-
Questo passaggio è privo di traduzione. Aiuta a tradurlo
-
Use the sharp end of a spudger to push the optical drive bracket tabs out of their slots on the bottom of the optical drive.
-
-
Questo passaggio è privo di traduzione. Aiuta a tradurlo
-
Using the sharp end of a spudger, press the optical drive bracket tab out of its slot on the side of the optical drive.
-
-
Questo passaggio è privo di traduzione. Aiuta a tradurlo
-
Push the optical drive bracket tabs out of their slots in the top of the optical drive.
-
-
Questo passaggio è privo di traduzione. Aiuta a tradurlo
-
Pull the optical drive away from its bracket, minding any tabs that may still be caught in their slots.
-
-
Questo passaggio è privo di traduzione. Aiuta a tradurlo
-
Use a flat end of a spudger to remove the EMI gasket from the top of the optical drive.
-
-
Questo passaggio è privo di traduzione. Aiuta a tradurlo
-
Use the flat end of a spudger to pry the optical drive thermal sensor off the adhesive holding it to the top of the optical drive.
-
Don't forget to transfer this to your new drive.
-


Annulla: non ho completato questa guida.
Altre 25 persone hanno completato questa guida.

2 Commenti
There are two things not mentioned in this guide (which is, all-in-all very good)
1. There is a short lead connected through the EMI shielding at the top of the IMac to th right (inside vie) of the camera board, to a very small daughter card marked Apple 820 2009-A 2006 srewed to the inside upper ABS case surface by a single 1mm torx screw. The lead s othere end goes to the power board. Check this has not been severed. I extended mine.
2. The Super drive DVD drive is very difficult to re-position because apart from the mounting frame ears mentioned, there are two "dowels" moulded into the ABS bezel. If these are not correctly aligned when fitting, then the CD/DVD will not eject because of the mis-alinement. The ears can be difficult to release because the unit is forced against the logic board at the point where the board to drive connector is situated.
I didn't buy a DVD I'm taking it out of my other 27" IMAC I'm hoping this works as there was no mention of what drive to use buy but this is an excellent guide and I hope others have easier time also I'm replacing the screen new>(LP171WU1 (TL)(A3) LINES in it from walmart $54.00 and got a deal on V4 adapter. Thank you all for this info .