Questa versione può contenere modifiche errate. Passa all'ultima istantanea verificata.
Cosa ti serve
-
-
Utilizzando un cacciavite Philips #00, rimuovi le quattro viti da 6.86 mm dalla piastra metallica.
-
-
Questo passaggio è privo di traduzione. Aiuta a tradurlo
-
Use a spudger to lift and remove the AirPort's antenna connector.
-
-
Questo passaggio è privo di traduzione. Aiuta a tradurlo
-
Release the tabs on each side of the module by simultaneously pushing each tab away from the RAM.
-
Remove the RAM module from the iMac.
-
-
Questo passaggio è privo di traduzione. Aiuta a tradurlo
-
Remove the four 28.07mm Torx #15 screws from the lower case.
-
-
-
Questo passaggio è privo di traduzione. Aiuta a tradurlo
-
Open the base by carefully pulling straight off, do not rotate the cover.
-
-
Questo passaggio è privo di traduzione. Aiuta a tradurlo
-
Squeeze the small black tab and wiggle gently to remove the colored power cable.
-
-
Questo passaggio è privo di traduzione. Aiuta a tradurlo
-
Grab both sides of the blue connector and firmly pull to remove it from the mother board.
-
-
Questo passaggio è privo di traduzione. Aiuta a tradurlo
-
Using a Torx #9 screw driver, remove the two 8.77mm screws holding the drive's shield onto your iMac G4.
-
Remove the drive shield from your iMac.
-
-
Questo passaggio è privo di traduzione. Aiuta a tradurlo
-
Using a Torx # 10 screw driver, remove the four 19.12mm screws that mount the optical drive.
-
-
Questo passaggio è privo di traduzione. Aiuta a tradurlo
-
Grasp the HD/Optical Drive bundle by the by the sides and gently wiggle it loose from the sides.
-
-
Questo passaggio è privo di traduzione. Aiuta a tradurlo
-
Unplug the power source from the optical drive by pinching the plastic base of the connector and wiggling it gently.
-
-
Questo passaggio è privo di traduzione. Aiuta a tradurlo
-
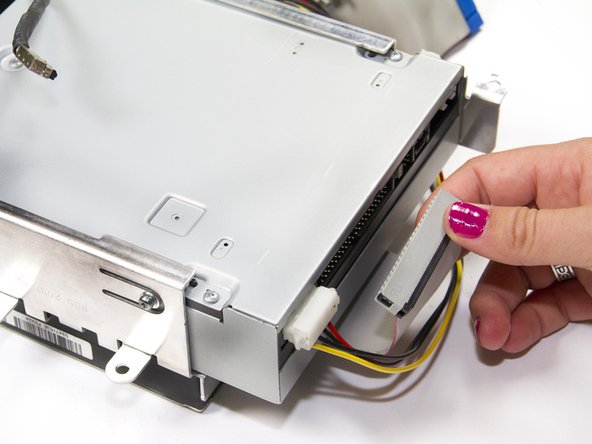
Unplug the ribbon cable from the optical drive by grasping the plastic base of the connector and wiggling it gently.
-
-
Questo passaggio è privo di traduzione. Aiuta a tradurlo
-
Remove the four 6.75mm Torx # 10 screws mounting the drive.
-
-
Questo passaggio è privo di traduzione. Aiuta a tradurlo
-
Slide the optical drive out from the metal support mounted to hard drive.
-


Annulla: non ho completato questa guida.
Altre 15 persone hanno completato questa guida.

Team

Cal Poly, Team 5-32, Amido Fall 2011 Membro di Cal Poly, Team 5-32, Amido Fall 2011
CPSU-AMIDO-F11S5G32
4 Membri
8 Guide realizzate