Questa versione può contenere modifiche errate. Passa all'ultima istantanea verificata.
Cosa ti serve
-
Questo passaggio è privo di traduzione. Aiuta a tradurlo
-
Remove the eight screws from the bottom side of the iHome.
-
-
Questo passaggio è privo di traduzione. Aiuta a tradurlo
-
Remove the cover to expose the inside.
-
With pliers, or tweezers,if needed, remove the three wire harnesses by gently pulling straight up on them.
-
-
Questo passaggio è privo di traduzione. Aiuta a tradurlo
-
Remove the 5 screws with a #2 Phillips screwdriver.
-
-
-
Questo passaggio è privo di traduzione. Aiuta a tradurlo
-
Remove all wire harnesses from the bottom of the board. There eight wire harnesses.
-
-
Questo passaggio è privo di traduzione. Aiuta a tradurlo
-
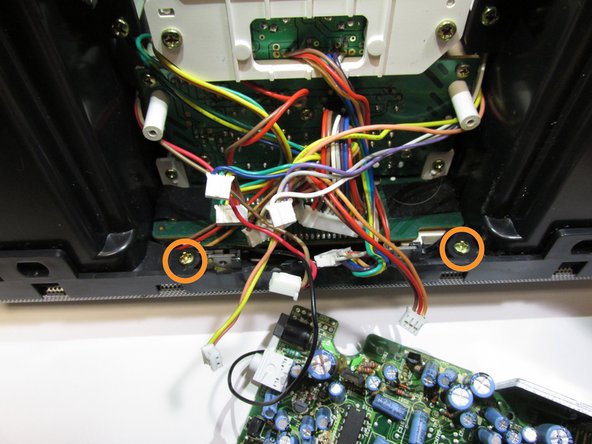
Remove the two screws from the speakers with a #2 Phillips screwdriver.
-
Turn the device on its front side and remove the two screws with a #2 Phillips screwdriver.
-
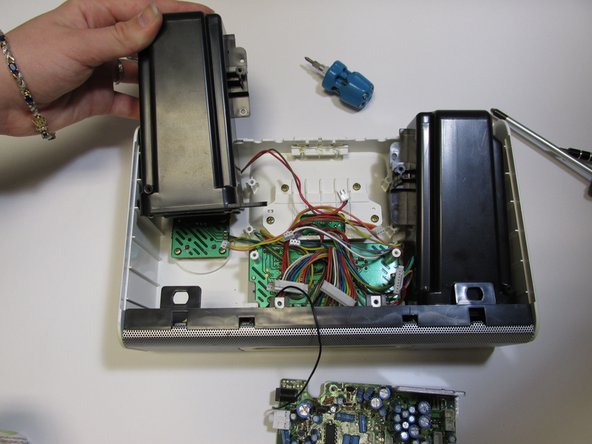
Pull the speaker up from the back as shown with the speaker on the right. Then pull the speaker straight back as shown with the speaker on the left.
-
-
Questo passaggio è privo di traduzione. Aiuta a tradurlo
-
Remove the front piece by pulling up until it hits the plastic pieces sticking out from the display screen. Then pull it out horizontally from the device.
-
-
Questo passaggio è privo di traduzione. Aiuta a tradurlo
-
Remove the three screw from the dial with a #2 Phillips screwdriver.
-
-
Questo passaggio è privo di traduzione. Aiuta a tradurlo
-
Pull back the circuit board to access the plastic piece.
-
Lift to separate the plastic piece from the dial.
-
Replace the broken piece.
-


Annulla: non ho completato questa guida.
Altre 3 persone hanno completato questa guida.
Team

New Mexico State, Team 1-6, Easley Spring 2014 Membro di New Mexico State, Team 1-6, Easley Spring 2014
NMSU-EASLEY-S14S1G6
5 Membri
4 Guide realizzate