Questa versione può contenere modifiche errate. Passa all'ultima istantanea verificata.
Cosa ti serve
-
Questo passaggio è privo di traduzione. Aiuta a tradurlo
-
Lay your iBook upside down on a flat surface.
-
Use a coin to rotate the battery locking screw 90 degrees clockwise.
-
Lift the battery out of the computer.
-
-
Questo passaggio è privo di traduzione. Aiuta a tradurlo
-
Use a spudger or small flathead screwdriver to remove the three rubber feet from the lower case.
-
-
Questo passaggio è privo di traduzione. Aiuta a tradurlo
-
Remove the three newly-revealed Phillips screws.
-
-
Questo passaggio è privo di traduzione. Aiuta a tradurlo
-
Use a spudger or small flathead screwdriver to pry up the three metal rings that housed the rubber bumpers.
-
-
Questo passaggio è privo di traduzione. Aiuta a tradurlo
-
Remove the three Torx screws using a T8 Torx screwdriver.
-
-
Questo passaggio è privo di traduzione. Aiuta a tradurlo
-
Remove the two 4.5 mm Phillips screws on either sides of the battery contacts.
-
-
-
Questo passaggio è privo di traduzione. Aiuta a tradurlo
-
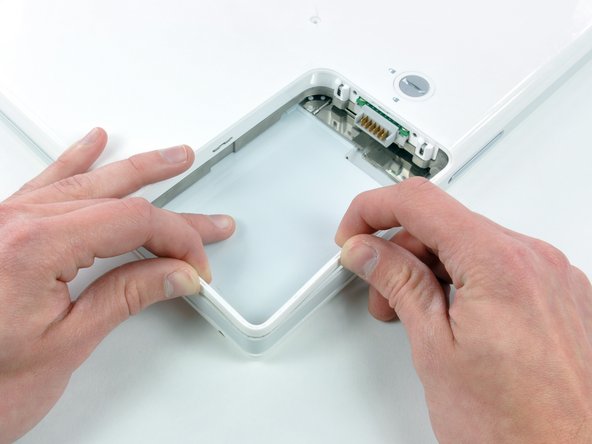
Push the thin rims of the lower case surrounding the battery compartment in, bending them past the tabs, and then lift up to free that corner of the lower case.
-
-
Questo passaggio è privo di traduzione. Aiuta a tradurlo
-
There is a slot on the wall of the battery compartment that locks the lower case in place. Use a small flathead screwdriver to pry out the slot's lower rim and pull up on the lower case to free the slot from the tabs holding it.
-
-
Questo passaggio è privo di traduzione. Aiuta a tradurlo
-
Run a spudger along the seam between the lower case and upper case on the front of the computer to free the tabs locking the lower case. Pull up on the lower case and continue to use the spudger as necessary until you hear three distinct clicks.
-
-
Questo passaggio è privo di traduzione. Aiuta a tradurlo
-
Continue to run the spudger around the front right corner. There are two tabs on the port side of the computer, one near the front corner and one near the sound-out port.
-
-
Questo passaggio è privo di traduzione. Aiuta a tradurlo
-
There are three tabs over the optical drive that must be released before the lower case can come off. Slide the spudger into the lower case above the optical drive and run it toward the back of the computer until you hear three distinct clicks.
-
-
Questo passaggio è privo di traduzione. Aiuta a tradurlo
-
Turn the computer so that the back is facing you and pull the lower case up and toward you until the back tabs pop free.
-
-
Questo passaggio è privo di traduzione. Aiuta a tradurlo
-
Remove the small greasy springs with white plastic caps from either side of the battery contacts.
-
-
Questo passaggio è privo di traduzione. Aiuta a tradurlo
-
Have patience and follow the directions, the end result is up to you.
-
-
Questo passaggio è privo di traduzione. Aiuta a tradurlo
-
Remove the following 4 screws from the bottom shield:
-
Two 3 mm Phillips.
-
Two 7.5 mm Phillips.
-
-
Questo passaggio è privo di traduzione. Aiuta a tradurlo
-
Remove the 4 Phillips screws securing the fan to the metal framework.
-
-
Questo passaggio è privo di traduzione. Aiuta a tradurlo
-
Lift the fan out of its compartment and disconnect it from the logic board, removing tape as necessary.
-


Annulla: non ho completato questa guida.
Altre 2 persone hanno completato questa guida.
