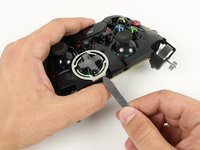
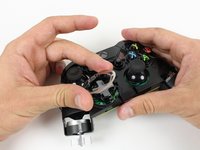
Salta al contenuto principale

Xbox One Wireless Controller D-Pad Replacement

Cosa ti serve

  1. Xbox One Wireless Controller D-Pad Replacement, Battery Pack: passo 1, immagine 1 di 1
    • Remove the battery pack cover.

    • Remove batteries.

  2. Xbox One Wireless Controller D-Pad Replacement, Side Handles: passo 2, immagine 1 di 2 Xbox One Wireless Controller D-Pad Replacement, Side Handles: passo 2, immagine 2 di 2
    • We recommend using a nylon spudger for this step. A metal spudger is shown.

    • Grip the controller firmly to remove the side handles, wedging a spudger into the seam between the front and handle plates.

    • Pry the side plate away from the front plate by moving the spudger back and forth. You will need to do this all the way around the side plate's seam.

    Start prying the side plate off underneath the trigger, this makes it easier to disconnect the other clips connecting the side plate to the backplate.

    Brandon - Replica

    One you take it off, is it possible to click it back in?

    Aiden Bear - Replica

    As long as you don’t exceed the couple tons you need to take it off you should be able to put it back.

    Brandon -

    I don’t have a squdger

    TimidFerret4982 Gaming - Replica

    getting those handles back on seems impossible, they just dont fit as well, a gap remains even after snapping into place.

    Dont think ill be doing this in the future

    Spoutin Wyze - Replica

    edit: wiggled the bo9ttom middlewith the handles off and somethign finally “clicked” into place for that extra 1/4 mm for the down arrow on my D-Pad to click back up into place!.

    Spoutin Wyze - Replica

  3. Xbox One Wireless Controller D-Pad Replacement, Screws: passo 3, immagine 1 di 2 Xbox One Wireless Controller D-Pad Replacement, Screws: passo 3, immagine 2 di 2
    • There is a hidden screw located in the middle of the controller behind the label.

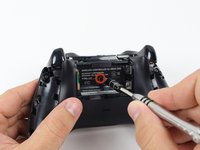
    • Use a screwdriver and punch a hole directly in the center of the label.

    • You may also lift the label if you do not want to puncture it.

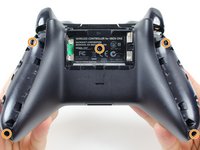
    • Remove the five 10mm screws located on the back of the controller using the TR8 Security Torx Screwdriver.

    i damaged my screws. how do i get the screws out?

    tenzin - Replica

    wait. i just watched a video guide on ifixit's youtube channel about damaged screws. i'll try those methods.

    tenzin - Replica

    It's a t8 or t9 security bit btw, I got the top two out with a regular T8, but the bottom two and middle needed a T9 Security bit.

    David Loper - Replica

    All five faceplate/backplate screws in the controller I disassembled were T8 security fasteners.

    John Dziedzic - Replica

    Am I doing something wrong because I got the tool it said I needed and got the middle screw out but the others have a bump or something in the center of the screw and it won't fit.

    kolton77 - Replica

    The T8 is only good for the middle screw on my One S controller. The others require something bigger

    Matej Skelo - Replica

    These requires SECURITY Torx bits (they have a cannulated hole in the driver). I don't believe the iFixIt branded driver is cannulated but you can buy a set of bits from DeWalt DWAX200 which is overkill but has what you need.

    jhighsmith - Replica

    The driver that iFixIt sells is cannulated.

    jhighsmith -

    where do you get this dumb ass screw driver

    Jake Zweier - Replica

    iFixit Store #IF145-027-3

    VauWeh - Replica

    You can bypass it with a 1.5mm flathead.

    Marianne Sandling - Replica

    thank you for this. worked for me

    Mr Anderson (Evolluisionist) -

    These screws required a T10, not T8.

    Armand - Replica

    TR9. A $10 kit from Walmart has the bit/driver in it and extra goodies to make life simple.

    Matt Martin - Replica

    As weird as it sounds, the top 2 came out for me with a flathead- but the bottom two and the middle one wont

    macybrooksevans - Replica

    If you damage the middle part of the screws you can still take it out with the same screwdriver.

    Kev God - Replica

    Thank-You :)

    Isaiah - Replica

    needed a T8H, not easy to see.

    on a grey green xbox one controller

    Michael - Replica

    On my 1708 controller there are two internal screws near the rumble motors that need to be removed with a T6 non security bit to remove the back cover.

    teeedubb - Replica

  4. Xbox One Wireless Controller D-Pad Replacement, Backplate: passo 4, immagine 1 di 1
    • Remove the backplate.

  5. Xbox One Wireless Controller D-Pad Replacement, Faceplate: passo 5, immagine 1 di 1
    • Remove the faceplate.

  6. Xbox One Wireless Controller D-Pad Replacement, Metal Frame: passo 6, immagine 1 di 2 Xbox One Wireless Controller D-Pad Replacement, Metal Frame: passo 6, immagine 2 di 2
    • Pry off the metal frame around the D-Pad.

  7. Xbox One Wireless Controller D-Pad Replacement, D-Pad: passo 7, immagine 1 di 1
    • Lift the D-Pad out of its housing.

Conclusione

To reassemble your device, follow these instructions in reverse order.

Altre 44 persone hanno completato questa guida.

Garrett George

Membro da: 01/22/15

6.151 Reputazione

3 Guide realizzate

Team

Cal Poly, Team 20-15, Maness Winter 2015 Membro di Cal Poly, Team 20-15, Maness Winter 2015

CPSU-MANESS-W15S20G15

5 Membri

50 Guide realizzate

7 Commenti

Can you show me how to replace xbox one controller 3.5mm stereo jack dpad

Arief Hidayat - Replica

This model of the xbox one controller does not feature a 3.5mm headphone jack. Please look at the guides for later models of the xbox one controller.

Brandon -

it's exactly the same like shown above :)

David Schmidt - Replica

How do u fix one of the silver things behind the d-pad?

Bob - Replica

How do fix the silver things behind each d-pad

Bob - Replica

I had a unresponsive left-button on my D-pad. It worked consistently only if I pressed very hard. l fixed mine, not with a new D-pad, but by adding a few layers of plastic tape over the press-sensitive “cushion” (the one that the button plastic part of the left d-pad should trigger). That made it much more responsive. It feels slightly different pressing down on the button now, but I can live with that trade-off.

john lastson - Replica

Como arreglo las teclas además de desmontar se puede arreglar cada botón?

isaac barreto - Replica

Aggiungi Commento

Visualizza Statistiche:

Ultime 24 Ore: 5

Ultimi 7 Giorni: 55

Ultimi 30 Giorni: 260

Tutti i Tempi: 62,863