Introduzione
Questa guida ti mostrerà come eseguire la sostituzione del pannello superiore della tua Xbox 360 S.
Cosa ti serve
-
-
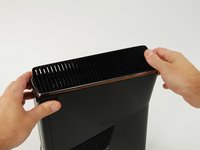
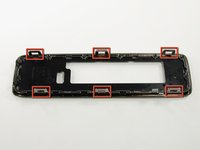
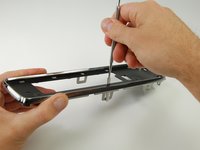
Nei seguenti passaggi, rimuoverai la grata superiore, assicurata al pannello dai tredici fermi di plastica mostrati nella foto.
-
-
-
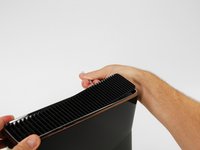
Orienta la console in modo che le parole "XBOX 360" sui lati siano rivolte verso l'alto e il frontalino sia rivolto verso sinistra.
-
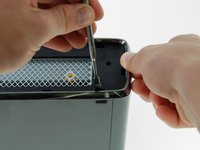
Inserire lo spudger di metallo tra lo sfiato superiore e la mascherina superiore vicino al retro della Xbox.
-
Ruota lo spudger verso l´esterno dalla console, facendo leva sul bordo dello sfiato della ventola fino a liberare i due fermagli di plastica.
-
-
-
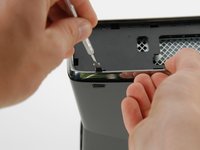
Inserisci lo spudger tra la grata di sfogo e la cornice superiore, lungo il lato sinistro della console.
-
Nello stesso modo descritto sopra, inizia a far leva sul lato sinistro dello sfiato superiore per staccarlo dalla cornice.
-
Continua a fare leva lungo tutto il lato sinistro per sganciare tutte le clip su questo lato.
-
-
-
-
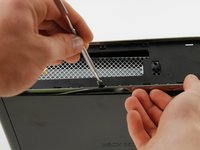
Inserisci uno spudger metallico attraverso la fessura più anteriore sul bordo sinistro del telaio superiore e tra il bordo inferiore del fermo e il case sinistro, come descritto sopra.
-
Ruota contemporaneamente lo spudger lontano dalla console e tira verso l'alto il telaio superiore per liberare il fermo.
-
-
-
Ruota la console in modo che la parte posteriore dell'Xbox 360 S sia rivolta verso destra e il case destro sia rivolto verso di te.
-
Inserisci uno spudger metallico attraverso la fessura più posteriore sul bordo destro del telaio superiore e tra il bordo inferiore del fermo e il case destro.
-
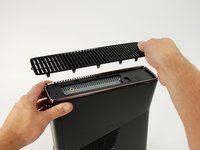
Mentre sollevi il telaio superiore con le dita, ruota lo spudger lontano dalla console per liberare il fermo.
-


Per rimontare il tuo dispositivo, segui le istruzioni della guida in ordine inverso.
Per rimontare il tuo dispositivo, segui le istruzioni della guida in ordine inverso.
Annulla: non ho completato questa guida.
Altre 26 persone hanno completato questa guida.
Un ringraziamento speciale a questi traduttori:
100%


Questi traduttori ci stanno aiutando ad aggiustare il mondo! Vuoi partecipare?
Inizia a tradurre ›

