Salta al contenuto principale

X-street Lamborghini Murcielago LP670-4 SV Front Steering Motor Replacement

Cosa ti serve

  1. X-street Lamborghini Murcielago LP670-4 SV Front Steering Motor Replacement, Battery: passo 1, immagine 1 di 1
    • Unscrew the two 2.5mm Phillips #00 screws from the middle of the car.

    • Unclip the two clips to remove the battery cover.

  2. X-street Lamborghini Murcielago LP670-4 SV Front Steering Motor Replacement: passo 2, immagine 1 di 1
    • Unplug the battery by pushing on the clip.

  3. X-street Lamborghini Murcielago LP670-4 SV Front Steering Motor Replacement, Underbody: passo 3, immagine 1 di 1
    • Unscrew the two 2.5mm Phillips #00 screws from each side

  4. X-street Lamborghini Murcielago LP670-4 SV Front Steering Motor Replacement: passo 4, immagine 1 di 1
    • Remove the side skirt covers on each side of the car.

  5. X-street Lamborghini Murcielago LP670-4 SV Front Steering Motor Replacement: passo 5, immagine 1 di 2 X-street Lamborghini Murcielago LP670-4 SV Front Steering Motor Replacement: passo 5, immagine 2 di 2
    • Lift up and remove the two side skirts.

  6. X-street Lamborghini Murcielago LP670-4 SV Front Steering Motor Replacement: passo 6, immagine 1 di 1
    • Unscrew the two 2.5mm Phillips #00 screws from the front skirt of the car.

  7. X-street Lamborghini Murcielago LP670-4 SV Front Steering Motor Replacement: passo 7, immagine 1 di 1
    • Lift the front part of the underbody and pull it out from the main underbody.

  8. X-street Lamborghini Murcielago LP670-4 SV Front Steering Motor Replacement: passo 8, immagine 1 di 2 X-street Lamborghini Murcielago LP670-4 SV Front Steering Motor Replacement: passo 8, immagine 2 di 2
    • Unscrew the remaining seven 9mm Phillips #00 screws from the underbody of the car.

    • The second image shows a closer view of the rear three screws

  9. X-street Lamborghini Murcielago LP670-4 SV Front Steering Motor Replacement: passo 9, immagine 1 di 2 X-street Lamborghini Murcielago LP670-4 SV Front Steering Motor Replacement: passo 9, immagine 2 di 2
    • Lift the main underbody from the shell of the car.

    • Lift up the body to expose the wiring and hardware underneath.

  10. X-street Lamborghini Murcielago LP670-4 SV Front Steering Motor Replacement: passo 10, immagine 1 di 1
    • Remove the reflective sticker from the top of the body.

  11. X-street Lamborghini Murcielago LP670-4 SV Front Steering Motor Replacement: passo 11, immagine 1 di 1
    • Unplug the wire connector.

  12. X-street Lamborghini Murcielago LP670-4 SV Front Steering Motor Replacement, Steering Column: passo 12, immagine 1 di 3 X-street Lamborghini Murcielago LP670-4 SV Front Steering Motor Replacement, Steering Column: passo 12, immagine 2 di 3 X-street Lamborghini Murcielago LP670-4 SV Front Steering Motor Replacement, Steering Column: passo 12, immagine 3 di 3
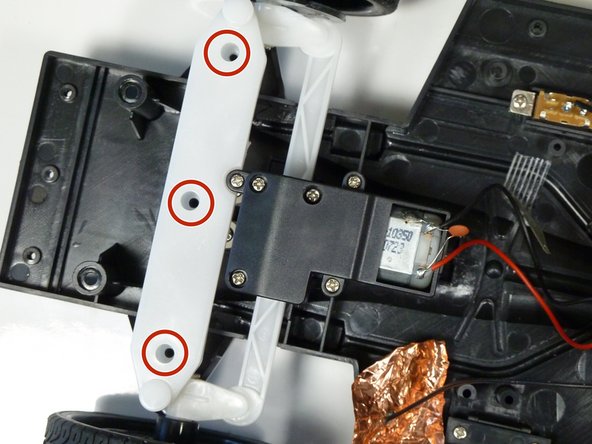
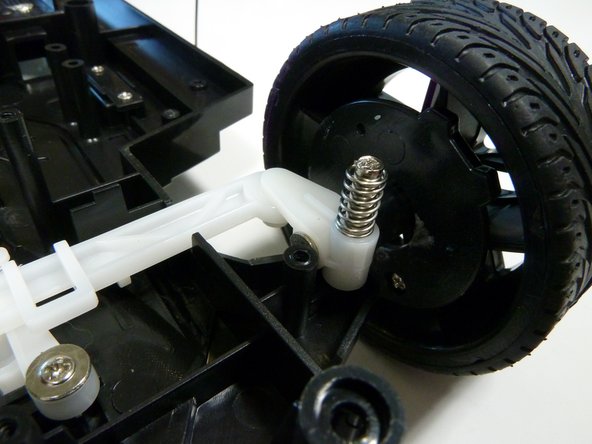
    • Unscrew the three 2.5mm Phillips #00 screws from the white steering column.

    • After removing the three screws, the steering column will pop out of position because of the springs underneath. To reassemble, put the springs back together as shown in picture #3.

  13. X-street Lamborghini Murcielago LP670-4 SV Front Steering Motor Replacement, Front Steering Motor: passo 13, immagine 1 di 1
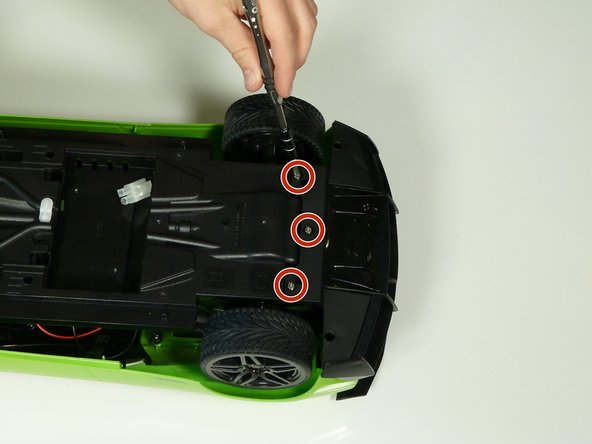
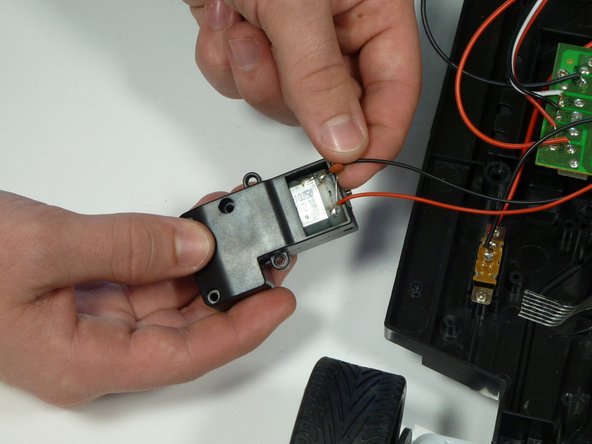
    • Remove the three 1.6mm Phillips #000 screws from the black motor casing

  14. X-street Lamborghini Murcielago LP670-4 SV Front Steering Motor Replacement: passo 14, immagine 1 di 1
    • Remove the front motor and its casing from the chassis of the car.

  15. X-street Lamborghini Murcielago LP670-4 SV Front Steering Motor Replacement: passo 15, immagine 1 di 2 X-street Lamborghini Murcielago LP670-4 SV Front Steering Motor Replacement: passo 15, immagine 2 di 2
    • Remove the remaining three 1.6 mm Phillips #000 screws from the black motor casing

    • The second image shows the screws removed from the casing.

  16. X-street Lamborghini Murcielago LP670-4 SV Front Steering Motor Replacement: passo 16, immagine 1 di 1
    • Pull out the front motor, making sure to keep the gears intact

Conclusione

To reassemble your device, follow these instructions in reverse order.

Team

Cal Poly, Team 24-3, Lancaster Spring 2015 Membro di Cal Poly, Team 24-3, Lancaster Spring 2015

CPSU-LANCASTER-S15S24G3

3 Membri

9 Guide realizzate

Un commento

How many volts is the battery?

DC2 - Replica

Aggiungi Commento

Visualizza Statistiche:

Ultime 24 Ore: 2

Ultimi 7 Giorni: 4

Ultimi 30 Giorni: 7

Tutti i Tempi: 535