Salta al contenuto principale
Why! NH57ADS M.2 SSD Replacement

Why! NH57ADS M.2 SSD Replacement

Felice Suglia

Felice Suglia e un altro collaboratore

Ultimo aggiornamento il 11 ago 2022

55 secondi
Molto facile
Guida fornita dalla comunità
Inconveniente Markup
Introduzione Migliore

Cosa ti serve

Ricambi

Strumenti

Mostra di più…

  1. Why! NH57ADS M.2 SSD Replacement, Battery: passo 1, immagine 1 di 3 Why! NH57ADS M.2 SSD Replacement, Battery: passo 1, immagine 2 di 3 Why! NH57ADS M.2 SSD Replacement, Battery: passo 1, immagine 3 di 3
    • Remove the two screws holding the battery in place.

    • Slip your finger into the finger hole provided at the top of the battery and lift to remove it.

  2. Why! NH57ADS M.2 SSD Replacement, Bottom Cover: passo 2, immagine 1 di 3 Why! NH57ADS M.2 SSD Replacement, Bottom Cover: passo 2, immagine 2 di 3 Why! NH57ADS M.2 SSD Replacement, Bottom Cover: passo 2, immagine 3 di 3
    • Remove the five Phillips screws securing the bottom to the case.

    • Slide the cover up slightly to release the catches holding it in place. This is the view on the right. The mark on the cover should now line up with the second mark on the case of the computer.

  3. Why! NH57ADS M.2 SSD Replacement, Removing the Bottom Cover: passo 3, immagine 1 di 3 Why! NH57ADS M.2 SSD Replacement, Removing the Bottom Cover: passo 3, immagine 2 di 3 Why! NH57ADS M.2 SSD Replacement, Removing the Bottom Cover: passo 3, immagine 3 di 3
    • This is the view on the left before and after sliding the cover. The mark on the cover should now line up with the second mark on the case of the computer.

    • Lift the bottom cover to remove it.

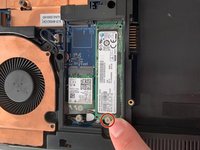
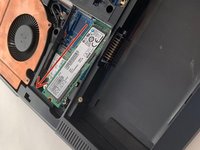
  4. Why! NH57ADS M.2 SSD Replacement, Remove the M.2 SSD: passo 4, immagine 1 di 2 Why! NH57ADS M.2 SSD Replacement, Remove the M.2 SSD: passo 4, immagine 2 di 2
    • Remove the Phillips screw securing the M.2 SSD drive in place. The end of the drive will pop up by a small amount.

    • Slide the drive out from the connector in a straight line. If you feel resistance, try raising it slightly.

Conclusione

To reassemble your device, follow the instructions in reverse order.

Un ringraziamento speciale a questi traduttori:

fr en

100%

Jerry Wheeler ci sta aiutando ad aggiustare il mondo! Vuoi partecipare?
Inizia a tradurre ›

Felice Suglia

Membro da: 06/15/13

33.312 Reputazione

282 Guide realizzate

0Commenti sulla guida

Aggiungi Commento

Visualizza Statistiche:

Ultime 24 Ore: 0

Ultimi 7 Giorni: 2

Ultimi 30 Giorni: 9

Tutti i Tempi: 245