Introduzione
Cambiare la lampadina bruciata del faro della tua Volkswagen New Beetle è abbastanza semplice, anche se la procedura non è così scontata. Invece di portare la macchina dal concessionario, risparmia tempo e denaro cambiandola da te. La lampadina di ricambio utilizzata è una alogena H7 da 55 W sia per il faro anabbagliante che quello abbagliante, mentre la lampadina per il parcheggio è una 2825 da 5 W (conosciuta anche come W5W).
Cosa ti serve
-
-
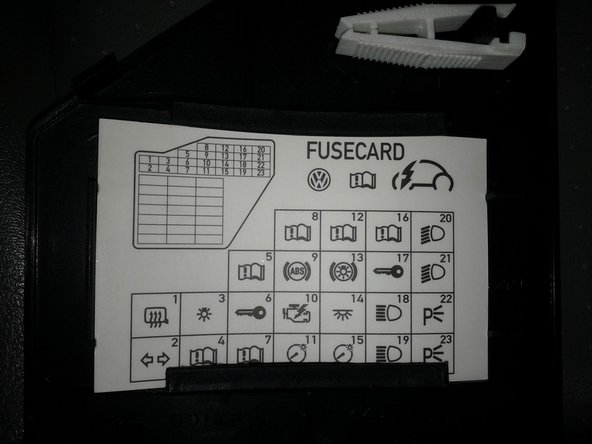
Prima di decidere di cambiare una lampadina, controlla che non sia il fusibile ad essersi bruciato. Dovrai aprire la scatola dei fusibili che si trova a sinistra del cruscotto. Usa uno strumento sottile e piatto, come un cacciavite a testa piatta o una chiave, per aprirla.
-
All'interno vedrai diversi fusibili multi colore.
-
Usa la scheda e le pinzette in plastica bianca attaccate sul retro della porta della scatola dei fusibili per trovare e rimuovere i fusibili delle lampadine dei fari. I fusibili 18 e 19 sono per le lampadine dei fari abbaglianti, i 20 e 21 per quelli anabbaglianti, 22 e 23 per il parcheggio. Rimuovi i fusibili uno ad uno in modo da non mischiarli.
-
Il corpo dei fusibili è semi trasparente. Osservalo di lato per capire se il fusibile è in buono stato.
-
-
-
Se hai controllato che tutti i fusibili sono apposto, allora è la lampadine che è bruciata. Per sostituire la lampadina dovrai rimuovere l'intero gruppo dei fari sfilandolo dal suo alloggio nel parafango.
-
Per prima cosa, sblocca il cofano tirando la maniglia a sinistra dei pedali.
-
Quindi apri il cofano tirando l'aletta in plastica verso di te e sollevandolo.
-
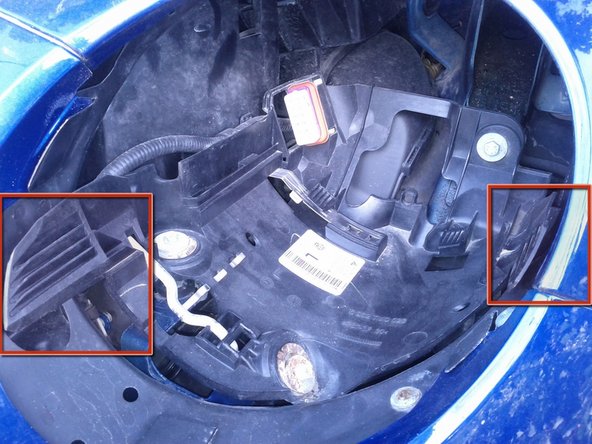
Il gruppo dei fari lato passeggero è facilmente identificabile, mentre quello lato guidatore è nascosto sotto la batteria. Può essere utile rimuovere la copertura della batteria, permettendoti di vederlo ed accederci un po' meglio.
-
-
-
-
Per rimuovere il gruppo dei fari, usa una chiave da 5 mm per girare il bullone di bloccaggio di 1/4 di giro nella direzione indicata. Dal lato passeggero il bullone è facilmente identificabile: giralo in senso orario.
-
Dal lato guidatore dovrai infilarti tra la batteria e il corpo della macchina, usando una chiave con un manico lungo, per girare il bullone in senso antiorario.
-
Cerca di non girare il bullone per più di 1/4 di giro, o potresti rigirarlo nella posizione bloccata.
-
-
-
dopo aver sbloccato il gruppo dei fari, premi sulla leva di bloccaggio: è visibile guardando in basso da sopra i fari.
-
Sul lato guidatore si può vedere solo una parte della leva tra la batteria e il filtro dell'aria, ma puoi comunque raggiungerla con un cacciavite con un manico lungo.
-
Mentre premi sulla leva di bloccaggio, spingi il gruppo dei fari in avanti, fuori dal suo alloggio. Stai attento: potrebbe essere difficile da spingere e potrebbe uscire improvvisamente.
-
-
-
Trova la copertura delle lampadine sul retro. Sganciala e apri la copertura per accedere alle lampadine.
-
Rimuovi il connettore elettrico e tira fuori la lampadina che vuoi sostituire. La lampadina anabbagliante è tenuta ferma con un gancio. Le altre sono tenute ferme dall'attrito. Usa delle pinze per tirarle fuori delicatamente.
-
Installa la nuova lampadina e ricollega il connettore. Non toccare il vetro della lampadina a mani nude: gli oli delle tue dita resteranno sul vetro e lo romperanno quando si scalderà dopo aver acceso la lampadina.
-
Reinstalla la copertura delle lampadine.
My problem was that the socket was burned out. So be sure to check that. It was easy to replace. They had the socket at the autoparts store and we just spliced the wires together.
Confirming what Be Green said: the low beam bulb is the one with a clip.
Thelma, it is possible that the headlight assembly did not make solid contact with the connector when you slid it back in. The result will be that none of the lights will come on for that side. Try sliding out the assembly and slide it back in. For the driver side assembly, at least, you can also access the back side of the connector to try pressing it in tight after the assembly is seated.
Okay, so I took my Beetle to the dealer to have them replace the bulb, and I asked them to let me watch the mechanic as he replaced the bulb, which they did. He showed me how to do it, and the first thing that I noticed was that you DON'T turn the 5mm nut 1/4 turn, you turn it until it stops turning. That's why I wasn't able to get the headlight assembly out of the car. He even let me turn the nut with his ratchet, to see where it stopped turning.
-
-
-
Mentre reinstalli il gruppo dei fari nel suo alloggio, assicurati che le guide dell'alloggio si inseriscano su entrambi i lati del gruppo.
-
Spingi il gruppo nell'alloggio finché non lo senti scattare in posizione.
-
Riusa la chiave da 5 mm per girare il bullone di bloccaggio che tiene fermo il gruppo nel suo alloggio.
-
Accendi la macchina e controlla che la nuova lampadina funzioni. Chiudi il cofano.
Danke, Danke, Danke war sehr gut beschrieben!!!
Is this a 2011+ guide or does it apply to the 2001-2010 beetle too?
That particular car was a 2007, but I expect it to be applicable to all New Beetles
-


Dopo aver rimontato il tutto, assicurati di girare il meccanismo di bloccaggio nella direzione indicata per tenere fermo il gruppo dei fari, altrimenti potrebbero esserci dei problemi con i contatti e le luci potrebbero non accendersi.
Dopo aver rimontato il tutto, assicurati di girare il meccanismo di bloccaggio nella direzione indicata per tenere fermo il gruppo dei fari, altrimenti potrebbero esserci dei problemi con i contatti e le luci potrebbero non accendersi.
Annulla: non ho completato questa guida.
Altre 55 persone hanno completato questa guida.
Un ringraziamento speciale a questi traduttori:
100%
Daniele Carminati ci sta aiutando ad aggiustare il mondo! Vuoi partecipare?
Inizia a tradurre ›
31 Commenti
First part of step 6 is ESSENTIAL. Be warned that the assembly will slip easily into position without the locator guides being inside the catches on the unit, and the locking lever will click into place, but the locking nut will not tighten it into position. Don't ask me how many times I repeated this before I did it properly because I will lie!
I never heard a "click"; however, I lock the hex nut ok. So the light works but seems like the car hits a bump and the light jumps out of the connector enough to stop working. Any thoughts?
Thanks for the guide, this was super easy to perform and took less than 10 minutes.
I had to squeeze the headlight assembly and holder together really hard to get the connector to seat properly - at first nothing worked when I put it back together...
Thank you, Nick, for creating this manual! My daughter has an '06 Beetle. I've had to replace the driver side headlight three times. I recently had to replace the whole assembly because when I replaced the light bulb, I evidently did not properly lock the assembly, and it vibrated loose in traffic, and disappeared. As for the click, I have never heard it click. Even with the new headlight installed, still no high or low beam. Not sure what's going on. All comments have been helpful, though. Thank you, iFixit!
I am far from handy when it comes to cars, but I was not going to pay $200 to fix a headlight ! It took about 1.5 hours of reading this site, looking under the hood and some trial and error...but it all makes sense if you follow this closely. Be sure to look closely at what they show in the red boxes above. The main problem was finding a nut driver long enough to reach the Driver's side lock for the headlight. I found one that was a 3/16 inches and it worked fine. Depressing the lever to release the assembly and pull at the same time also was tough to figure out the first time. All total I got it done for $24 bucks (new bulb, nut driver) and 90 minutes of work (will only take 30 minutes next time....) Thanks to you for putting this together.
Can anyone help troubleshoot lights not working after putting assembly back together? I've tried 5 times already and still nothing! All lights worked fine when I first replaced it but I'm thinking maybe I didn't lock it correctly and vibrates loose? Any tips would be greatly appreciated!
Have you looked at the copper leads? Do they look like they might have been burned? Volkswagens are notorious for electrical issues and they can short circuit. There should be three copper coated wires in the assembly, and if even one is burned it will cause the light to only work sometimes. You can check that. If they all look fine, make sure the connections are touching fully and going to the right places. It is also easy to put the metal clip part on backwards! Don't do that, I did that, it only goes one way. Hope I helped. There should be another guide on this. Maybe I will make one.
Marcy -
Something you don't explain is that, on the driver's side light, once you've turned the nut 1/4 turn, and as you are pushing down on the lever, how do you get the headlight assembly out? There is nothing to grab hold of from the front of the headlight, and you can't get your hands on the back of the assembly, so how do you get it out? I tried putting the handle of a pipe wrench between the back of the headlight assembly and the air filter housing and pushing as hard as I could while pushing down on the lever, and the headlight assembly wouldn't come out. After an hour, I gave up and took it to the dealer.....a 15 minute job my rear end!
I thought my bulb replacement would be a 15minute job also...... no such luck. After the bulb was replaced, I pushed the headlight assembly back into the housing until I heard it click. I did not lock the assembly down using the hex nut. I then turned on the ignition and headlights to see if it was operational. None of the bulbs would light. I diagnosed the problem and found that the electrical connector was not fully seated. Once I locked the light down with the hex nut, the electrical connector snugged into place and everything was working fine. Hopes this helps someone with the same dilemna.
I replaced the bulbs. It fixed the driver side low beam but the passenger side still doesn't work. Fuses are good. Any suggestions?
Where is the lever for the passenger side to release the light
Better than YouTube!!! Excellent work. Thank you so much!
Thank you so much for taking the time to share this information. Previous instructions had major removal of other components to complete this repair. The only issues that I had were not getting a good electrical connection. One was caused by not turning the locking screw tight enough. The second was not having the lamp housing seated correctly. I completed replacement of both head lamps in under 1/2 hour.
I replaced all 4 bulbs on my 2000 beetle and dims wouldn't work found out that each bulb has it own fuse replaced low beam fuses and lights came on ur head light fuses are top left corner of box 15 amp between 19 and 23 number fuse for headlights
Sorry it's top
I’m 67 years old and a woman last time I took my car to VW dealership costed 200.00 for a 10.00 bulb so I got on you tube and the man said use this nut with a long handle and then push this gold level down but he didn’t show how or what size nut but this is step by step with pictures on how to did it love it save a lot of money thank you
I have a 99 better, the high beams work fine. Only one of the low beams work. I checked the fuse and replaced the headlights,and the low beams on one side still don't work. I'm homeless right now a trying to save what money I have. My question is if I switch the high and low beam connectors around will that screw up everything.
I had to replace bulb in wife’s 2006 bug but it didn’t work. After searching these sites I and seeing what others were doing I tried drilling a hole and putting a short 3/4 shim with screw between the plastic that holds the headlight socket and the inner fender. This helped keep the socket from flexing when the headlight assembly was reinserted. Also, and this is important, after all was together, from inside engine compartment I pushed the socket even harder with a large screwdriver and heard a ‘click’. I knew all was right with the world then.
Great guide, there is no way I would have figured this out on my own. Sadly, it didn't fix my driver side light. Neither the hi or low beams work, the fuses are all good, replaced the low beam as a test and put the headlight back in even heard the click but still no lights. Any suggestions what else to check, is there a way to test that power is going to the pins?
What happens when you find that the lever (passenger side) was broken by te former owner and badly glued back?
This how-to was great. I removed both headlight assemblies, replaced the bulbs, and re-installed the assemblies in about 10 minutes. Great job of describing the procedure.
Very generous of you to share your knowledge. Your awesome
I don't see any 21 fuses for the low beams. Should I? Don't see them in your picture either.
John Malcolmson - Replica