Introduzione
While there are plenty of guides on how to virtualize macOS on Apple Silicon-based Macs, there are very few on how to do it on Intel-based Macs. I stumbled across a good method and decided to share it.
I wrote this based on macOS Mojave as it's the last macOS version to support 32-bit applications, and I have a few I'd like to run. For running PowerPC applications, Mac OS X Snow Leopard is the best option, as it's the last version to run Rosetta 1. macOS Tahoe is good for testing app compatibility (i.e. will my app look good with the new rounding? Does the icon have a gray border around it? etc.). Other versions are only valuable from a historical perspective.
Note that macOS Tahoe is terrible without graphics acceleration. You may want to check out Proxmox VE for running Tahoe, as there are some tools for GPU passthrough with it (see step 1 for more details).
If you're making a virtual machine for macOS Monterrey (12) or higher on an Apple Silicon Mac, iPhone, or iPad, you'll want to follow this guide instead as it allows for virtualization on those devices. Catalina VMs (10.15) and below should still follow this guide to get them to work, as they were only compiled for Intel. Big Sur (11) supports Apple Silicon Macs, but it's not officially supported for virtualization in UTM. If you really need Big Sur in a VM on Apple Silicon for some reason, follow this guide anyway.
-
-
Before you begin, there are some things you need to know:
-
UTM does not have SPICE tools for Intel macOS (Tiger 10.4 to Tahoe 26). This means there will be no graphics acceleration, clipboard sharing, dynamic window resizing, etc. If you need graphics acceleration, use different software.
-
Virtualization will not work with Mac OS X 10.3 Panther or before because they only support PowerPC, or past macOS 26 Tahoe because 27 and beyond only support Apple Silicon. The steps for getting PowerPC macOS working are much different than these.
-
Some versions will need patches to work properly. These may or may not be available through OpenCore Legacy Patcher. Keep in mind that macOS Tahoe-specific problems will not have patches available through OCLP because, at the time of writing, Tahoe is not supported for patching. This guide will not go over how to individually install such patches.
 Chiedi a FixBot
-
-
-
First, you'll need to get a copy of OpenCore ISO from Github.
-
Go to the repo's releases page and download LongQT-OpenCore-vX.X.iso. Put it somewhere you'll remember but won't clutter your workspace (i.e. documents folder), as moving it later may break the VM.
-
-
-
If you're using a Mac, or at least have a Mac you can use for this, type
curl -s https://raw.githubusercontent.com/LongQT-sea/mkmaciso/main/mkmaciso | bash -s mojaveinto Terminal, replacingmojavewith the macOS version you want, and hit return. This makes an ISO file containing an installer for your selected OS version. -
This method will output to your user's home folder, accessible in Finder through Go>Home.
-
If you don't have a Mac and are running UTM on iOS, the steps are a little trickier. If you have a Github account, clone the ISO Builder repo by clicking here.
-
Go to the Actions tab in your forked repository and click the green "I understand my workflows, go ahead and enable them" button.
-
Select Recovery ISO from the sidebar, then click Run Workflow.
-
Select the macOS version you want and select ISO as the format, then press the green Run Workflow button.
-
When it finishes, reload the tab, then scroll down to Artifacts. Download the ISO labeled your macOS version, (e.g. macOS_Mojave_10.14.6.iso).
-
-
-
Now that you have your ISOs, you can load them into a VM. If you haven't already, install UTM, then create a new VM. On macOS, you'll click virtualize next, while iOS users will need to use emulate.
-
Click Other for preconfigurations.
-
Leave everything at default until you get to selecting a boot ISO. You want LongQT_OpenCore, not the macOS installer.
-
For storage, 64GB should be fine. If you plan to run lots of software that needs to be installed on the system itself, you may consider setting it to higher than that. You can't easily change the size of this later, so know what you're doing with the VM before you set it up.
-
Leave everything at default until the summary screen. Change the name of the VM to macOS Mojave and check open VM settings, then click save.
-
-
-
-
Optionally, you can set the VM to have an Apple logo as its icon in the UTM sidebar. Click operating system down at the bottom, then select macOS.
-
If you want a different icon (like the actual macOS logo) press custom and upload your own image. Note that if it's not perfectly square, it will stretch to fit the space.
-
-
-
You'll want to get the Mojave installer connected to the VM, so make a new drive by selecting New… at the very bottom of the sidebar.
-
Press import and select the Mojave installer ISO.
-
-
-
Under system, set CPU to Penryn for 10.4 to 10.10, Skylake-client for 10.11 to 26.
-
Under display, set the emulated display card to virtio-vga-gl (GPU supported). Some others may also work, but if you ever want to tinker around with graphics acceleration, this is definitely the option to pick.
-
Under network, set network mode to emulated VLAN and emulated network card to usb-net. Other configurations may work, but the defaults will not.
-
Click save when you're done.
-
-
-
Press the play button on the left to start the VM.
-
Verbose mode is enabled on this ISO, so lots of text will fly across the screen. What the text says doesn't matter; just let it run in the background.
-
You'll also see a button briefly pop up that says Install macOS version. You don't need to do anything when you see this screen, as it picks the correct option for you.
-
After a little time, you'll see the VM boot into macOS recovery. This is the expected behavior.
-
-
-
Right now, the internal drive is completely blank and unformatted, therefore you cannot directly install macOS on it.
-
Open Disk Utility and select QEMU HARDDISK Media.
-
Erase the drive. Name it Macintosh HD and set the format to APFS.
-
After this has finished, you can close Disk Utility.
-
-
-
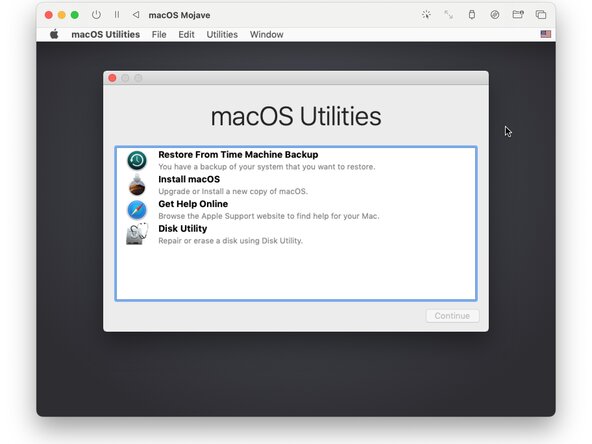
Select install macOS.
-
Click the arrow at the bottom of the screen, then agree to the license.
-
Select Macintosh HD and continue.
-
At this point, the VM will handle everything for you. You can sit back and relax until you see a setup screen. It will take a while to fully install. If your computer has fans, they will likely start blowing. If it doesn't, you should consider moving it to a cooler room and elevating it to allow for more airflow.
-
-
-
Once you see the setup screen, macOS has fully installed. Set up your user account and password. You don't need to sign in to your VM with your Apple ID.
-
At this point you no longer need the macOS installer. You can delete it from your system to clear up space.
-
Open UTM, select your VM (without running it yet), click on the settings button in the top-right corner of the window, and scroll down on the sidebar to drives. Clicking on the drives will reveal their name. There will be a delete button near the bottom-left corner.
-


You've created a functioning macOS virtual machine in UTM.
If I find a way to get a GPU passthrough set up, I'll add the instructions on how to do so to this guide. Right now UTM only has experimental GPU support, and for Linux guests only.
