Salta al contenuto principale

Vintage Oster Mixer Power Cord Replacement

Cosa ti serve

  1. Vintage Oster Mixer Power Cord Replacement, Power Cord: passo 1, immagine 1 di 1
    • The tools you will need are:

    • Needle nose pliers

    • Tweezers

    • Slip joint pliers

    • A 9/32 &7/16 socket

    • Extension optional

    • A multi head screwdriver

  2. Vintage Oster Mixer Power Cord Replacement: passo 2, immagine 1 di 3 Vintage Oster Mixer Power Cord Replacement: passo 2, immagine 2 di 3 Vintage Oster Mixer Power Cord Replacement: passo 2, immagine 3 di 3
    • To begin you need to remove the top of the blender. To do this you must push inward on the tab located on the bottom of the top half of the machine. After pushing the tab you can then lift up using the handle to remove the top.

  3. Vintage Oster Mixer Power Cord Replacement: passo 3, immagine 1 di 3 Vintage Oster Mixer Power Cord Replacement: passo 3, immagine 2 di 3 Vintage Oster Mixer Power Cord Replacement: passo 3, immagine 3 di 3
    • Next you will need to tip the mixer onto its back to get a better angle. After you tip it onto its back, you will need to take a screwdriver with a 9/32 head or a 9/32 socket and unscrew the four bolts thus removing the black bottom tray.

  4. Vintage Oster Mixer Power Cord Replacement: passo 4, immagine 1 di 2 Vintage Oster Mixer Power Cord Replacement: passo 4, immagine 2 di 2
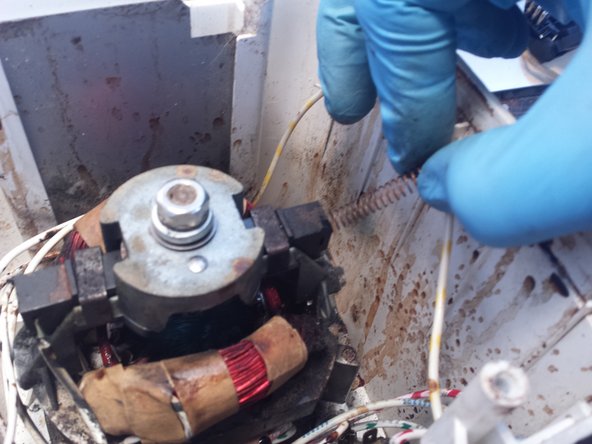
    • Here you will need your 7/16 socket and your slip joint pliers. First you will need fit your 7/16 socket on the hex nut on the bottom of the machine and your slip joint pliers on the rod sticking through the top of the machine. You will then loosen the nut with your socket while holding the top with your slip joint pliers.

    • By doing this you will be removing the flywheel thus giving you more room to remove the electrical connections.

  5. Vintage Oster Mixer Power Cord Replacement: passo 5, immagine 1 di 2 Vintage Oster Mixer Power Cord Replacement: passo 5, immagine 2 di 2
    • At this step you will need your needle nose pliers to pry this angled tab straight which will allow you to pull it back through the slot.

    • After pulling the connector back through the slot a spring will begin to come out, do not remove or lose it.

  6. Vintage Oster Mixer Power Cord Replacement: passo 6, immagine 1 di 1
    • After you remove the first connection, this motor brush will begin to come out but do not remove it completely.

  7. Vintage Oster Mixer Power Cord Replacement: passo 7, immagine 1 di 2 Vintage Oster Mixer Power Cord Replacement: passo 7, immagine 2 di 2
    • Lastly you will need to use tweezers or needle nose pliers to remove the last electrical connection. With this connection all you need is to pull back on the metal part or the connection with your tweezers or needle nose pliers.

Conclusione

To reassemble your device, follow these instructions in reverse order.

Un'altra persona ha completato questa guida.

0 Commenti

Aggiungi Commento

Visualizza Statistiche:

Ultime 24 Ore: 0

Ultimi 7 Giorni: 0

Ultimi 30 Giorni: 10

Tutti i Tempi: 868