Salta al contenuto principale

Sony Vaio VGN-FS640 Fan Replacement

Guida Archiviata
Questa guida è mantenuta solo per scopi storici. Usa la versione aggiornata della guida per eseguire la riparazione.

Cosa ti serve

  1. Sony Vaio VGN-FS640 Fan Replacement, Backplate: passo 1, immagine 1 di 1
    • Turn off the laptop and disconnect any charging cables.

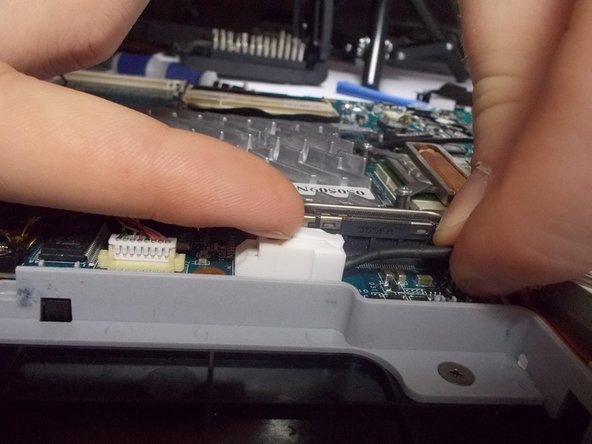
    • Flip the laptop over so that the Service Tag is shown at the top left corner.

  2. Sony Vaio VGN-FS640 Fan Replacement: passo 2, immagine 1 di 1
    • Remove the highlighted screws from the back of the laptop with a Phillips #0 Screwdriver.

  3. Sony Vaio VGN-FS640 Fan Replacement: passo 3, immagine 1 di 1
    • Remove the highlighted screws from the panels in the bottom right-hand corner of the laptop using the Phillips #0 Screwdriver.

  4. Sony Vaio VGN-FS640 Fan Replacement: passo 4, immagine 1 di 1
    • Remove the two panels in the bottom right-hand corner by sliding in the direction of the arrows imprinted on the panels.

  5. Sony Vaio VGN-FS640 Fan Replacement: passo 5, immagine 1 di 1
    • Remove the highlighted screws underneath the removed panels using the Phillips #0 Screwdriver.

  6. Sony Vaio VGN-FS640 Fan Replacement: passo 6, immagine 1 di 1
    • Carefully remove the hard drive from the panel in the bottom right-hand corner of the laptop.

  7. Sony Vaio VGN-FS640 Fan Replacement: passo 7, immagine 1 di 1
    • Locate the battery, located on the top side of the laptop to the right of the Service Tag .

    • Remove the battery by pressing inwards on the tabs on either side of the battery.

  8. Sony Vaio VGN-FS640 Fan Replacement: passo 8, immagine 1 di 1
    • Remove cover in the top left side of the laptop next to the battery by pulling it outwards.

  9. Sony Vaio VGN-FS640 Fan Replacement: passo 9, immagine 1 di 1
    • Remove the backplate of the laptop by pulling it away from the laptop.

  10. Sony Vaio VGN-FS640 Fan Replacement, Fan: passo 10, immagine 1 di 3 Sony Vaio VGN-FS640 Fan Replacement, Fan: passo 10, immagine 2 di 3 Sony Vaio VGN-FS640 Fan Replacement, Fan: passo 10, immagine 3 di 3
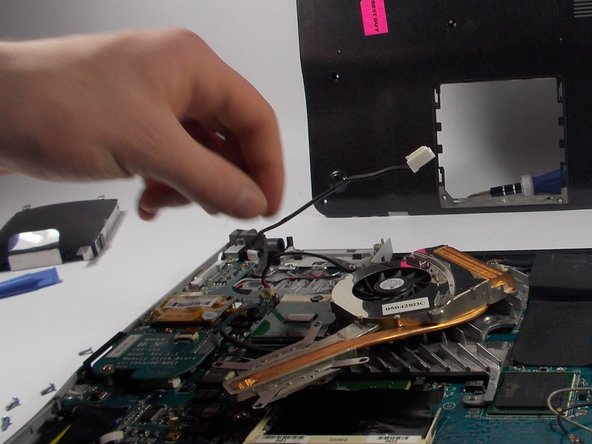
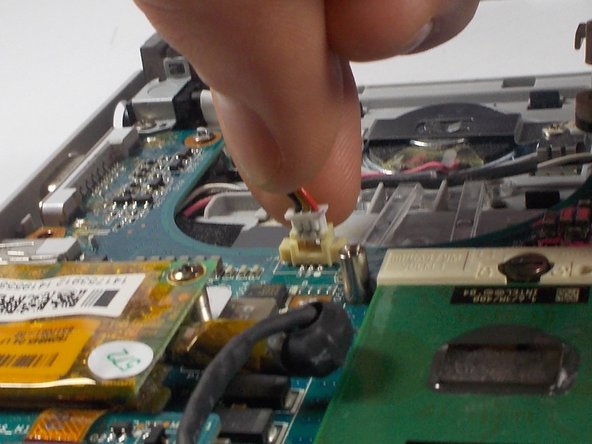
    • Gently remove the connector for the wire running over the fan by lifting the tab on top up with your fingernail and sliding it out.

  11. Sony Vaio VGN-FS640 Fan Replacement: passo 11, immagine 1 di 2 Sony Vaio VGN-FS640 Fan Replacement: passo 11, immagine 2 di 2
    • Remove the four screws securing the fan.

  12. Sony Vaio VGN-FS640 Fan Replacement: passo 12, immagine 1 di 2 Sony Vaio VGN-FS640 Fan Replacement: passo 12, immagine 2 di 2
    • Gently lift out the fan.

    • Do not forcefully pull the fan away. This may damage the circuit board.

  13. Sony Vaio VGN-FS640 Fan Replacement: passo 13, immagine 1 di 2 Sony Vaio VGN-FS640 Fan Replacement: passo 13, immagine 2 di 2
    • Gently disconnect the remaining wire connecting the fan to the circuit board.

    • Remove the fan from the laptop.

Conclusione

To reassemble your device, follow these instructions in reverse order.

Un'altra persona ha completato questa guida.

Geoffrey

Membro da: 03/28/14

252 Reputazione

2 Guide realizzate

Team

0 Commenti

Aggiungi Commento

Visualizza Statistiche:

Ultime 24 Ore: 0

Ultimi 7 Giorni: 4

Ultimi 30 Giorni: 7

Tutti i Tempi: 538