Salta al contenuto principale

UK-830LN Disassembly

Cosa ti serve

  1. UK-830LN Disassembly, Please remove the case of the electrical tester: passo 1, immagine 1 di 3 UK-830LN Disassembly, Please remove the case of the electrical tester: passo 1, immagine 2 di 3 UK-830LN Disassembly, Please remove the case of the electrical tester: passo 1, immagine 3 di 3
    • The case is made of flexible silicone and can be easily peeled off.

  2. UK-830LN Disassembly, Loosen the 2 screws on the back.: passo 2, immagine 1 di 3 UK-830LN Disassembly, Loosen the 2 screws on the back.: passo 2, immagine 2 di 3 UK-830LN Disassembly, Loosen the 2 screws on the back.: passo 2, immagine 3 di 3
    • Loosen (remove) the two screws on the back by installing the J1 (JIS1) standard screwdriver bit of the ifixit pro tech toolkit.

  3. UK-830LN Disassembly, Open the rear panel by lifting only the lower part: passo 3, immagine 1 di 3 UK-830LN Disassembly, Open the rear panel by lifting only the lower part: passo 3, immagine 2 di 3 UK-830LN Disassembly, Open the rear panel by lifting only the lower part: passo 3, immagine 3 di 3
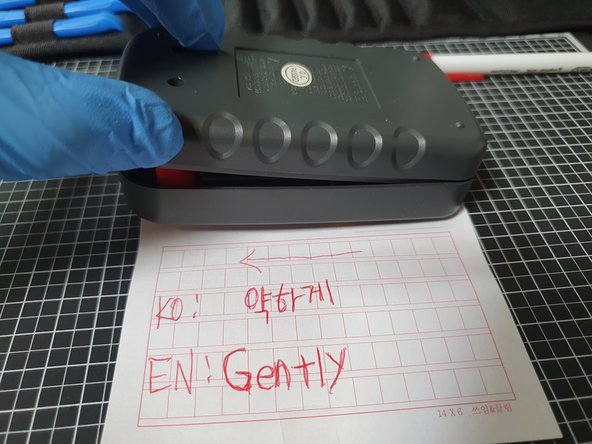
    • At first, there is a latch on the upper part, so only the lower part is lifted as much as it is lifted without force.

    • After lifting only as much as it can be lifted, pull it very slightly in the direction of the arrow in the photo, thinking that it is moving only 1mm very weakly. Very little!

  4. UK-830LN Disassembly, intermediate internal cleanup: passo 4, immagine 1 di 1
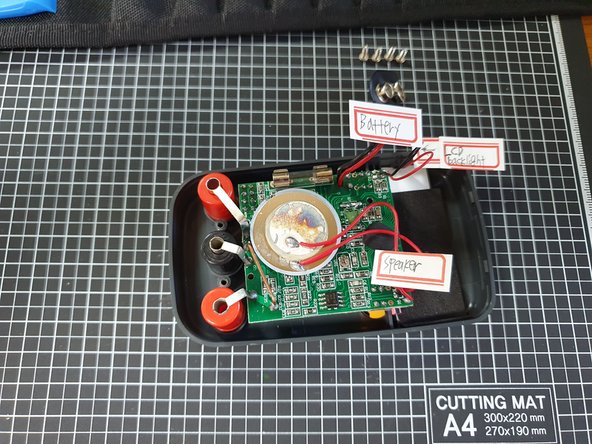
    • This step is inserted in the middle to show the internal structure

  5. UK-830LN Disassembly, Remove the battery: passo 5, immagine 1 di 2 UK-830LN Disassembly, Remove the battery: passo 5, immagine 2 di 2
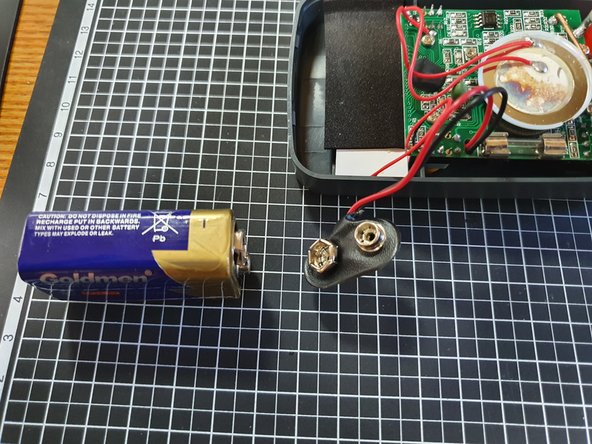
    • Disconnect the 9V battery from the device.

    • Be careful not to cut the battery cable at this time.

  6. UK-830LN Disassembly, To remove the motherboard, loosen the 4 screws.: passo 6, immagine 1 di 2 UK-830LN Disassembly, To remove the motherboard, loosen the 4 screws.: passo 6, immagine 2 di 2
    • Remove (unscrew) only the screws shown in the picture

    • At this time, the driver bit uses J0 (JIS0).

  7. UK-830LN Disassembly, internal structure: passo 7, immagine 1 di 1
    • A = operation mode selection switch (inner connect)

    • A = operation mode setting switch (internal contact)

  8. UK-830LN Disassembly, internal structure: passo 8, immagine 1 di 1
    • A' = Lubricated Steel Beads

    • A' = lubricated iron beads

Conclusione

To reassemble the unit, follow the instructions in reverse order.

Altre 3 persone hanno completato questa guida.

Un ringraziamento speciale a questi traduttori:

ko en

100%

Questi traduttori ci stanno aiutando ad aggiustare il mondo! Vuoi partecipare?
Inizia a tradurre ›

Turtle

Membro da: 07/12/21

3.916 Reputazione

3 Guide realizzate

Team

Blackpink [Korea] Membro di Blackpink [Korea]

Community

2 Membri

5 Guide realizzate

0 Commenti

Aggiungi Commento

Visualizza Statistiche:

Ultime 24 Ore: 1

Ultimi 7 Giorni: 3

Ultimi 30 Giorni: 24

Tutti i Tempi: 253