Salta al contenuto principale
UE BOOM 2 Micro-USB Port Replacement

UE BOOM 2 Micro-USB Port Replacement

Alex Bahm

Alex Bahm e un altro collaboratore

Ultimo aggiornamento il July 17, 2023

10 - 20 minuti
Moderato

Introduzione

Vai al passo 1

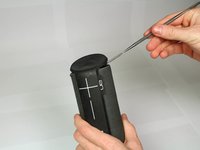
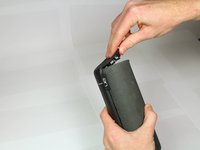
The micro-USB port is located under a rubber cover on the bottom of the UE Boom 2 speaker. Replacing this part requires the removal of the D-ring and rubber port cover, In addition the bottom pad must be removed, which will void the device warranty.

Cosa ti serve

iFixit guadagna commissioni quando acquisti tramite questi link.
  1. UE BOOM 2 Micro-USB Port Replacement, Micro-USB Port: passo 1, immagine 1 di 2 UE BOOM 2 Micro-USB Port Replacement, Micro-USB Port: passo 1, immagine 2 di 2
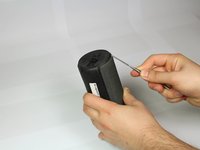
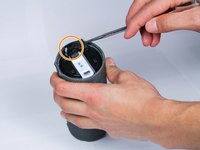
    • First, remove the D-ring located on the bottom of the UE Boom 2, the opposite end of the power button.

    • Remove by twisting in a counter-clockwise motion.

  2. UE BOOM 2 Micro-USB Port Replacement: passo 2, immagine 1 di 2 UE BOOM 2 Micro-USB Port Replacement: passo 2, immagine 2 di 2
    • After the D-ring has been removed, the rubber port cover can be removed.

  3. UE BOOM 2 Micro-USB Port Replacement: passo 3, immagine 1 di 3 UE BOOM 2 Micro-USB Port Replacement: passo 3, immagine 2 di 3 UE BOOM 2 Micro-USB Port Replacement: passo 3, immagine 3 di 3
    • Remove the rubber stripping using a metal spudger.

    • Work around the edge of the rubber stripping slowly prying up the edge.

  4. UE BOOM 2 Micro-USB Port Replacement: passo 4, immagine 1 di 1
    • Continue removing the rubber stripping down the side.

  5. UE BOOM 2 Micro-USB Port Replacement: passo 5, immagine 1 di 3 UE BOOM 2 Micro-USB Port Replacement: passo 5, immagine 2 di 3 UE BOOM 2 Micro-USB Port Replacement: passo 5, immagine 3 di 3
    • On the bottom, unscrew the four 15mm Phillips Head #2 screws, using the Phillips head #2 bit (labeled PH2 in the Pro Tech Toolkit).

    • Pry up at the location marked, and remove the plastic end cap.

    • The white plastic section houses the USB micro B, and must be replaced as a whole.

Conclusione

To reassemble your device, follow these instructions in reverse order.

Altre 8 persone hanno completato questa guida.

Alex Bahm

Membro da: 01/18/18

2.311 Reputazione

6 Guide realizzate

Team

Cal Poly, Team S12-G5, Banghart Winter 2018 Membro di Cal Poly, Team S12-G5, Banghart Winter 2018

CPSU-BANGHART-W18S12G5

2 Membri

15 Guide realizzate

6Commenti sulla guida

Hi,

Do you know where to buy this part?

Thanks!

cpgoga - Replica

Hello,

I am also looking to find where to order this part? I have searched on ebay / internet with no luck.

KM

Roock Canada - Replica

i too am looking to find the replacement part

Liam Nicholls - Replica

Found a place you can replace the USB connector if you can do a bit of soldering/unsoldering.

https://www.joesge.com/products/micro-us...

Roger Burke - Replica

Anyone have the part number to convert it to a USB type c instead of A?

vdub_corrado - Replica

Aggiungi Commento

Visualizza Statistiche:

Ultime 24 Ore: 1

Ultimi 7 Giorni: 26

Ultimi 30 Giorni: 99

Tutti i Tempi: 9,884