Salta al contenuto principale

Tribute Kendama String Replacement

Cosa ti serve

Panoramica Video

  1. Tribute Kendama String Replacement, Replacing a Tribute Kendama String: passo 1, immagine 1 di 2 Tribute Kendama String Replacement, Replacing a Tribute Kendama String: passo 1, immagine 2 di 2
    • Remove the damaged string and the small plastic bead completely, using scissors if necessary.

    • If knots have come undone, but the string is intact, follow the knot tying instructions under step 5.

  2. Tribute Kendama String Replacement: passo 2, immagine 1 di 1
    • Place the body of the kendama face down.

    • The big cup should be on the right-hand side.

  3. Tribute Kendama String Replacement: passo 3, immagine 1 di 1
    • Begin by inserting one end of the new string straight through the hole at the crosspiece.

    • The official minimum kendama string length is 38 cm or about 15 inches. Longer strings provide players with more of a challenge.

  4. Tribute Kendama String Replacement: passo 4, immagine 1 di 2 Tribute Kendama String Replacement: passo 4, immagine 2 di 2
    • Flip the kendama over to the other side, so that the big cup is now on the left-hand side.

    • Pull the end of the string until it extends about an inch out of the hole. This will be used to tie the knot.

  5. Tribute Kendama String Replacement: passo 5, immagine 1 di 3 Tribute Kendama String Replacement: passo 5, immagine 2 di 3 Tribute Kendama String Replacement: passo 5, immagine 3 di 3
    • To tie the knot, begin by taking the inch of extended string and making a small loop.

    • Put the tip of the string through the loop.

    • Put the tip of the string through the loop a second time to strengthen the knot. Pull the knot tight.

  6. Tribute Kendama String Replacement: passo 6, immagine 1 di 3 Tribute Kendama String Replacement: passo 6, immagine 2 di 3 Tribute Kendama String Replacement: passo 6, immagine 3 di 3
    • Now, we will attach the ball.

    • Begin by placing the ball upright, with the small hole on top.

    • Insert the free end of the string through the small hole, and continue pushing it through until it comes out the big hole on the bottom.

    • Wetting the string or dipping it in glue will make the string straighter and easier to thread through the ball.

  7. Tribute Kendama String Replacement: passo 7, immagine 1 di 3 Tribute Kendama String Replacement: passo 7, immagine 2 di 3 Tribute Kendama String Replacement: passo 7, immagine 3 di 3
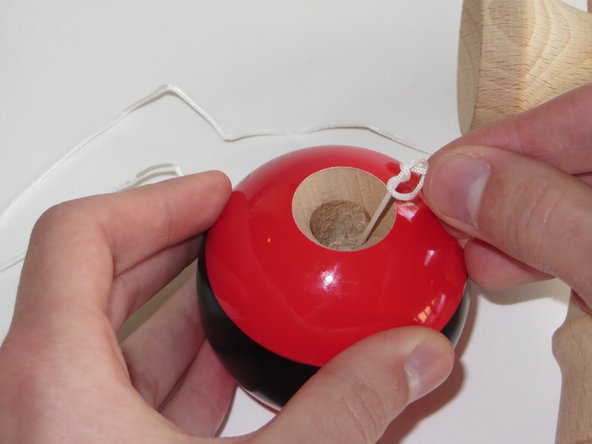
    • Thread the free end of the string through a small plastic bead, and allow the bead to slide down into the ball.

    • Now, with about an inch of string extending out from the big hole, we will tie a knot on the free end of the string, just like what was done in step 5.

    • Adjust the two knots to reach your preferred string length.

    • The kendama is ready to go!

Conclusione

Strings are bound to become damaged through excessive kendama use. However, these steps should save you plenty of time and frustration when repairing your beloved kendama.

For replacement strings visit: https://shop.kendamausa.com/collections/...

Andrew Melrose

Membro da: 04/09/15

101 Reputazione

1 Guida realizzata

Team

Cal Poly, Team 28-3, Green Spring 2015 Membro di Cal Poly, Team 28-3, Green Spring 2015

CPSU-GREEN-S15S28G3

4 Membri

8 Guide realizzate

Un commento

This tutorial is awesome, waiting for the next tutorial on how to be 99 parsing warlock.

Brite Cloud - Replica

Aggiungi Commento

Visualizza Statistiche:

Ultime 24 Ore: 3

Ultimi 7 Giorni: 4

Ultimi 30 Giorni: 13

Tutti i Tempi: 9,004