Salta al contenuto principale

Questa guida ha delle modifiche più recenti. Passa all'ultima versione non verificata.

Toshiba Tecra 8200 Hard Drive Replacement

Cosa ti serve

  1. Toshiba Tecra 8200 Hard Drive Replacement, Battery: passo 1, immagine 1 di 1
    • Turn off the device and unplug the power cord.

    • To remove the battery, flip the device, so that the bottom is facing upward.

  2. Toshiba Tecra 8200 Hard Drive Replacement: passo 2, immagine 1 di 3 Toshiba Tecra 8200 Hard Drive Replacement: passo 2, immagine 2 di 3 Toshiba Tecra 8200 Hard Drive Replacement: passo 2, immagine 3 di 3
    • Slide the battery to the right side until you hear a click.

    • Carefully remove the battery from its compartment.

  3. Toshiba Tecra 8200 Hard Drive Replacement, Hard Drive: passo 3, immagine 1 di 3 Toshiba Tecra 8200 Hard Drive Replacement, Hard Drive: passo 3, immagine 2 di 3 Toshiba Tecra 8200 Hard Drive Replacement, Hard Drive: passo 3, immagine 3 di 3
    • Locate the hard drive panel.

    • Remove the single screw labeled F4 by using a Philips size #00 screwdriver.

    • Save the screw, as it will be needed for reassembly.

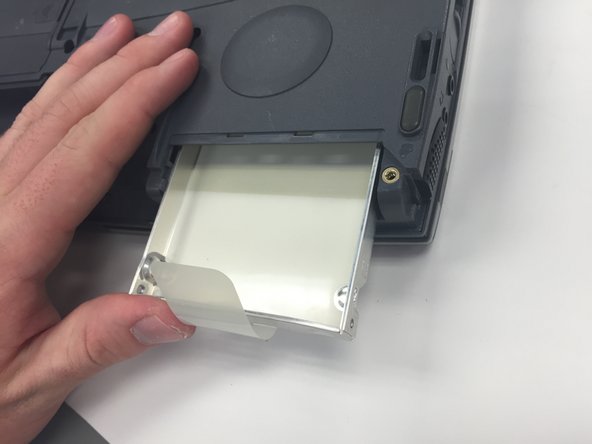
    • Remove the panel, exposing the hard drive.

  4. Toshiba Tecra 8200 Hard Drive Replacement: passo 4, immagine 1 di 2 Toshiba Tecra 8200 Hard Drive Replacement: passo 4, immagine 2 di 2
    • Pull the tab to remove the hard drive.

    • Insert the new hard drive by pushing it into the compartment, leaving the new "pull" tab exposed.

  5. Toshiba Tecra 8200 Hard Drive Replacement: passo 5, immagine 1 di 2 Toshiba Tecra 8200 Hard Drive Replacement: passo 5, immagine 2 di 2
    • Tuck the "pull" tab back into the hard drive compartment.

    • Replace the panel.

    • Replace the single F4 screw.

  6. Toshiba Tecra 8200 Hard Drive Replacement: passo 6, immagine 1 di 3 Toshiba Tecra 8200 Hard Drive Replacement: passo 6, immagine 2 di 3 Toshiba Tecra 8200 Hard Drive Replacement: passo 6, immagine 3 di 3
    • Identify the connector pins on the battery.

    • Line up the connector pins on the battery with the connector pins on the computer and push inward to reconnect the battery.

    • Slide the exterior panel towards the center of the computer to lock the battery in place.

Linea Traguardo

Sally

Membro da: 02/17/15

306 Reputazione

3 Guide realizzate

Team

Ohio State, Team 1-3, Buehl Winter 2015 Membro di Ohio State, Team 1-3, Buehl Winter 2015

OSU-BUEHL-W15S1G3

3 Membri

9 Guide realizzate

Un commento

Awesome Thanks!

Erin Dulac - Replica

Aggiungi Commento

Visualizza Statistiche:

Ultime 24 Ore: 0

Ultimi 7 Giorni: 1

Ultimi 30 Giorni: 6

Tutti i Tempi: 2,217