Introduzione
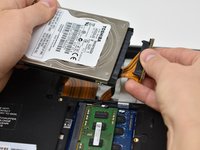
The hard drive is one of the most simple part replacements to perform on this computer. A screwdriver and prying tool are the only tools needed.
Cosa ti serve
-
-
Loosen the screw holding the back panel for RAM in place using a Phillips #0 screwdriver. Once loosened, lift the panel up and set it aside.
-
-


To reassemble your device, follow these instructions in reverse order.
To reassemble your device, follow these instructions in reverse order.
Team

Central Washington University, Team S1-G5, Pengilly Fall 2018 Membro di Central Washington University, Team S1-G5, Pengilly Fall 2018
CWU-PENGILLY-F18S1G5
3 Membri
21 Guide realizzate
Un commento
I cannot lift up the “back cover” (step 1). I’ve twirled the screw left for minutes and tried to lift up the panel using a small flathead screwdriver and it will not lift up. HELP!