Salta al contenuto principale
Toshiba Satellite U925T-S2120 Fan Replacement

Toshiba Satellite U925T-S2120 Fan Replacement

Andrew Honderich

Andrew Honderich e 6 altri collaboratori

Ultimo aggiornamento il May 7, 2024

15 - 20 minuti
Facile

Introduzione

Vai al passo 1

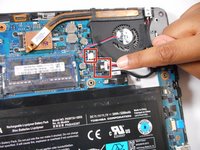
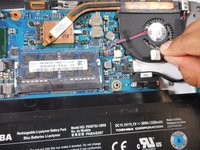
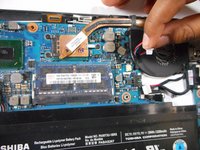
In this guide you will learn how to remove the fan of your Toshiba Satellite U925T-S2120. If your fan is broken, you may need to replace it. Before beginning this guide you should have all required tools that are listed.

Cosa ti serve

Strumenti

Mostra di più…

  1. Toshiba Satellite U925T-S2120 Fan Replacement, Fan: passo 1, immagine 1 di 2 Toshiba Satellite U925T-S2120 Fan Replacement, Fan: passo 1, immagine 2 di 2
    Attrezzo utilizzato in questo passaggio:
    Tweezers
    $4.99
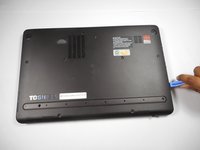
    • Use tweezers to remove the 9 rubber grip pads on the back panel of the laptop.

  2. Toshiba Satellite U925T-S2120 Fan Replacement: passo 2, immagine 1 di 3 Toshiba Satellite U925T-S2120 Fan Replacement: passo 2, immagine 2 di 3 Toshiba Satellite U925T-S2120 Fan Replacement: passo 2, immagine 3 di 3
    • Use a PH1 screwdriver to remove the nine 5.8 mm screws.

    • Unscrew the two 6.8 mm screws. Set all screws aside.

  3. Toshiba Satellite U925T-S2120 Fan Replacement: passo 3, immagine 1 di 2 Toshiba Satellite U925T-S2120 Fan Replacement: passo 3, immagine 2 di 2
    • Remove the back panel by inserting the plastic opening tool into the seam of the laptop, and pushing the opening tool downwards.

  4. Toshiba Satellite U925T-S2120 Fan Replacement: passo 4, immagine 1 di 1
    • Unscrew the two 5.4 mm screws with a PH1 screwdriver.

  5. Toshiba Satellite U925T-S2120 Fan Replacement: passo 5, immagine 1 di 3 Toshiba Satellite U925T-S2120 Fan Replacement: passo 5, immagine 2 di 3 Toshiba Satellite U925T-S2120 Fan Replacement: passo 5, immagine 3 di 3
    • Pull the cables away from the two connectors in the same direction as the individual wires are running.

  6. Toshiba Satellite U925T-S2120 Fan Replacement: passo 6, immagine 1 di 1
    • Gently use you thumb and forefinger to lift and remove the fan.

Conclusione

To reassemble your device, follow these instructions in reverse order.

Un'altra persona ha completato questa guida.

Team

Baylor, Team S5-G5, Williams Spring 2017 Membro di Baylor, Team S5-G5, Williams Spring 2017

BU-WILLIAMS-S17S5G5

3 Membri

5 Guide realizzate

0 Commenti

Aggiungi Commento

Visualizza Statistiche:

Ultime 24 Ore: 0

Ultimi 7 Giorni: 0

Ultimi 30 Giorni: 0

Tutti i Tempi: 424