Salta al contenuto principale

Toshiba Satellite U405D-S2902 Keyboard Replacement

Cosa ti serve

  1. Toshiba Satellite U405D-S2902 Keyboard Replacement, Keyboard: passo 1, immagine 1 di 3 Toshiba Satellite U405D-S2902 Keyboard Replacement, Keyboard: passo 1, immagine 2 di 3 Toshiba Satellite U405D-S2902 Keyboard Replacement, Keyboard: passo 1, immagine 3 di 3
    • Situate the laptop so that it is open and the display is facing you.

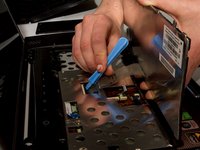
    • Use the plastic opening tool to pry the black plastic insert upward. The insert can be found at the top of the keyboard.

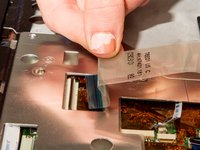
    • Once the insert is loose, carefully remove it from the device.

  2. Toshiba Satellite U405D-S2902 Keyboard Replacement: passo 2, immagine 1 di 2 Toshiba Satellite U405D-S2902 Keyboard Replacement: passo 2, immagine 2 di 2
    • Using #1 Phillips Screwdriver, remove both of the 5 mm screws that are located beneath the insert.

  3. Toshiba Satellite U405D-S2902 Keyboard Replacement: passo 3, immagine 1 di 2 Toshiba Satellite U405D-S2902 Keyboard Replacement: passo 3, immagine 2 di 2
    • Use the plastic opening tool to begin removing the keys off of the device.

    • Once the keys are off, gently remove the keyboard. Be careful of the ribbon cable that still connects the keyboard to motherboard.

  4. Toshiba Satellite U405D-S2902 Keyboard Replacement: passo 4, immagine 1 di 2 Toshiba Satellite U405D-S2902 Keyboard Replacement: passo 4, immagine 2 di 2
    • Lift up the gate on the ZIF socket to release the ribbon.

    • Ease the ribbon connecting the keyboard to the motherboard out of the ZIF socket.

Conclusione

To reassemble your device, follow these instructions in reverse order.

Altre 2 persone hanno completato questa guida.

Team

Cal Poly, Team 7-8, Maness Winter 2013 Membro di Cal Poly, Team 7-8, Maness Winter 2013

CPSU-MANESS-W13S7G8

4 Membri

8 Guide realizzate

0 Commenti

Aggiungi Commento

Visualizza Statistiche:

Ultime 24 Ore: 0

Ultimi 7 Giorni: 0

Ultimi 30 Giorni: 1

Tutti i Tempi: 600