Salta al contenuto principale

Questa guida ha delle modifiche più recenti. Passa all'ultima versione non verificata.

Toshiba Satellite U405D-S2902 Display Replacement

Cosa ti serve

  1. Toshiba Satellite U405D-S2902 Display Replacement, Display: passo 1, immagine 1 di 1
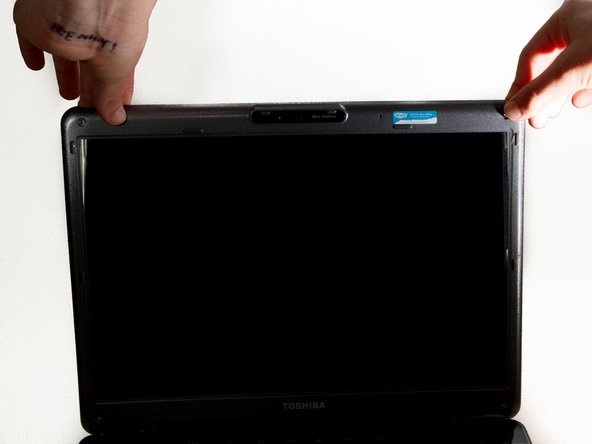
    • Use tweezers to remove the small rubber covers over the screws on the top and bottom of the laptop case.

  2. Toshiba Satellite U405D-S2902 Display Replacement: passo 2, immagine 1 di 2 Toshiba Satellite U405D-S2902 Display Replacement: passo 2, immagine 2 di 2
    • Use a #1 Phillips screwdriver to remove the 3mm screws located on both sides of the top of the laptop as well as the lower corners.

  3. Toshiba Satellite U405D-S2902 Display Replacement: passo 3, immagine 1 di 3 Toshiba Satellite U405D-S2902 Display Replacement: passo 3, immagine 2 di 3 Toshiba Satellite U405D-S2902 Display Replacement: passo 3, immagine 3 di 3
    • Use a plastic opening tool to separate the front plastic panel from the back side of the top of the laptop.

    • Carefully pull the top away from the back.

  4. Toshiba Satellite U405D-S2902 Display Replacement: passo 4, immagine 1 di 3 Toshiba Satellite U405D-S2902 Display Replacement: passo 4, immagine 2 di 3 Toshiba Satellite U405D-S2902 Display Replacement: passo 4, immagine 3 di 3
    • Turn the laptop around.

    • Remove the webcam/microphone data cable.

  5. Toshiba Satellite U405D-S2902 Display Replacement: passo 5, immagine 1 di 2 Toshiba Satellite U405D-S2902 Display Replacement: passo 5, immagine 2 di 2
    • Remove the lower lighting power supply.

    • Remove the signal light power supply and data cable.

  6. Toshiba Satellite U405D-S2902 Display Replacement: passo 6, immagine 1 di 2 Toshiba Satellite U405D-S2902 Display Replacement: passo 6, immagine 2 di 2
    • Locate and remove the four 2mm #1 Phillips screws around the sidewalls of the display.

    • After removing the last screw, the screen will be very loose, be sure to keep a hand on it to prevent it from damaging the keyboard.

  7. Toshiba Satellite U405D-S2902 Display Replacement: passo 7, immagine 1 di 2 Toshiba Satellite U405D-S2902 Display Replacement: passo 7, immagine 2 di 2
    • Carefully remove the screen from the side brackets.

    • Remove the LCD ribbon connector from the display.

Conclusione

To reassemble your device, follow these instructions in reverse order.

Altre 4 persone hanno completato questa guida.

Team

Cal Poly, Team 7-8, Maness Winter 2013 Membro di Cal Poly, Team 7-8, Maness Winter 2013

CPSU-MANESS-W13S7G8

4 Membri

8 Guide realizzate

0 Commenti

Aggiungi Commento

Visualizza Statistiche:

Ultime 24 Ore: 0

Ultimi 7 Giorni: 0

Ultimi 30 Giorni: 0

Tutti i Tempi: 681