Salta al contenuto principale

Toshiba Satellite L855-S5119 Hard Drive Replacement

Cosa ti serve

  1. Toshiba Satellite L855-S5119 Hard Drive Replacement, Battery: passo 1, immagine 1 di 1
    • Turn the laptop face down to expose the back.

    • Locate the battery.

  2. Toshiba Satellite L855-S5119 Hard Drive Replacement: passo 2, immagine 1 di 3 Toshiba Satellite L855-S5119 Hard Drive Replacement: passo 2, immagine 2 di 3 Toshiba Satellite L855-S5119 Hard Drive Replacement: passo 2, immagine 3 di 3
    • Locate the battery latches. The battery latch mechanism can be compared to a door -- The right latch, when pushed right, unlocks the battery, while the left latch, when pushed left, releases the battery, pushing it out from its container.

    • Push the latch on the right to the right to unlock the battery latch locking mechanism.

    • Push the battery latch on the left to the left to unlock the battery.

  3. Toshiba Satellite L855-S5119 Hard Drive Replacement: passo 3, immagine 1 di 2 Toshiba Satellite L855-S5119 Hard Drive Replacement: passo 3, immagine 2 di 2
    • With the left battery latch pushed left, remove the battery from its port by lifting the battery from the middle of the battery.

    • The battery will come free.

  4. Toshiba Satellite L855-S5119 Hard Drive Replacement, Back Plate Removal: passo 4, immagine 1 di 3 Toshiba Satellite L855-S5119 Hard Drive Replacement, Back Plate Removal: passo 4, immagine 2 di 3 Toshiba Satellite L855-S5119 Hard Drive Replacement, Back Plate Removal: passo 4, immagine 3 di 3
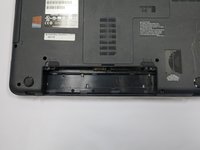
    • Turn the laptop over to place it top down.

    • Use a Phillips #1 screwdriver to remove the screw holding in the back plate. This screw does not come out of the plate.

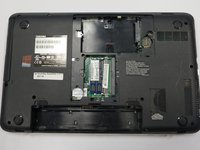
    • Lift the back plate off the laptop, exposing the RAM and Hard Disk.

  5. Toshiba Satellite L855-S5119 Hard Drive Replacement, Hard Drive: passo 5, immagine 1 di 2 Toshiba Satellite L855-S5119 Hard Drive Replacement, Hard Drive: passo 5, immagine 2 di 2
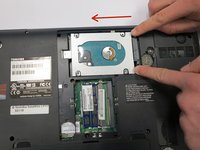
    • Unscrew the hard drive.

    • There could be up to five 3mm screws - One on each corner of the hard drive, and one at one end of the hard drive, attaching the drive to the laptop's frame.

    • Carefully push the hard drive away from its port. This should not require substantial force.

    • Lift the hard drive out.

    • Some hard drives have a plastic tab, which can be lifted from to remove the hard drive.

    • Otherwise, take hold of opposite sides of the hard drive and lift the drive straight up.

Conclusione

To reassemble your device, follow these instructions in reverse order.

Altre 2 persone hanno completato questa guida.

0 Commenti

Aggiungi Commento

Visualizza Statistiche:

Ultime 24 Ore: 0

Ultimi 7 Giorni: 2

Ultimi 30 Giorni: 16

Tutti i Tempi: 645