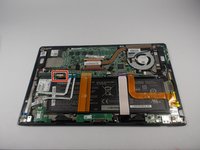
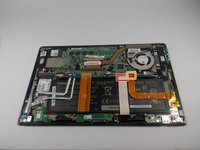
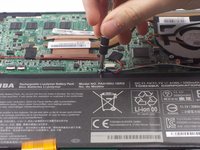
Salta al contenuto principale

Toshiba Satellite Click 2 Pro Battery Replacement

Cosa ti serve

  1. Toshiba Satellite Click 2 Pro Battery Replacement, Battery: passo 1, immagine 1 di 2 Toshiba Satellite Click 2 Pro Battery Replacement, Battery: passo 1, immagine 2 di 2
    • Working on your device while it is turned on may result in electric shock. Make sure to shut down and unplug your device before you begin.

    • Push down on the tablet sides until you feel a click, then pull up.

    • This will separate the tablet from the detachable base, make sure to hold down the keyboard for easier detachment.

  2. Toshiba Satellite Click 2 Pro Battery Replacement: passo 2, immagine 1 di 3 Toshiba Satellite Click 2 Pro Battery Replacement: passo 2, immagine 2 di 3 Toshiba Satellite Click 2 Pro Battery Replacement: passo 2, immagine 3 di 3
    • Remove the base of the tablet from the screen using a plastic opening tool.

    • Make sure to separate the base evenly on both sides when removing it from the screen.

  3. Toshiba Satellite Click 2 Pro Battery Replacement: passo 3, immagine 1 di 2 Toshiba Satellite Click 2 Pro Battery Replacement: passo 3, immagine 2 di 2
    • Remove the battery power connector using ESD safe tweezers.

  4. Toshiba Satellite Click 2 Pro Battery Replacement: passo 4, immagine 1 di 2 Toshiba Satellite Click 2 Pro Battery Replacement: passo 4, immagine 2 di 2
    • Remove the LED ribbon cable using ESD safe tweezers.

    • Remove the SIM card ribbon cable using ESD safe tweezers.

    • Remove the Docking connector ribbon cable using plastic opening tool.

    • The ribbons may be stuck to the battery so make sure to peel off gently to prevent damage.

    • Make sure to flip up the white connector attached to the LED and Sim Card ribbons before removing them .

  5. Toshiba Satellite Click 2 Pro Battery Replacement: passo 5, immagine 1 di 3 Toshiba Satellite Click 2 Pro Battery Replacement: passo 5, immagine 2 di 3 Toshiba Satellite Click 2 Pro Battery Replacement: passo 5, immagine 3 di 3
    • Remove the LCD Display ribbon cable using a plastic opening tool.

    • Remove the I/O ribbon cable using a plastic opening tool.

    • The ribbons may be stuck to the battery so make sure to peel them off gently to prevent damage.

  6. Toshiba Satellite Click 2 Pro Battery Replacement: passo 6, immagine 1 di 2 Toshiba Satellite Click 2 Pro Battery Replacement: passo 6, immagine 2 di 2
    • Remove five 3.5mm Phillips J0 screws using a Phillips screw driver.

  7. Toshiba Satellite Click 2 Pro Battery Replacement: passo 7, immagine 1 di 1
    • Remove the battery from its holding position.

Conclusione

To reassemble your device, follow these instructions in reverse order.

Altre 5 persone hanno completato questa guida.

Team

Un commento

Muchas gracias por el aporte, tengo una Tablet de este modelo el cual luego de cambiar la batería, al encender me pide que ingrese un password. la única forma de poder ingresar a w10 es desconectar la batería y volver encender la tablet, por favor su gentil ayuda de como hacer un reset a password de inicio.

Brita Macias - Replica

Aggiungi Commento

Visualizza Statistiche:

Ultime 24 Ore: 0

Ultimi 7 Giorni: 0

Ultimi 30 Giorni: 4

Tutti i Tempi: 2,558