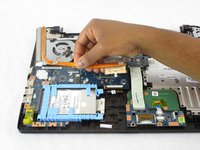
Salta al contenuto principale

Toshiba Satellite C55D-B5310 Fan Replacement

Cosa ti serve

  1. Toshiba Satellite C55D-B5310 Fan Replacement, Keyboard: passo 1, immagine 1 di 2 Toshiba Satellite C55D-B5310 Fan Replacement, Keyboard: passo 1, immagine 2 di 2
    • Turn off your device before starting.

    • Flip the phone over so that the back camera is facing you.

  2. Toshiba Satellite C55D-B5310 Fan Replacement: passo 2, immagine 1 di 3 Toshiba Satellite C55D-B5310 Fan Replacement: passo 2, immagine 2 di 3 Toshiba Satellite C55D-B5310 Fan Replacement: passo 2, immagine 3 di 3
    • Use a your hands to remove the backing of the phone.

    • Use your phillips screwdriver to begin removing all the accesible screws.

    • Now begin to remove the coverings above and below the middle plate with your hand.

    • use your hand or a tool to remove the tabbing on the metal plate covering the battery.

    • Remove the metal plate covering the battery.

    • Use your wedging tool to begin removeing the adhesive under the battery.

    • Remove these two screws with your phillips screw driver.

    • Open the two metal tabs

    • Flip the phone back over with the screen facing you.

    • Begin to use the wedging tool to remove the space bar off of the keyboard.

    • remove the screws on each end of the space bars vacant lcoation.

    • Grab the wedging tool and begin wedging the old keyboard.

    • begind wedging the back of the keyboard until free.

    • Begin deperating the keyboard from the backing.

    • grab your replacement keyboard and connect it to the backing of the old keyboard.

    • place the keyboard back onto the front of the phone

    • once placed, hold the keyboard onto the phone while clicking the two metal plates back down to connect the keyboard.

  3. Toshiba Satellite C55D-B5310 Fan Replacement, Fan: passo 19, immagine 1 di 1
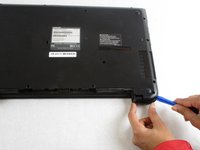
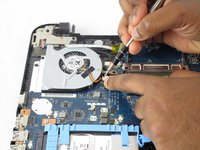
    • Remove the remaining thirteen 7 mm Phillips screws holding the back cover using the PH1 bit and Magnetic Driver.
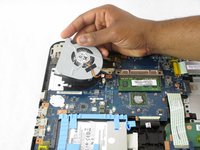
  4. Toshiba Satellite C55D-B5310 Fan Replacement: passo 20, immagine 1 di 2 Toshiba Satellite C55D-B5310 Fan Replacement: passo 20, immagine 2 di 2
    • Using the plastic opening tools, separate the back cover from the laptop.

    • It is recommended that you start from a corner and run the tool along the edge of the cover.

    • Be careful not to bend or crack the plastic back cover.

  5. Toshiba Satellite C55D-B5310 Fan Replacement: passo 21, immagine 1 di 3 Toshiba Satellite C55D-B5310 Fan Replacement: passo 21, immagine 2 di 3 Toshiba Satellite C55D-B5310 Fan Replacement: passo 21, immagine 3 di 3
    • Remove the three 3 mm Phillips screws holding the fan cable in place using the PH1 bit and Magnetic Driver.

    • Lift the fan cable connector from the fan.

  6. Toshiba Satellite C55D-B5310 Fan Replacement: passo 22, immagine 1 di 3 Toshiba Satellite C55D-B5310 Fan Replacement: passo 22, immagine 2 di 3 Toshiba Satellite C55D-B5310 Fan Replacement: passo 22, immagine 3 di 3
    • Remove the fan from the plug by releasing the clamps located on each side of the socket.

    • Slide the connector out of the socket.

    • Lift the computer fan from the motherboard.

Conclusione

To reassemble your device, follow these instructions in reverse order.

0 Commenti

Aggiungi Commento

Visualizza Statistiche:

Ultime 24 Ore: 0

Ultimi 7 Giorni: 0

Ultimi 30 Giorni: 3

Tutti i Tempi: 506