Salta al contenuto principale

Toshiba Satellite C55-C5268 Disk Drive Replacement

Cosa ti serve

  1. Toshiba Satellite C55-C5268 Disk Drive Replacement, Battery: passo 1, immagine 1 di 1
    • Unplug and power off the laptop.

    • Unscrew the two 9 mm Phillips #1screws holding the battery in place.

  2. Toshiba Satellite C55-C5268 Disk Drive Replacement: passo 2, immagine 1 di 2 Toshiba Satellite C55-C5268 Disk Drive Replacement: passo 2, immagine 2 di 2
    • Grab the battery and pull it away from the laptop to remove it.

    • This doesn't require a lot of effort, so you don't have to pull too hard.

  3. Toshiba Satellite C55-C5268 Disk Drive Replacement, Back Panel: passo 3, immagine 1 di 1
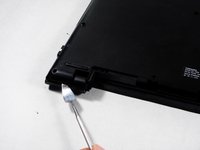
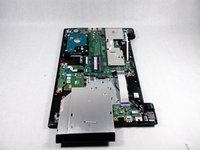
    • Unscrew the 10 9.0 mm screws holding the back panel on using a Phillips head #1 screwdriver.

  4. Toshiba Satellite C55-C5268 Disk Drive Replacement: passo 4, immagine 1 di 2 Toshiba Satellite C55-C5268 Disk Drive Replacement: passo 4, immagine 2 di 2
    • Using a metal spudger can damage sensitive components.

    • Insert a metal spudger tool in the seam between the back cover and the laptop itself. Gently run the spudger around the edge to pop the cover off.

  5. Toshiba Satellite C55-C5268 Disk Drive Replacement: passo 5, immagine 1 di 2 Toshiba Satellite C55-C5268 Disk Drive Replacement: passo 5, immagine 2 di 2
    • Pry up the back panel from the rest of the laptop using a spudger.

    • It is best to start around the USB port and work your way around the edge until the panel completely snaps off.

  6. Toshiba Satellite C55-C5268 Disk Drive Replacement, Disk Drive: passo 6, immagine 1 di 1
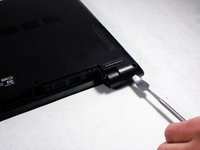
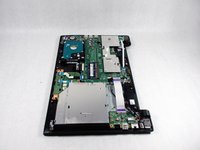
    • Unscrew one 3.0 mm screw from the disk drive using a #1 Phillips screwdriver.

  7. Toshiba Satellite C55-C5268 Disk Drive Replacement: passo 7, immagine 1 di 2 Toshiba Satellite C55-C5268 Disk Drive Replacement: passo 7, immagine 2 di 2
    • Grab the disk drive with one hand and the laptop with another, then gently pull the disk drive straight toward yourself.

    • Pull it in a straight line horizontally until it is completely removed.

    • This does not require much force, so be gentle.

Conclusione

To reassemble your device, follow these instructions in reverse order.

Team

UMass Dartmouth, Team 4-1, Catania Fall 2016 Membro di UMass Dartmouth, Team 4-1, Catania Fall 2016

UMASSD-CATANIA-F16S4G1

2 Membri

12 Guide realizzate

0 Commenti

Aggiungi Commento

Visualizza Statistiche:

Ultime 24 Ore: 1

Ultimi 7 Giorni: 5

Ultimi 30 Giorni: 6

Tutti i Tempi: 373